Category Archives: Assignments

week 5 sensors Xiaoyu

Goal of project/interaction

Create a circuit that the LED will light up only when the ultrasonic sensor detect something close and photocell sensor is covered.
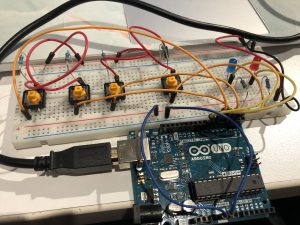
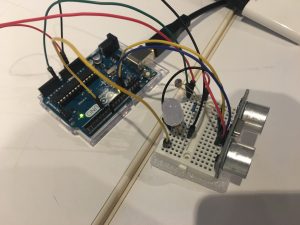
Core components

1 * ultrasonic sensor
1 * photocell sensor
1 * LED
1 * 10k ohms resistors
1 * 220 ohms resistors
Wires & jumpwires
Arduino board

How it works

Get close to the ultrasonic sensor
Cover the photocell
LED light up


Github

pcom/ultrasonic&photocell


Week 5 – sensors

Goal of the project : Turn on the light according to distance and ambient light
Core components : Led light, photocell, 220 Ohm resistor, 1k resistor, ultrasonic sensor, arduino
How it works : the ultrasonic sensor measures the distance and the photocell measures the ambient light. An if statement combines the two measurements to control the led light
Problems encountered : the led light blink when is on. I couldn’t find a way to connect the photocell data without using a map function

Continue reading

Week 4: Update & Redo

Hello, after my initial two failures I’m back at it again with a copied code. This code is from my classmate Alyssa http://lizastark.com/physcomp/alyssas-combination-lock-week-4/ https://drive.google.com/file/d/1OlpTO_oNPYWVEbz0SmbbegJo1Oo0Lawy/view

My breadboard set up is still functional, though to match with Alyssa’s code I got rid of a button. Here are some videos of my experience:

In this video I am inputting the combination and finding that after the combination is inputted there is no way to get the Arduino to lock/ reset again.

Here I found that prior to putting in the correct combination, the buttons will reset themselves after 3 pushes.


Thank you.

  1. Goal of the project : By clicking four buttons in a certain sequence, the lock will be locked or unlocked indicating by two leds. If it is unlocked, the blue led will light up; if it is locked, the red led will light up.
  2.  Core components : 4 buttons, 4 x 10K ohms resistors, red and blue leds, 2 x 220 ohms resistors, breadboard, arduino board, jumper wires
  3. How it works : If you press buttons from 1 to 4, the blue led will light up and fade out in a while. Otherwise the red led will light up.
  4. Problems encountered : the button is unstable sometimes.

IMG_0696

Alyssa’s Combination Lock (Week 4)

Goal: Build a combination lock using 2-4 buttons, at least 4 button presses, and LEDs indicating locked vs unlocked status.

Components: jumper wires, 3 buttons, 5 resistors (220 Ohms x 2, 10K Ohms x3), 2 LEDs (different colors), breadboard, arduino

Setup: 3 buttons and 2 LEDs with resistors wired to arduino. When the right combination of buttons is pressed, unlock and shine the green LED. Otherwise, lock and shine the red LED.

How it works:

Starts in a locked status, indicated by red LED.

Enter the following combination of buttons to unlock:
Button 1: 2 presses
Button 2: 1 press
Button 3: 2 presses

This combination unlocks, indicated by green LED.

To lock: press each button once. This triggers each button count to exceed the maximum limitation and thus reset to 0.

Continue reading

Week 5 Assignment

Create a circuit to light up a LED or control a Processing sketch using both a photocell sensor and an ultrasonic sensor.

  • If the environment is bright, the LED won’t light up.
  • If the environment is dark but the distance is far away, the LED won’t light up.
  • If the environment is dark and the distance is close, the LED will light up.

Week 4 Combination Lock

Goal:

I want to create a combination that allows me to push desired button in the desired order to unlock a green LED.

Description:

3 buttons to control red and green button. Red button means still lock but more step needed, Green button means unlock.

  • How it works: You have to push the 1st button to trigger the 2nd button, then push the second button to unlock the green LED. (Like a step-by-step unlock process)

Problem (solved):

The problem is that I cannot release buttons. Once I push the first one I have to hold it to while pushing the second one to make it work. My original intention is once I push the button even I release it the button will still work.

Materials:

  1. Arduino UNO R3 x 1
  2. Breadboard x 1
  3. Buttons x 3
  4. Red LED x 3
  5. Green LED x 1
  6. 220Ω Resistors x 3
  7. Wires

Connection Diagram:

Code:

Github Link: https://github.com/jiany457/PCom/blob/master/CombinationLock/version1/version1.ino


Combination Lock – Dario N (Week 4)

Goal of the Project:

The intention with this project was to learn about the capabilities of Arduino and how this platform connects to analog mediums. In this particular case, the proposal was to unlock a green LED by pressing 4 buttons with a programmed sequence. If the sequence is not pressed in the correct order, the red LED will turn on or the system is still locked.

List of Components:

  • x1 Arduino Uno
  • x1 Breadboard
  • x4 Pushbuttons
  • x6 220 kohm Resistors
  • x1 RED LED
  • x1 GREEN LED

Assembly Process:

The circuit is made of from 4 Buttons and 2 LEDs. All the components are connected in series with 220kohm resistors (in the case of the buttons, they help the charge to drain away when the button is released, for the LED, they help to limit the current flow to a safe level to the LED). Each button (INPUT) component is connected to the digital pins, and the LED (output).

How it works:

The Arduino program is constantly reading if a button is pressed and it’s telling it the sequence is correct or not. if it’s correct (true) and the previous button pressed is correct (true), then the green LED will light up; if not, until the buttonlenght (number of presses-4) is true, then the Red will turn on.

Problems:

This program is based on a program I found on internet (https://www.youtube.com/watch?v=7HeT4wvgz7w). The challenge consisted in getting to understand the code (I’m fairly new at coding), and to modify it to be more understandable and to function with the required components we had in the brief.

Circuit Diagrams:

Arduino Code (File):

https://www.dropbox.com/s/28b1s6tkrl9ltfu/Combination_Lock.ino?dl=0