- Goal: To create a four button combination lock. Upon the successful completion of the lock sequence, the LEDs will act as a means of output or confirmation.
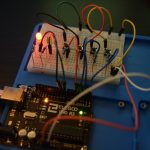
- Assembly: Jumper wires (13), pushbutton/switches (4), LEDs (2), 330ohm resistors (2) and 10Kohm resistors (4), breadboard, and an Arduino Uno.
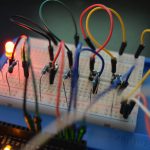
- How it works: There are four push buttons connected to the breadboard. One side of the button is connected to GND via the 10kohm resistor. This resistor serves as a pull-down. Buttons are typically floating pins, resting between positive and negative. So when you press the button, the response could be either positive or negative, making the interaction unstable and unpredictable. To stop that a resistor needs to be added to the GND side to make the connection negative until the button is pressed, indicating a positive value. On that same side of the button is where the button is connected to the Arduino. The other side is connected to power. The first button is connected digital pin 1, the second to digital pin 2, and so forth for the last two buttons. The LEDs as mentioned act as indicators for the button combination. The red led, which indicates LOCKED, is connected to digital pin 9. The green led, which indicates UNLOCKED, is connected to digital pin 8. The negative side is connected to GND on the breadboard via a 330ohm resistor and the positive side is connected to the pins. The setup is simple. The code is a bit more complicated. In regards to the code, I based this off of code by pranavvaid in GitHub. The original code used two buttons, I added an additional two. The reason for the complicated code is because the creator used various check aspects to prevent cheating, such as timing limits and sequence checking (fail state). The details are explained more directly inside of the code comments.
- Problems: The buttons can be a little unpredictable. At times when you press the correct button combination, it doesn’t “UNLOCK”. I think this may have something to do with the speed at which the button is pressed due to the time limitation initiated in the code. Or it could be because of the resistance. Perhaps the pull-down should be more or less resistive to make the reading more absolute?
-
Combination Lock (Week 4)
Leave a reply