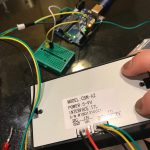
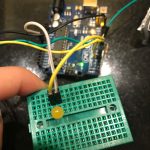
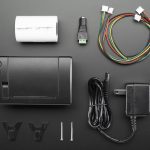
Goal: The next part of my prototype for my fortune teller was to get the Arduino thermal printer functioning and I did. With that being said the components of just the play-test for the thermal printer include;
- A mini thermal receipt printer – with cables and plastic mounting shims
- A roll of 50′ long thermal receipt paper – the perfect amount for the thermal printer. BPA-free.
- 5V 2A power supply – an ideal supply for powering the thermal printer (and anything else that can use 5V power
- 2.1mm DC jack adapter – makes it easy to attach the power supply to the printer
- 3x MM jumper wires
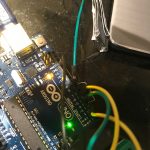
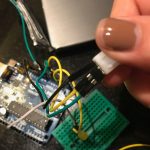
Assembling the thermal printer was a little challenging due to the site leaving out some essential pieces of information like how/where the F jumper cables for VH, GND, RX and TX are supposed to be oriented as well as the key instruction to strip the VH and GND wires to connect to the DC cable adaptor. However, lucky for me I had a friend who had experience with the Arduino thermal printer and was able to guide me through it.
Assembly:
- Plug in the GND (black) and VH (red) F wires into the printer
-
- Cut off the open end of the Red and black wires to expose the metal inside.
- Using the DC adaptor put in the exposed black and red end of the wires
-
- Make sure they are oriented correctly
- Plug in the GND (black), RX (yellow) and TX (Green) wires into the printer
- Using the 3 MM jumper wires attach them to the open end of the GND, RX and TX cord.
- Insert the TX (green) wire into the digital ~5 pin of the Arduino
- Insert the RX (yellow) wire into the digital ~6 pin of the Arduino
- Insert the GND (black) wire into the GND (any of them) of the Arduino
- Download the Thermal Printer Library
- Change the baud rate from 19200 to 9600 by accessing the source code.
-
- If your printer test page shows ‘BAUDRATE: 9600’, you’ll need to make a small change to the library source code.
- Go into your computer files where the Thermal Printer Library is being stored and using a text editor (Notepad, etc.) open the file Adafruit_Thermal.cpp
- Ctrl-F ‘BAUDRATE’ and change this line from 19200 to 9600.
- Save and exit.
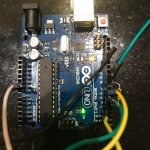
Though since this code has components that conflict with my capacitive sensor code I needed to make some adjustments. I changed the RX (yellow) input pin from ~6 to ~3.
Problems/Issues: Originally when I did this (change the pin from ~6 to ~3) the LED light and the capacity was working however after I tested the printer the LED no longer responded to the capacitor. Though, as stated in the video, the LED light isn’t essential to the project it is still a sign that there might be a problem with the physical system itself. As of right now I am looking at ways to integrate the capacitive code into the thermal printer code, but as a novice in coding I’m not sure how to do this syntactically correct. I have an appointment Friday (4/20 lol.) with the Learning Center to help me over this part of the project.
Play-Test Feedback:
To think about:
- Who will you playtest with? I will playtest with anyone who is available and willing. There is not criteria or prerequisite that needs to be met by the participants.
- How will you get their consent? Their willingness to touch the capacitive sensor is all that is necessary.
- What feedback do you want? I want people to experience a mediocre serendipity. It’s the equivalent to a fortune cookie so I have kind of low expectations on their reactions.
- What questions will you ask? I will ask whether they enjoyed their fortune and if they have any ideas on how I could enhance the experience and output.
- What information do they need to know before starting? None.
- How much will you help them during the test? I will tell them to touch the pad.
- How will you debrief them? I will tell them that this is my final project for a class and that is it an interactive art piece.