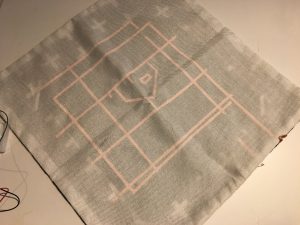
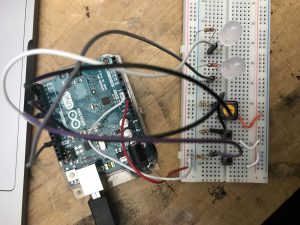
Documentation of your first prototype-
Got face tracking to work with two servo motors!
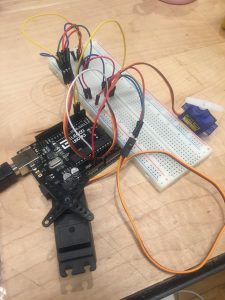
Now I need to figure out how to use force pressure sensors to trigger the face detection.
Documentation of your first prototype-
Got face tracking to work with two servo motors!
Now I need to figure out how to use force pressure sensors to trigger the face detection.
Week 12: 04/16–04/22
Week 13: 04/23–04/29
Week1 4: 04/30–05/07
Twin Object
Lovebox Spinning Heart Messenger
Long Distance Friendship Lamp
Pillow Talk
Goal: The goal of this project, to create the fortune teller using an arduino, thermal printer and capacitive sensor is still the same. The last time I posted I had achieve connecting the capacitive sensor and the printer into a single code. However, I still had no been able to figure out how to get the printer to print is accordance to when the capacity passes the 1000 point threshold, or in other words, when the capacity is touched. Ergo, for this past week my 3 major goals/ obstacles to overcome.
Assembly: So I made two appointments (knowing that I probably wouldn’t complete this in one day) at the Learning Center. Originally I was trying to connect the printer to print in accordance to the push of a button, but Tubah and I had a lot of difficulties with the button so we jumped straight into using capacity. Eventually by the end of the session we got it connected. However, the printer was unable to print the correct symbols (we were testing with a barcode) matter of fact it was printing an infinite series of illegible symbols. So with task #1 taken off the list I had simultaneously created 3 more.
I was able to conclude from my experience with the Serial monitor that a possible cause of the symbol affliction was due to baud-rate and or Arduino syntax between softwareserial/ mySerial.begin and Serial.begin. I also would have to code a way to make the Arduino read the first number of capacity and then pause so that it wasn’t continuously printing fortunes for the milliseconds a participant may be touching the capacitor. Lastly, the serial monitor was no longer printing the read capacity. I wanted to be able to see the capacity change on the serial monitor so that I could make capacity ranges for fortunes.
The following Monday I met with another tutor at the Learning Center, Aarati. She was amazing and helped me find the problems in my code. My intuition was right, the baudrate for the printer was changed from 9600 to 19200, which allowed the printer to be able to read the code and print correctly. Tangent from this, with small changes to the syntax of the code we were able to get the Arduino and the serial monitor to connect on the right level, thus presenting the capacity in the monitor. Lastly we even finished early enough to add in an “odd and even” if-else statement to the fortune code allowing for if the capacity if even an “evil fortune” if the capacity is odd a “nicer fortune.”
How it works:

This is intro code to how the Fortune Teller tells it fortune. By defining several specific ranges of capacity I am able to tell the printer to print an according fortune.
The ranges I have thus far:
Capacity >= 1999 — Fortune
Capacity >= 1750 — Fortune
Capacity >=1499 — Fortune
Capacity >=1250 — Fortune
Capacity >= 1000 — Fortune
Capacity == 666 — Fortune
Materials:
My next step of this process is now to construct the the fortune Teller itself, solder a new clean board and clean the code up a little.
Some of my new goals are:
1) Find a way to add a text box around the code
2) Possibly make the presentation of the fortune a little more aesthetic
3) Build a nice sturdy stand to hold to box up right.
4) Make a robe and hand.
We have tested several materials and components.
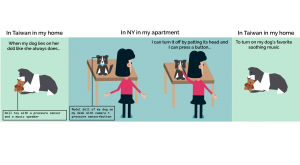
Output: audios represented different moods
Chairs also have work hours. They are happy to assist you during work hours but they can also get crappy sometimes. They also preserve the right to refuse anyone when they are on a break.
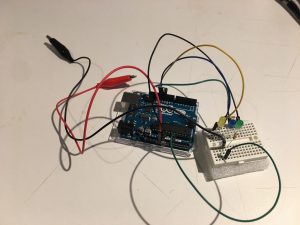
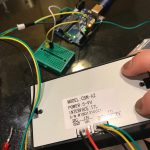
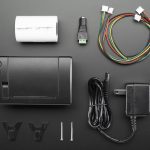
Goal: The next part of my prototype for my fortune teller was to get the Arduino thermal printer functioning and I did. With that being said the components of just the play-test for the thermal printer include;
Assembling the thermal printer was a little challenging due to the site leaving out some essential pieces of information like how/where the F jumper cables for VH, GND, RX and TX are supposed to be oriented as well as the key instruction to strip the VH and GND wires to connect to the DC cable adaptor. However, lucky for me I had a friend who had experience with the Arduino thermal printer and was able to guide me through it.
Assembly:
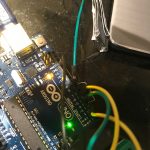
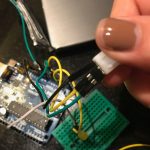
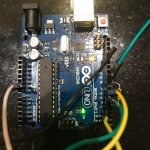
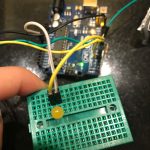
Though since this code has components that conflict with my capacitive sensor code I needed to make some adjustments. I changed the RX (yellow) input pin from ~6 to ~3.
Problems/Issues: Originally when I did this (change the pin from ~6 to ~3) the LED light and the capacity was working however after I tested the printer the LED no longer responded to the capacitor. Though, as stated in the video, the LED light isn’t essential to the project it is still a sign that there might be a problem with the physical system itself. As of right now I am looking at ways to integrate the capacitive code into the thermal printer code, but as a novice in coding I’m not sure how to do this syntactically correct. I have an appointment Friday (4/20 lol.) with the Learning Center to help me over this part of the project.
Play-Test Feedback:
To think about:
I migrated to Adafruit esp8266 module. The server now is successfully connecting to my iphone hotspot, pinging random IP numbers and when it get a success response it sends a request to a Geolocation API online service which provides the IP Geolocation information as a string of data.
What is left for the project is to edit the json data the server receives so it can easily identify the latitude and longitude coordinates and to create a light feedback. I will also create a tower design for my server.
A second stage for the project will be to create a custom laser projector that moves the laser point according to the IP coordinates. For this stage my objective is to have the relevant information to communicate to the laser.
1) Iteration
For this week’s progress, I’ve been figuring out the mechanism that will power my project.
Step 1: Achieve the base system of the moving plaque.
The Arduino and the stepper motor pull the pattern and release it again. This is a rough prototype to prove that works.
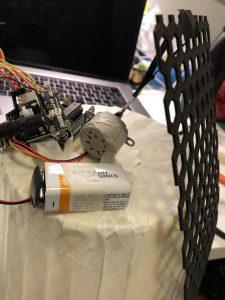
This video shows how the stepper motor turns pulling for several steps until it stops and it releases again.
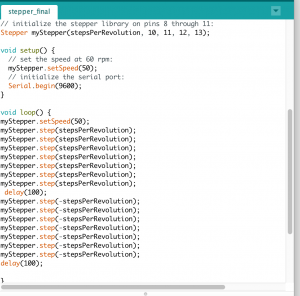
The next step should be trying to get a more reliable and stable prototype.
2) Your playtesting plan and desired feedback.
I’m planning on keep testing the prototype while I’m upgrading each part on D12.
There is still a lot of work to do to be able to test how the main interaction works.
This week’s progress has been dedicated to explore materials and define the structure of the piece.
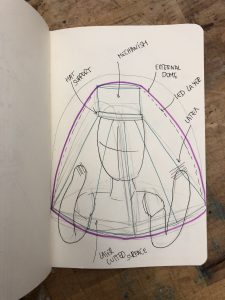
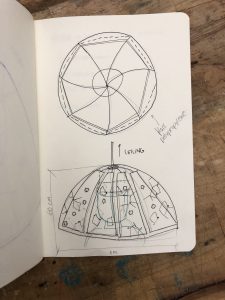
This deck shows a material/light exploration:
https://drive.google.com/file/d/1e-9NGO7eTLSqk6DuIXULpdP-2LseCJhs/view?usp=sharing
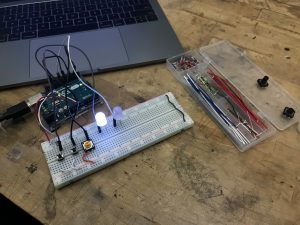
a combination lock
Understanding the basic logic behind the digital combination lock was the main goal of this project. although it seemed hardcore tech for me at first, thinking it step by step made me realize how simple it is.
Using basic components like Led, 220 ohms resistors, buttons and 10K ohms resistors, breadboard, Arduino board, jumper wires. you can build your very own safe.
although I realized it required very basic logic, for some reason the lock could work once and stop responding after that, so I wouldn’t recommend putting your governmental papers in such a safe 🙂 so after failing hard I had to use a code from Alyssa: http://lizastark.com/physcomp/alyssas-combination-lock-week-4/ https://drive.google.com/file/d/1OlpTO_oNPYWVEbz0SmbbegJo1Oo0Lawy/view
here is some documentation starting with the failed trial and then after using Alyssa’s code:
Thanks Alyssa!

CONCEPT: in this project, I would like to explore the difference between analog and digital photography and represent these two mediums as a different-colored eye or (Heterochromia) for a photographer. having the passion for both and how that affects the way a photographer sees the world. Continue reading