The goal and description of this project:
instruction for wireless assignment is to choose one of the wireless topics covered in class and put it to practice for use in everyday life. I chose Infrared LED (IR) as the topic I want to explore. With the IR(Emitter) and Photodiode(Receiver), I can create a simple IR detector by change the amount of infrared light received by the photodiode with my hand or any barrier to light up the indicator led. This simple idea is widely used in our daily life, for example, alarm system to detect the intruder.
Components list:
- arduino UNO x1
- breadboardx1
- photodiode x1
- IR LED x1
- LED x1
- resistor 300ohm x2 (IR, LED)
- resistor 10k x1 (photodiode)
- wires
How it works:
An IR sensor consists of two parts- the emitter circuit and the receiver circuit. This is collectively known as a photo-coupler or an optocoupler. The emitter is an IR LED and the detector is an IR photodiode. The IR photodiode is sensitive to the IR light emitted by an IR LED. The photodiodes resistance and output voltage change in proportion to the IR light received. This is the underlying working principle of the IR sensor.
The type of incidence can be direct incidence or indirect incidence. Indirect incidence, the IR LED is placed in front of a photodiode with no obstacle in between. In indirect incidence, both the diodes are placed side by side with an opaque object in front of the sensor. The light from the IR LED hits the opaque surface and reflects back to the photodiode. In this project, I found out the direct incidence is way more effective so I put emitter and receiver in front of each other.
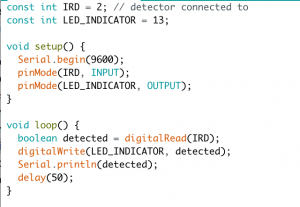
circuit and code :
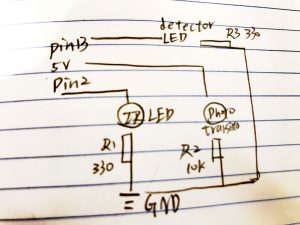
the code is very simple, using the boolean function to detect and light up detector LED
Troubleshooting:
note that photodiodes and emitter LED can look exactly the same (transparent led), don’t mess them up. Also, to get the best result, do put receiver and emitter as close as you can.