Final Project Planning (Week 10)

Project Description

I am planning to make a sound installation that reveals the cruel reality of domestic abuse against women and children. This installation will be produced in order to encourage hidden survivors of DA (Domestic Abuse) to speak out publicly or privately so that they might receive appropriate support, and enlighten general citizens the reality and prevalence of sexual abuse in family and further, influence policy-makers to provide adequate measurements.

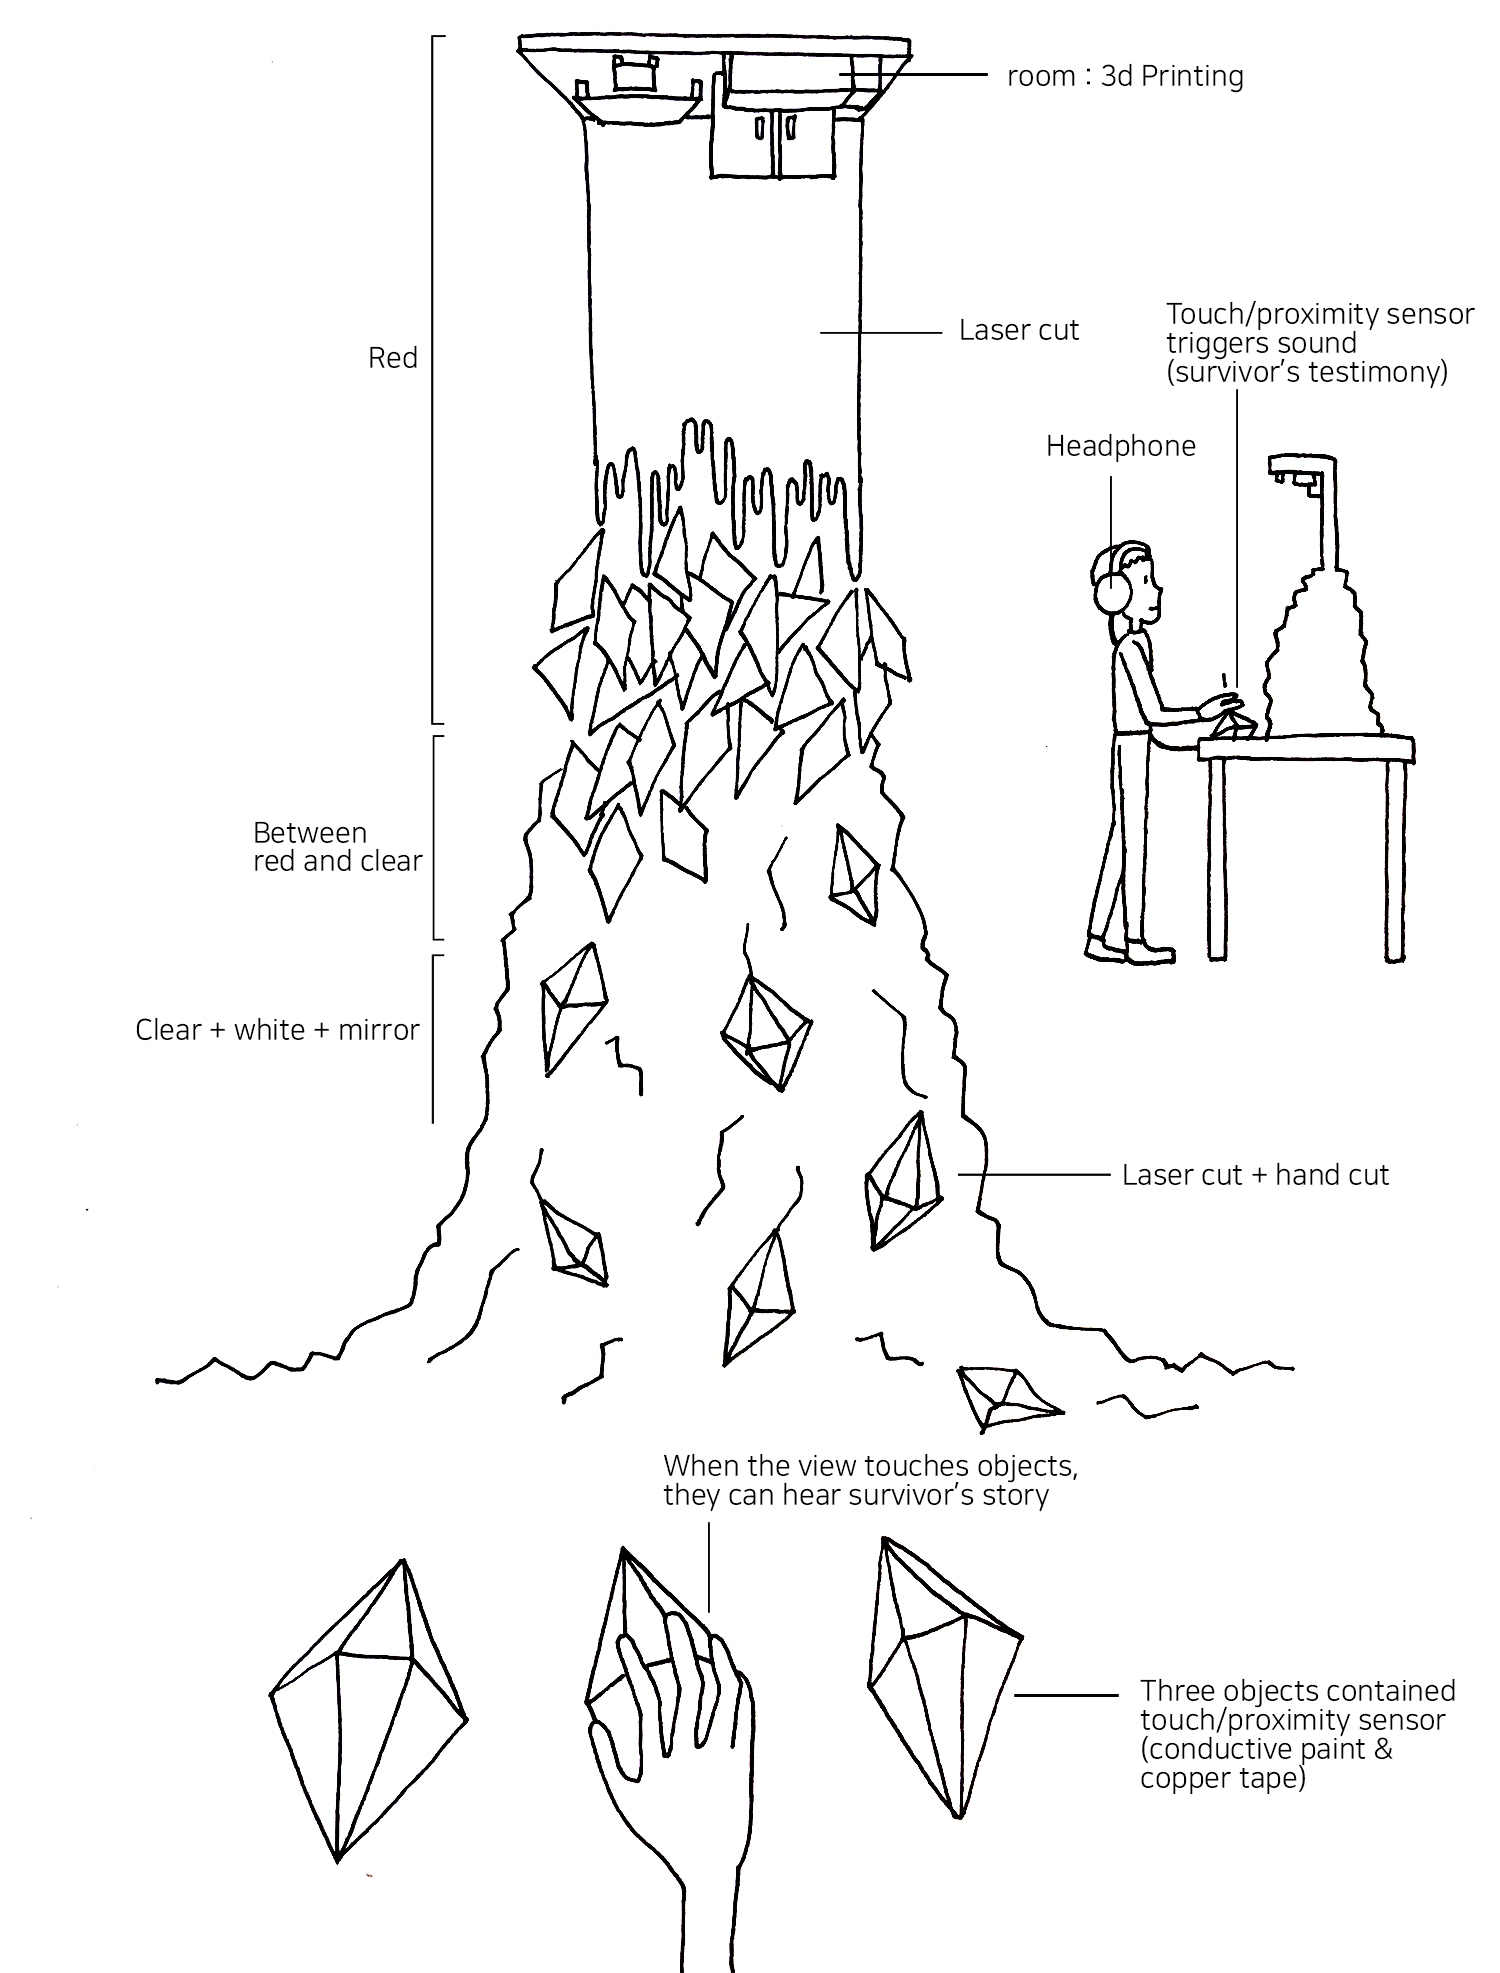
I know personally a woman who is a survivor of DA, and I am going to record her testimony directly. Based on this woman’s real voice and true story, the installation will illustrate the space where all these horrors happened, her room. In order to give satirical and reversing notion against traditional idea of family, I will create a miniature room – as a visually scary place using vivid red color material and weirdly distorted form by laser cut and 3D printing. The structure and objects of this miniature room will follow the real room of hers based on her testimony. The room will be upside down at the top of the installation, and lots of fragments and 3d shapes will be hanging from the room miniature like a waterfall. The fragments shapes are red when it is close to the room, but as it goes down, they will turn clear/white/mirror color. This symbolizes survivor’s eventual freedom and her current status to influence other people. 3 shapes are separately put on in front of the table and they contain touch/proximity sensor. Viewers are provided a headphone, and when they touch each objects, they can hear survivor’s story turn to turn. 
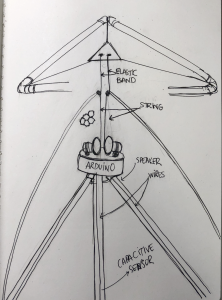
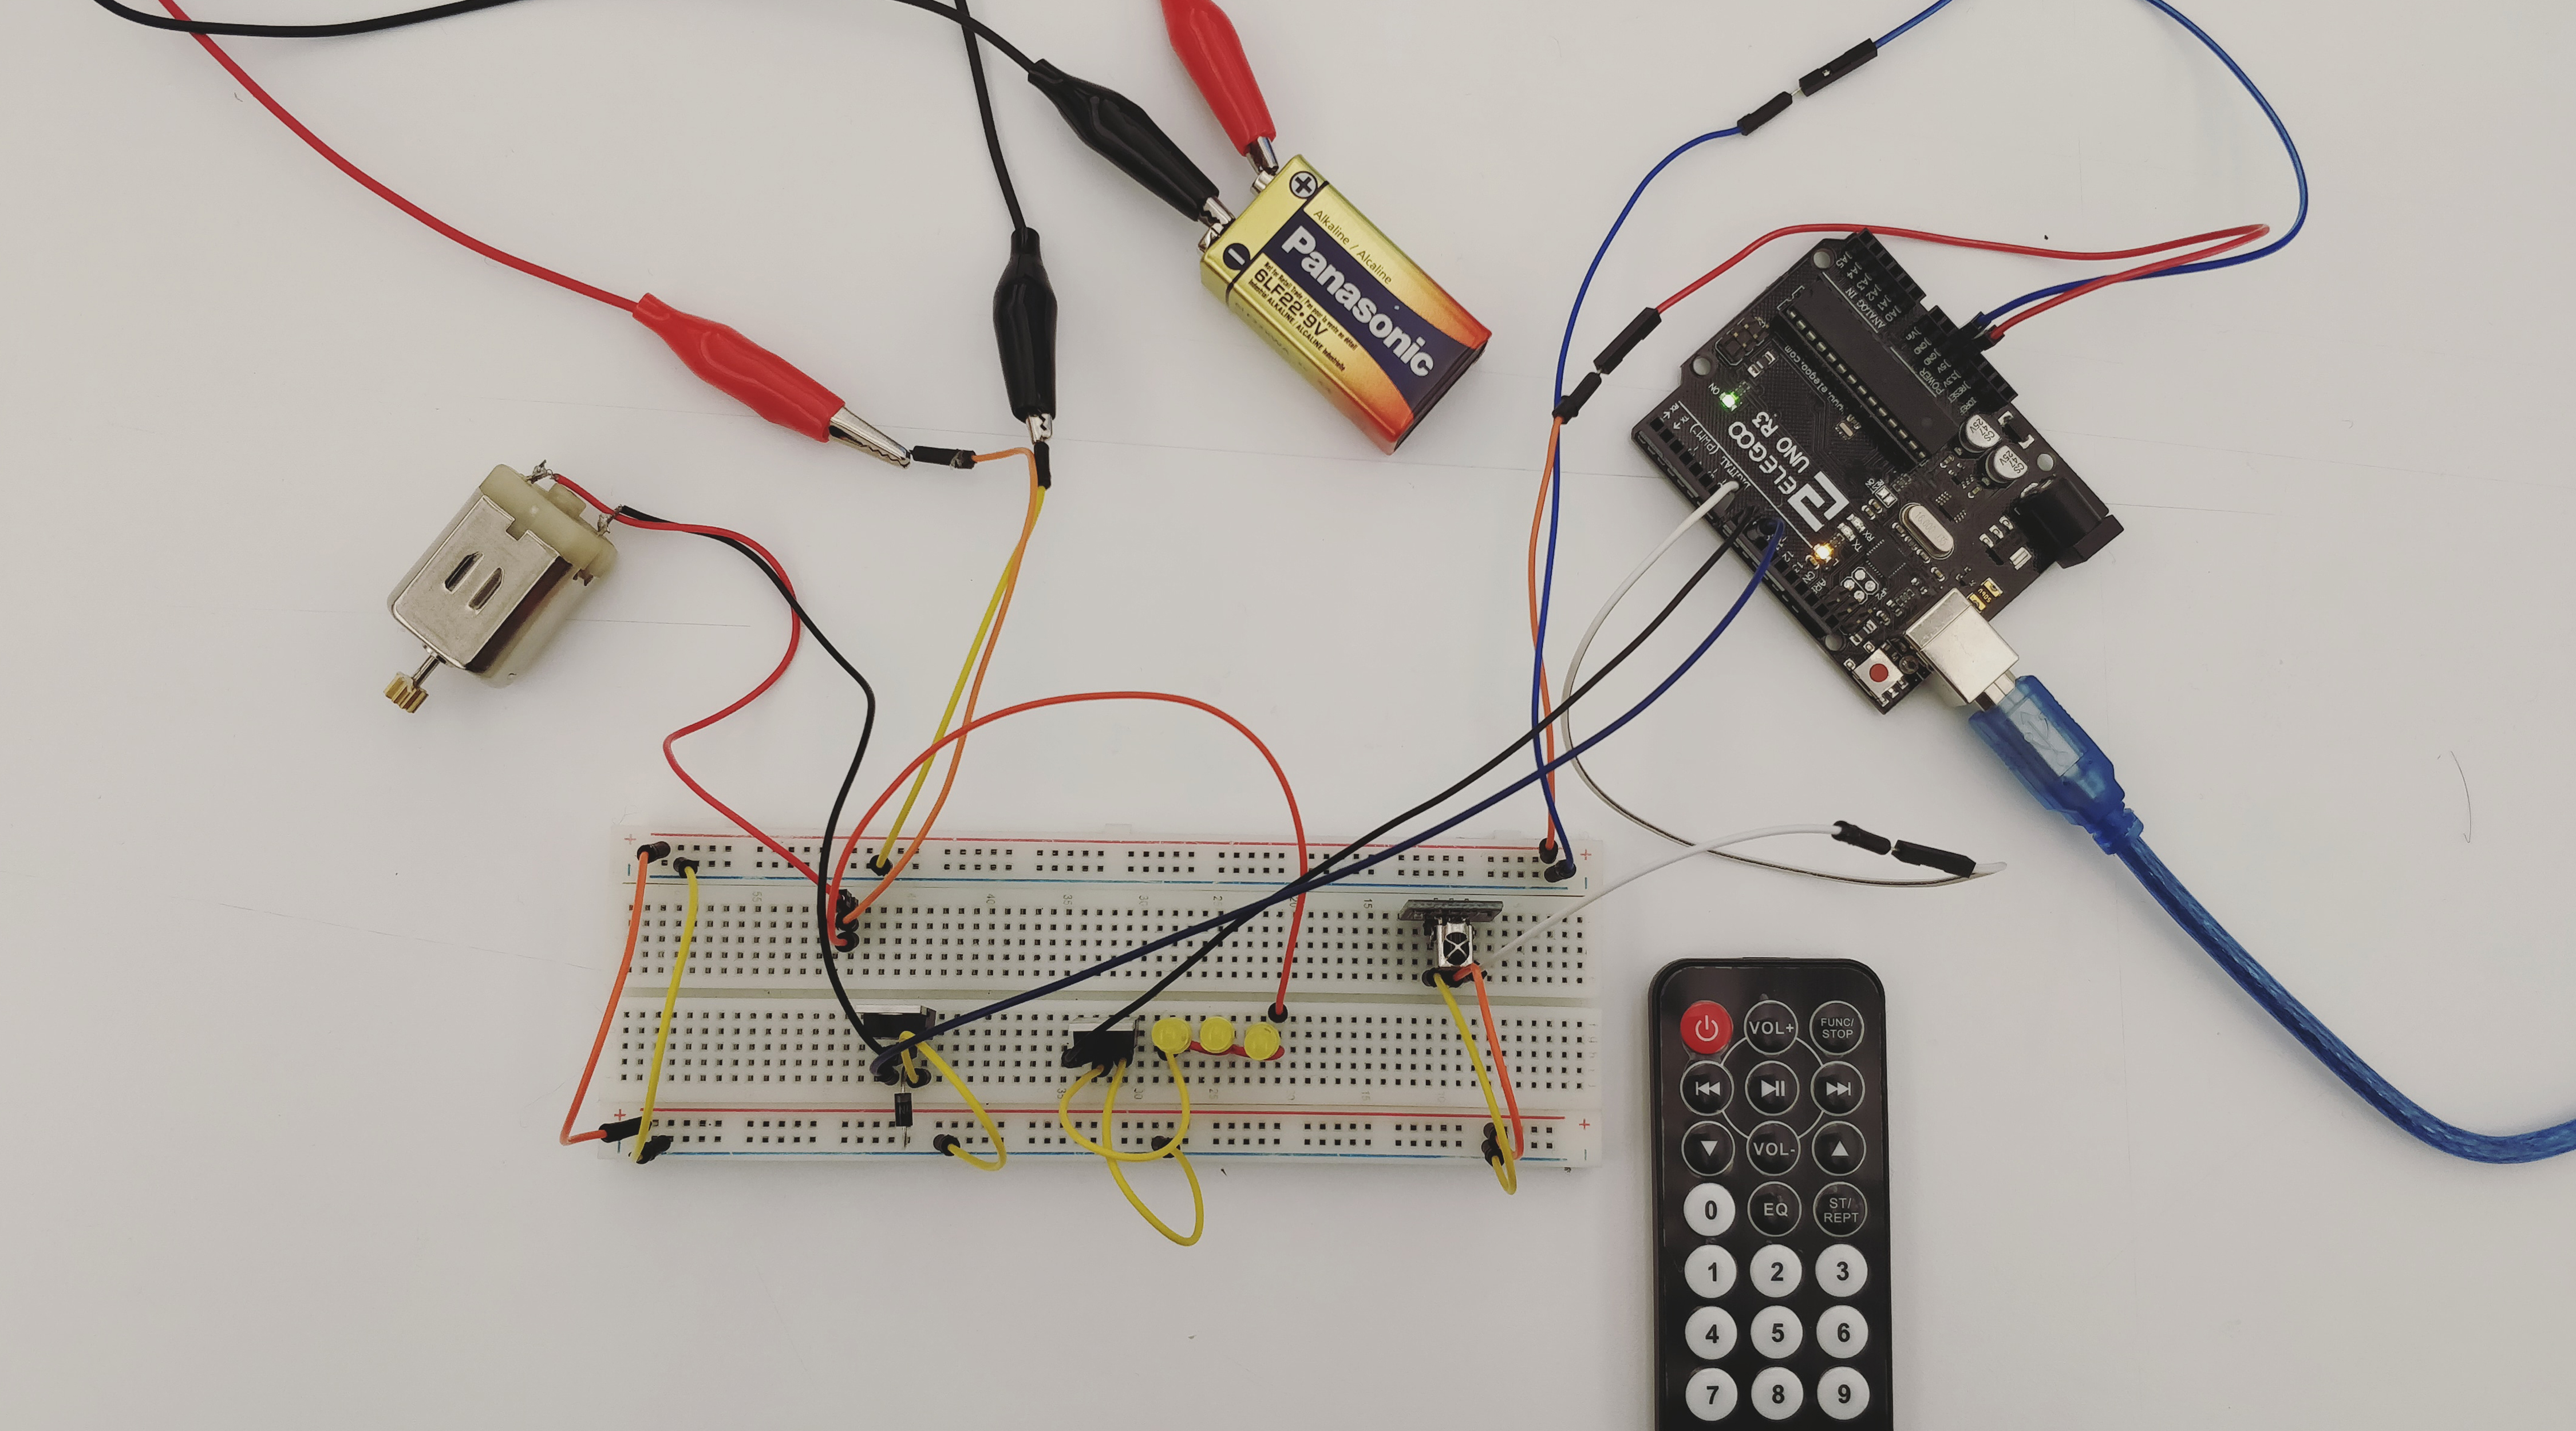
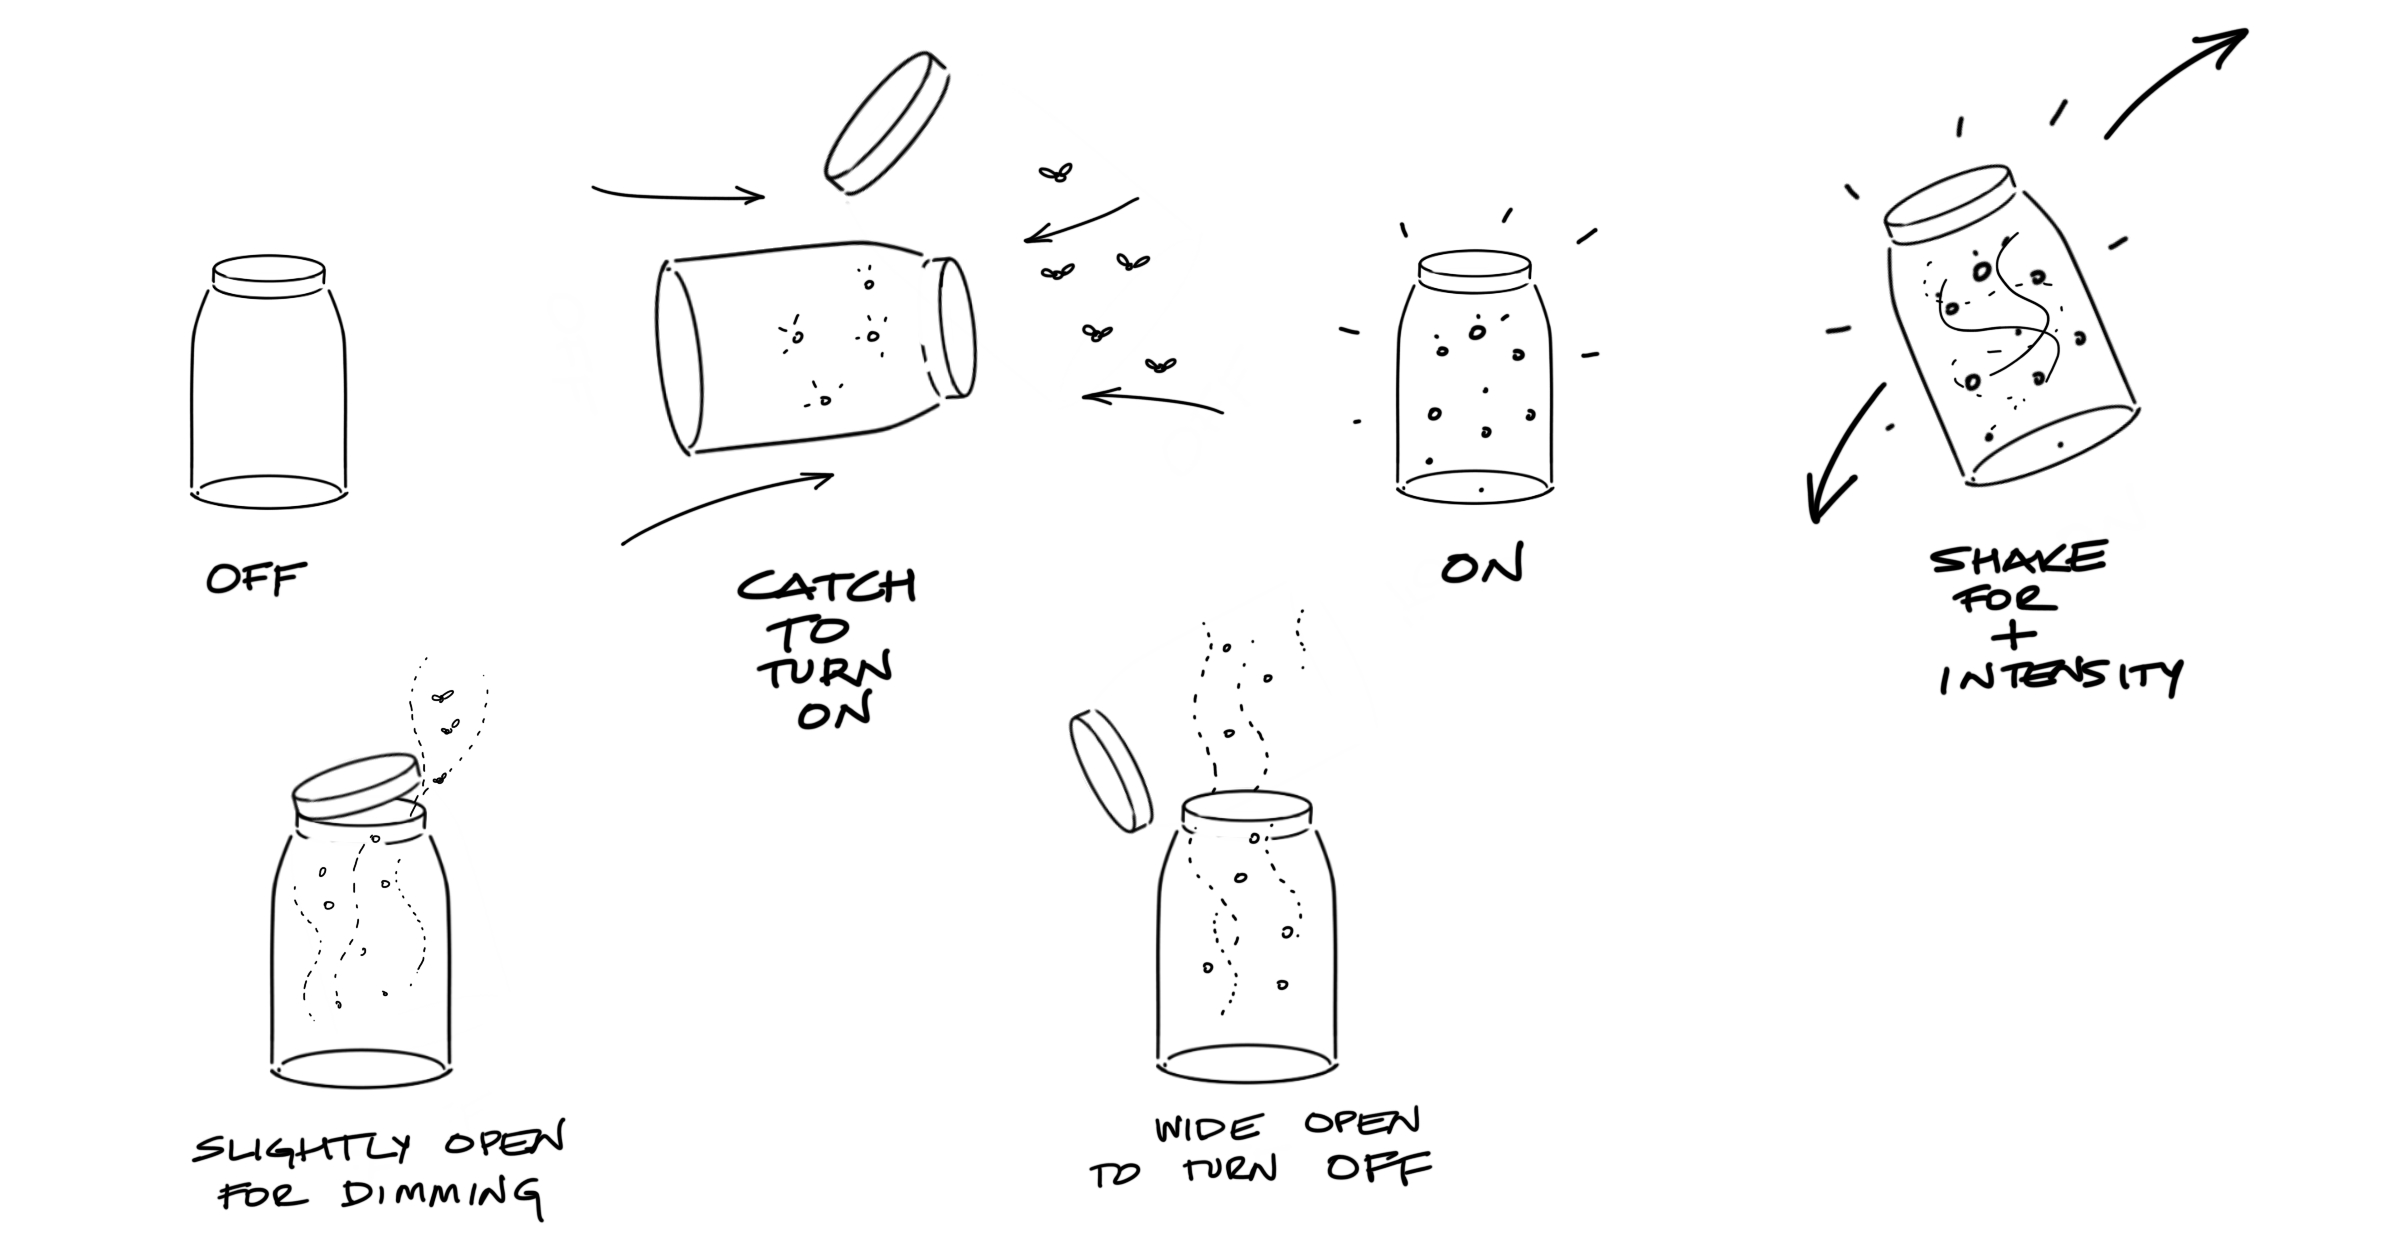
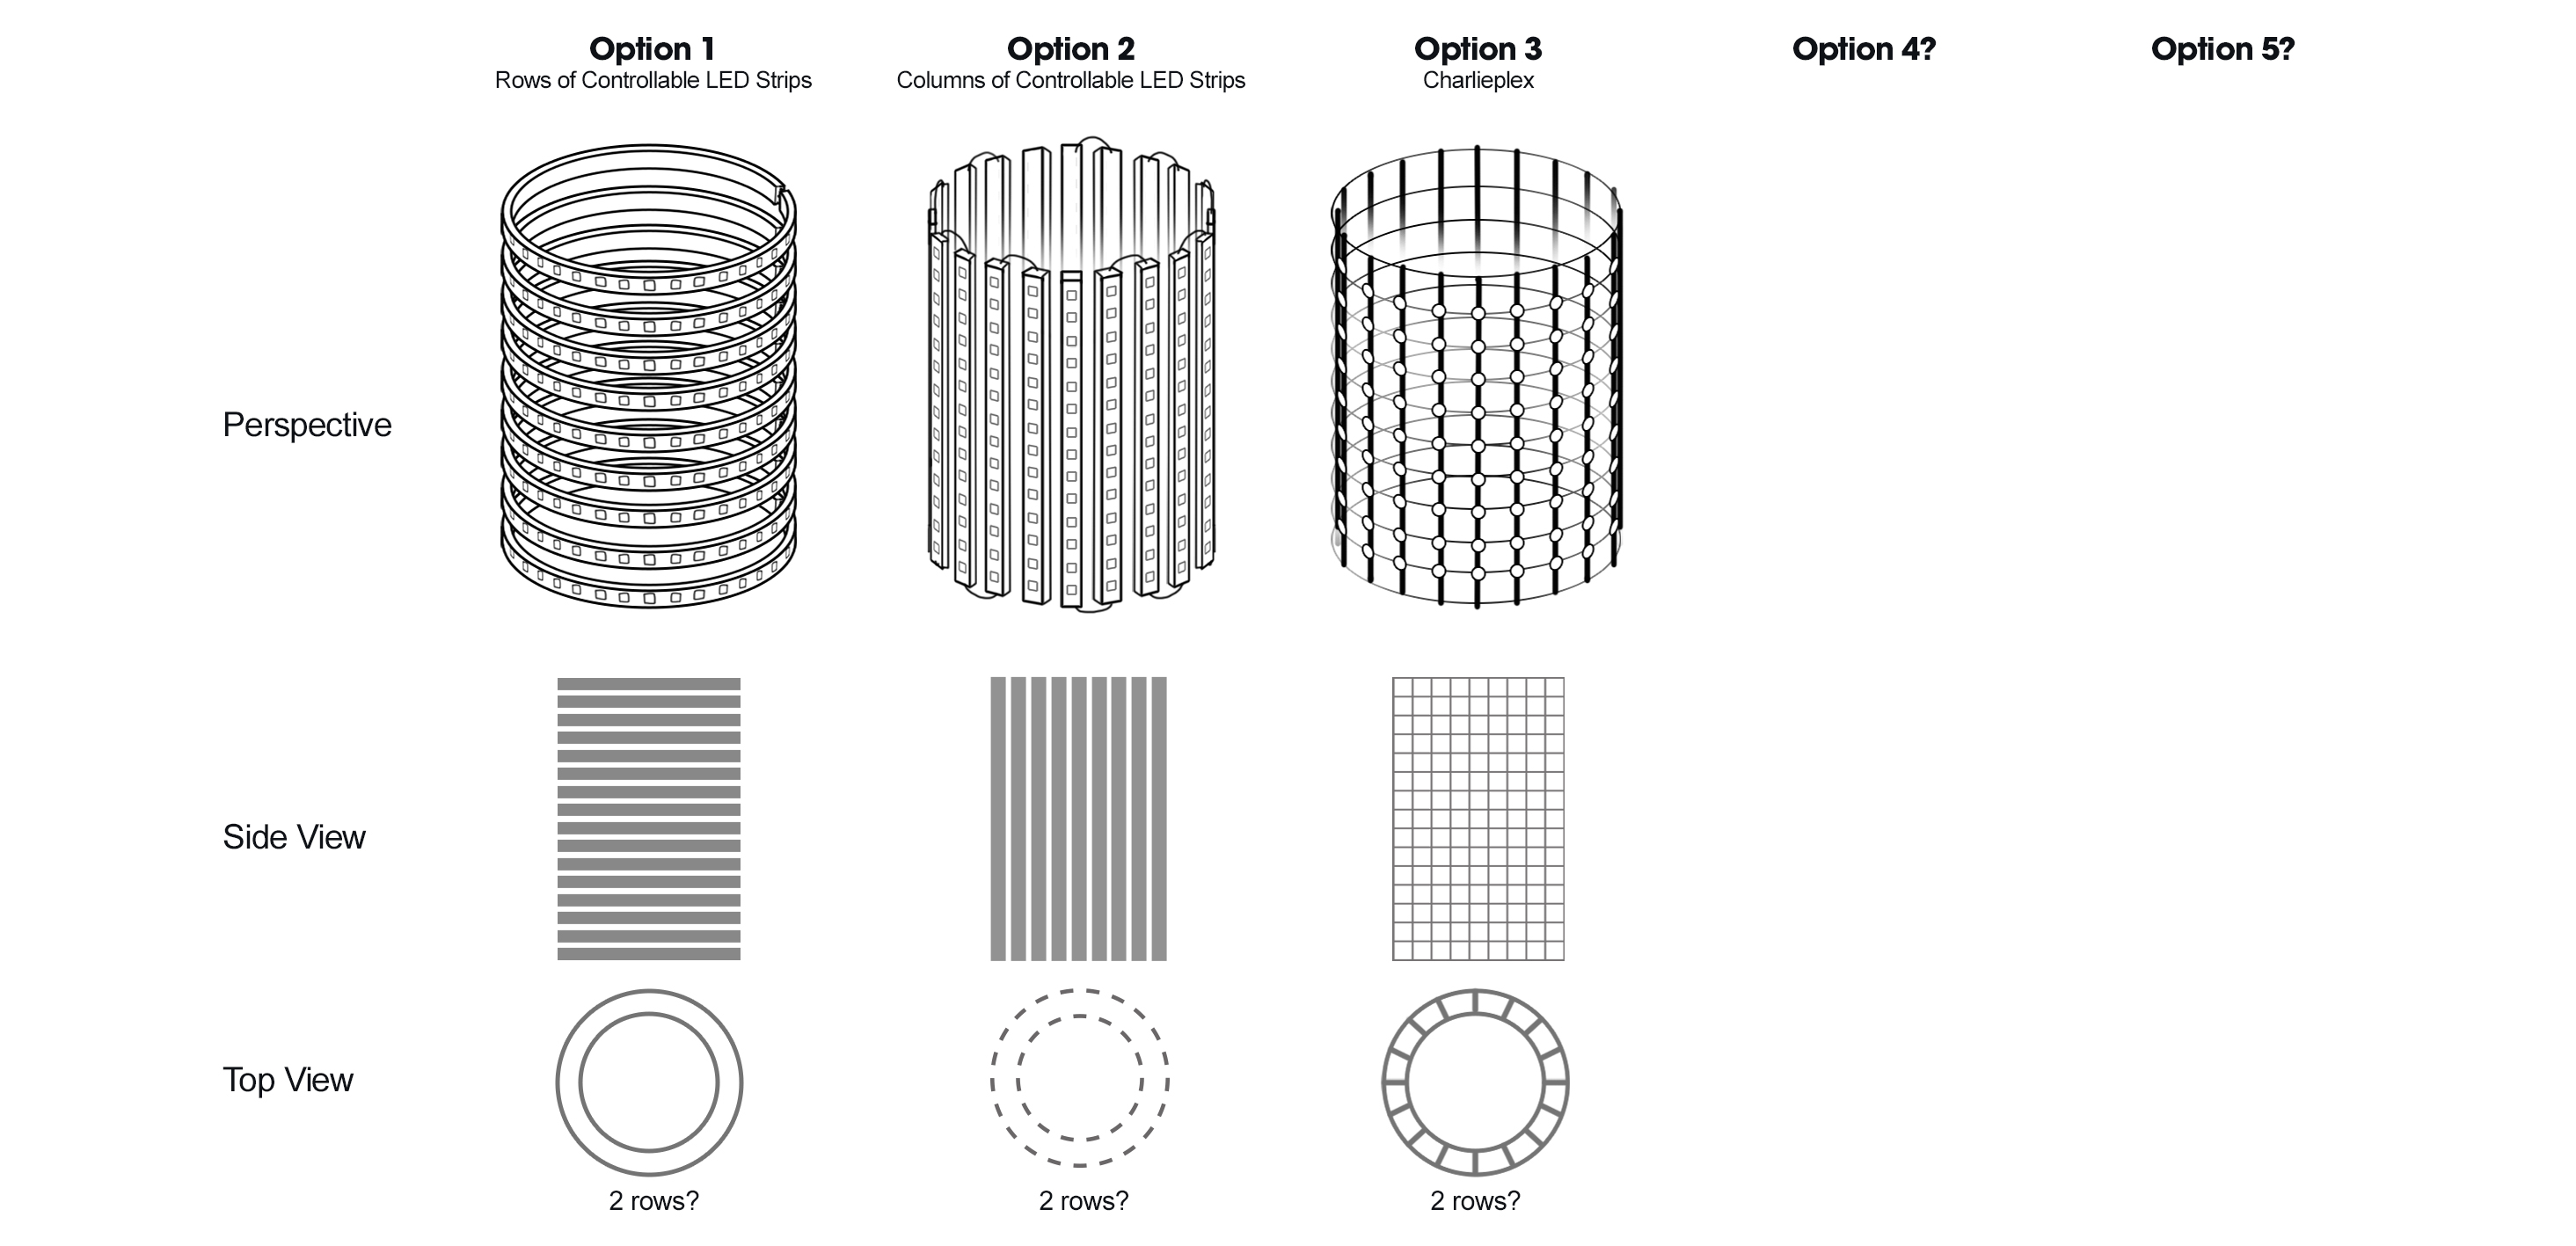
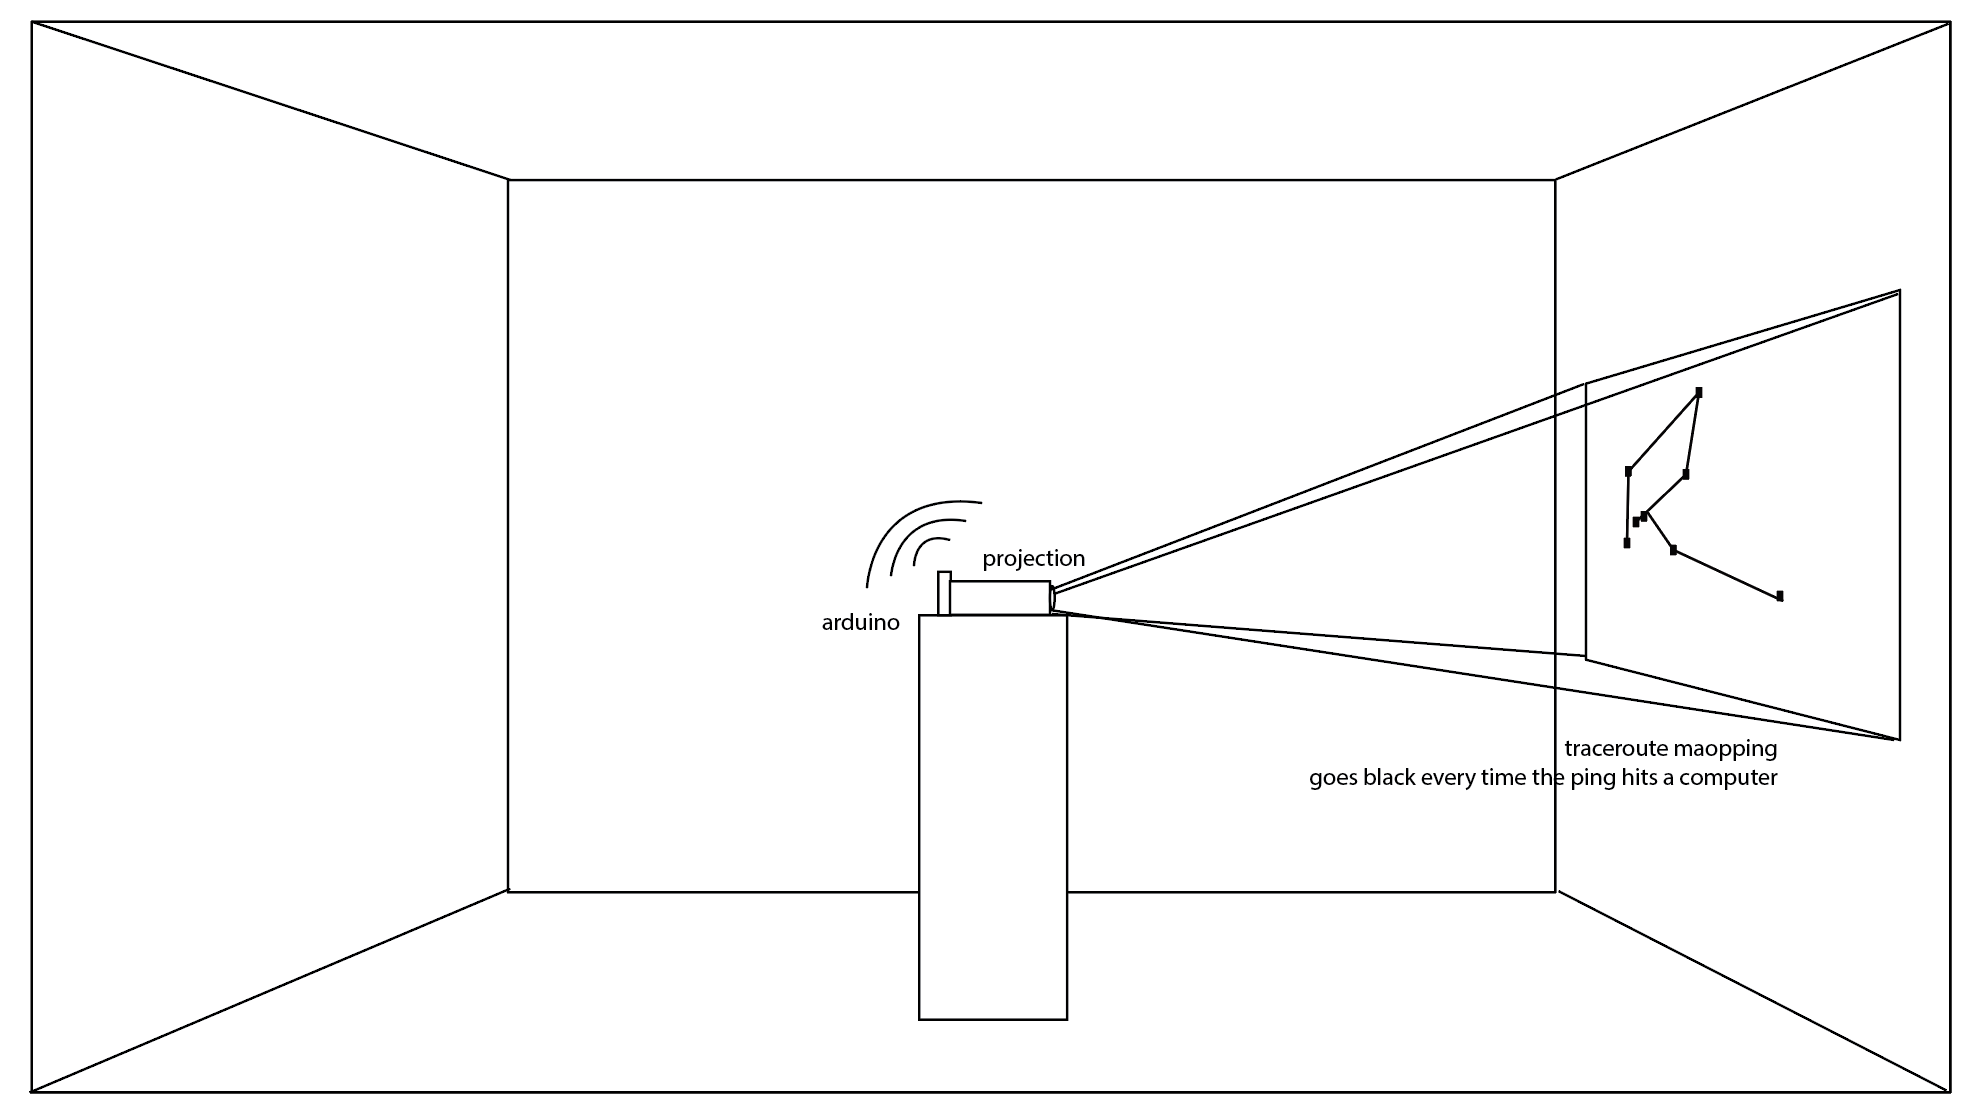
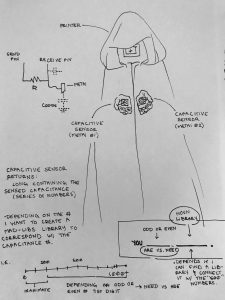
Diagram / Sketch

Continue reading

“The Dark Matter hut” – Final Concept Carla Molins

  • Refined project description

My concept is a little bit abstract, so I’m going to show my design question first:

How might a concept without visible instance like dark matter be represented for a better understanding?

My concept in order to answer that is a Experiential apparatus/ installation on perceiving a scientific concept (dark matter) for a better understanding.

This concept is based on a experimental installation trying to explore on different ways to “visualize” the concept including all senses but emphasizing haptics.

A whole system of small micro-experiences could be the result within a context of a bigger exhibition space such a science museum space installation.

  • Interaction/systems diagram

I’m still trying to define the form of my project, right now what I have in mind is this. I need to run several test to see if it’s feasible and it works as expected.

At this point, I see the installation in the shape of a haptic teepee. The user gets in to experience  dark matter by touching and triggering the system with those interactions.

This is a more defined sketch. The inner pyramid, the cubicle, it’s covered by latex ( 2 sides + entrance. The outer structure has 2 sides of lights made of a mesh of LED’s. In between, there is a layer of chipboard connected to a stepper motor that will change its shape depending  on the tension applied to the material by pulling a string and bending the board.


This tension will change the shape and as a consequence the shadow projected to the latex might seem closer or farther.

This is a more detailed drawing of the tech schematics.

  • Timeline with milestones

  • Materials list

Pcomp

  • Arduino
  • Power supply
  • Wire
  • 2 steppers
  • Capacitive sensors
  • 1 x Speaker
  • Led Mesh
  • Strings and rubber bands
  • Capacitive shield
  • conductive material
  • Solder

Other

  • Chipboard
  • PVC tubes and connectors
  • Latex
  • Precedents or references
  • Referents

TACTILE DOME

https://www.exploratorium.edu/visit/west-gallery/tactile-dome

JENNY SABINE WORK

http://www.jennysabin.com/new-page/

http://www.anilaagha.com


Week 7: Controlling a DC motor and LEDs using a keyboard

This week’s assignment was to use one of the wireless technologies we had learned in class and apply it to an everyday scenario. I decided to make a remote- controlled smart room of sorts, where one could control a tube light (string of LEDs) and fan (DC motor). This was done using the example code that we did in class. For the second part, I wanted to use the Arduino Uno as the Arduino Leonardo, and operate these devices through the keypad. This turned out to be more challenging than I had anticipated and did not work out.


The part that I got right

I was able to get the circuit to work by combining the IR sensor circuit with the circuit for controlling high current loads using an Arduino. The setup works when one uses a remote control, and I can control the LEDs and motor independently, but also run them together using the available power.

The part that did not work

Operating the circuit through the laptop keypad so that on pressing different buttons the different components would run.

What did I learn

  1. To use recent tutorials. A lot of the documentation around this topic is from around six years ago. I tried, unsuccessfully, to follow along with the tutorials only to realize that the hardware or the software had been modified/ was no longer in use.
  2. I realized the immense potential of the Arduino. For someone who is familiar with its inner workings, it gives a lot of room for experimentation.
  3. The importance of weighing in multiple factors before starting the project. The functionality that I was trying to recreate using the Arduino Uno is inherently present in the Leonardo. Moving forward, I will look at the time, effort, resources and cost involved in the process before choosing it over another alternative.

Continue reading

Final Project Plan (Week 10)_Alyssa

This will be a small installation that explores sexism, objectification, and empowerment through voice.  There will be a motorized arm with hammer, aligned to strike a perpendicular ‘glass’ pane. Accompanying the hammer/glass structure will be a printed poster of a woman with tape over her mouth. Upon introduction to the installation, the motorized arm will be static and audio can be heard: sexist commentary from men. There will be some invitation to the audience to peel back the tape from the poster. The removal of the tape will trigger the motor to start spinning, and thus the hammer to start striking the ‘glass’ pane. The audio will be replaced by women’s voices, consecutively telling their stories of sexism and sexual harassment. The hammer will continue striking until the tape is placed back over the poster’s mouth, returning status quo…or until the ‘glass’ shatters. 

Continue reading

Final Project Proposal – DarioN (Week 10)

Project Description: 

I’m designing a lamp that leverage on the magical tradition of catching fireflies in a jar, as a playful and intuitive ritual to illuminate, dim and turn off the light. This projects also get support in the technical challenge of “making an LED fly”. The main concept relies from evoking memories as a powerful tool to make the audience engage in the experience.

Concept Diagram (Experience):

Schedule:

Phase 1. Research. Week 11. April 2nd – April 8th

Domain Definition and Analysis. Concept Statement Proposal. Define Audience and Context. 2D Sketch of the relation of a user with the possible design solution. Show the experience step by step (User Scenario). Creation of Concept Mood-boards and Inspiration. Prototype 1 “Look and Feel”. GIF – screen based – . This prototype would help to visualize the idea, and to quickly test how interested the audience may be to this experience. Precedents Research. Research on different Technologies and Tools that could potentially support the development of the project.

Phase 2. Concept Generation. Week 12. April 9th – April 15th

Prototype 2 “Look and Feel – Role” and User Test. Prototype with an actual jar (or something similar) and test the experience. How ‘Natural’ is it? Is it too complex? Too many steps? Ideation. 2D Sketches on Experience and Form (Aesthetics Language and Appearance)Project Development Plan. Technical Approach. Determine Materials. Design Refinement. Generate 2D drawings of the different views and sections of the final physical design to facilitate the 3D modeling.   

Phase 3. Project Development. Week 13. April 16th – April 22nd

Prototype 3 “Implementation”. Technology Test 1. Test with different LEDs, arrangements and sensors… After reviewing Prototype 3, create the final technical and functional mockup. This will be a highly functional mockup. Consider Implementation. 3D CAD Model of the jar parts and mechanics housing. Send for 3D printing.

Phase 4. Construction. Week 14. April 23rd – April 29th

After receiving all the 3D components, the final product will be assembled and adjusted in the shop. Final User Tests.

Phase 5. Presentation Preparation. Week 15. April 30th – May 6

Create 3D renderings of final product for final presentation (6 images).Photograph and video record User experience.

Material List:

  • Arduino UNO
  • Breadboard
  • Jumper Wires
  • Controllable LED Strips. Or. LEDs connected in a matrix (Charlieplex)
  • Power Supply

This is my vision on the technical execution. Any recommendations?

Precedents:

Infinity Mirrors by Yayoi Kusama. An interesting way of using mirrors and light to create an immersive experience of endless worlds.

Dreamlights Lamp. 

Similar experience of using light and movement. Having the jar being frosted to hide the mechanisms and leds is a good strategy.

Project proposal

Physical Computing Final Project: 

Description

An Arduino that functions as a local server sends an autonomous and continuous “Ping” command that travels endlessly on the Internet infrastructure channels, drawing its path with light. The Arduino traces this Ping moving and hitting routers, IXP, servers. A bright and strong beam of light is projected from the Arduino to the space; this beam is broken every time the Ping hits a computer, having a second of darkness.
The traced IP locations are mapped to their geographical position and projected to the wall, translating the drawing the Ping creates.

Timeline: Continue reading

Project Planning

Group member: Weilin, Xiaoyu

Autonomous Objects: We are making a series of experimental prototypes that explore the ubiquitous but novel relationship between humans and objects. By reimagining the messages behind everyday objects, the project enables everyday objects to communicate and negotiate with us in their (possibly) preferable way.

Possible examples:

1. Printer: A printer who needs a break occasionally.
2. Hand Dryer: A hand dryer who messes with you.
3. Clock: A clock from China who only wants to live in the Beijing Time.

Interaction/systems diagram

(will be different depending on different objects)
Possible interactions seen from the link:
https://drive.google.com/drive/folders/1P6GbRzvbgr5uugYIn1UWCAOFMQYJbr63?usp=sharing

Timeline with milestones

Week 11: Idea development, research
Week 12: First prototype
Week 13: Play test
Week 14: Second prototype
Week 15: Refine
Week 16: Documentation, presentation

Materials list

Antique electrical devices

(will be different depending on different objects)

Precedents or references

When Objects Dream, ECAL
http://www.ecal.ch/en/3148/events/exhibitions/-when-objects-dream-exhibition-in-milan

BroomBroom
https://vimeo.com/208130162

Objects Thinking Too Much @ICC
http://okikata.org/%E2%98%83/omoisugosu_icc/

Objective Realities
http://www.creativeapplications.net/unity-3d/objective-realities-becoming-an-object-in-a-smart-home/

On the Secret Life of Things
http://www.creativeapplications.net/objects/on-the-secret-life-of-things-familiar-objects-new-behaviours/

Week 10: Project Timeline

  • Refined project description:


The Fortune Teller: Using an arduino, arduino printer, and a copper capacitive sensor I want to be able to give people a fortune based on the “random” amount of particles the sensor reads. Inspired by Mary Poppins measurement tape that collects the input of height and gives a corresponding description, “Perfect in everyway,” I want to design a fortune teller that reads its participants touch and subsequently gives them a corresponding fortune.


  • Interaction/systems diagram


I realize that capacitive sensors are widely unstable and inconsistent due to the incessant need for recalibration, but that is why I chose them. I like the random number of capacity because it considers so much; height, weight, if you just ate a lot, rubber shoes, lots of metal jewelry, and it able to reduce all this information to a “clean” and “concise” number.

Since I haven’t made the capacitive sensor yet I do not know the range return of capacitance number, but I acknowledge that I will have to code different responses if the number passes different thresholds. I imagine creating a mad-libs like formula for variables to be inputed depending on the number.

YOU *(ARE vs. NEED)* *(NOUN)*
Dependent on if the return variable is an odd or even number. Hopefully I can find a noun/ word library and have certain return numbers correspond to a word.


  • Timeline with milestones


Week 10:

  • Buy materials
  • Meet with learning center to compose the code
  • Connect Capacitive Sensor with Arduino

Week 11:

  • Connect Capacitive Sensor & Arduino with the Printer
  • Look for work library (noun)
  • Code the library and printer
  • Make plaster hand(s)

Week 12:

  • Begin to compose the entire project
    • Get/make a cloak
    • Make a stand

Week 13:

  • Final Touches


  • Materials list:


  • Precedents or references


  1. Use smoothing in your code.

If you followed the tutorial in step 3, you’ll notice that the signal from a cap sensor can be highly erratic. Therefore it’s a good idea to use some kind of smoothing function in your code. We used this one and it did a great job in stabilising the signal.

  1. Control as much of the environment as possible.

Everything from air humidity to electromagnetic noise to someone touching a cable will affect the signal strength. Eliminate as many variables as you can. Using shielded cables and making sure no other electronic equipment is operating in the immediate vicinity are two easy precautions you can take. Solid grounding will also reduce interference.

  1. Bigger surfaces = bigger signals.

The bigger the surface area of your sensor, the stronger your signal will be. A big surface area is also better for triggering the sensor at a distance.


http://www.instructables.com/id/Capacitive-Sensing-for-Dummies/

http://playground.arduino.cc/Main/CapacitiveSensor?from=Main.CapSense

https://www.arduino.cc/en/Reference/Libraries

Controlling DC Motors – on/off, speed, and direction (week 8)

  • Goal of this project : I made a circuit that is controlling DC motor in 3 different ways – on/off, adjusting speed, and changing direction. In order to turn the motor on and off, I used button switch, and to change direction of the motor I used H-bridge and button. And by the “analog” value read from potentiometer, the speed is also adjustable.
  • Assembly description : To change direction of the DC motor I used H-bridge. The one I used is SN754410 and I found data sheet of that model through internet search.

Continue reading

Week 10 + 11 Assignment

Due April 5: Create a blog post with the following:

  • Refined project description
  • Interaction/systems diagram
  • Timeline with milestones
  • Materials list
  • Precedents or references

Due April 12: Create a blog post with the following:
Documentation of your first prototype. This can be a circuit, physical object, etc. It should include any initial challenges or questions you have.