
- Refined project description:
The Fortune Teller: Using an arduino, arduino printer, and a copper capacitive sensor I want to be able to give people a fortune based on the “random” amount of particles the sensor reads. Inspired by Mary Poppins measurement tape that collects the input of height and gives a corresponding description, “Perfect in everyway,” I want to design a fortune teller that reads its participants touch and subsequently gives them a corresponding fortune.
- Interaction/systems diagram
I realize that capacitive sensors are widely unstable and inconsistent due to the incessant need for recalibration, but that is why I chose them. I like the random number of capacity because it considers so much; height, weight, if you just ate a lot, rubber shoes, lots of metal jewelry, and it able to reduce all this information to a “clean” and “concise” number.
Since I haven’t made the capacitive sensor yet I do not know the range return of capacitance number, but I acknowledge that I will have to code different responses if the number passes different thresholds. I imagine creating a mad-libs like formula for variables to be inputed depending on the number.
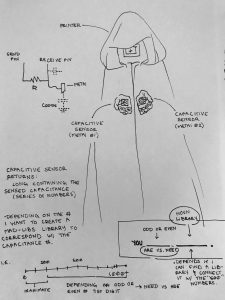
| YOU | *(ARE vs. NEED)* | *(NOUN)* |
| Dependent on if the return variable is an odd or even number. | Hopefully I can find a noun/ word library and have certain return numbers correspond to a word. |
- Timeline with milestones
Week 10:
- Buy materials
- Meet with learning center to compose the code
- Connect Capacitive Sensor with Arduino
Week 11:
- Connect Capacitive Sensor & Arduino with the Printer
- Look for work library (noun)
- Code the library and printer
- Make plaster hand(s)
Week 12:
- Begin to compose the entire project
- Get/make a cloak
- Make a stand
Week 13:
- Final Touches
- Materials list:
-
-
- Arduino
- Arduino Printer
- 2x Capacitive Sensor (Copper plate and Aluminum)
- 1 or 2x of Plaster hand
- Resistors (really high)
- 10 x LEDs (for test). We used one red, seven whites and two blues, but use whatever you want/have.
- 2 x Potentiometers. You can exclude one if you want.
- 7 x 4,7 MOhm resistors. The more resistors you have, the greater the resistance range you can explore. The lower values they have, the higher the resolution of the resistance range.
-
- Precedents or references
- Use smoothing in your code.
If you followed the tutorial in step 3, you’ll notice that the signal from a cap sensor can be highly erratic. Therefore it’s a good idea to use some kind of smoothing function in your code. We used this one and it did a great job in stabilising the signal.
- Control as much of the environment as possible.
Everything from air humidity to electromagnetic noise to someone touching a cable will affect the signal strength. Eliminate as many variables as you can. Using shielded cables and making sure no other electronic equipment is operating in the immediate vicinity are two easy precautions you can take. Solid grounding will also reduce interference.
- Bigger surfaces = bigger signals.
The bigger the surface area of your sensor, the stronger your signal will be. A big surface area is also better for triggering the sensor at a distance.
http://www.instructables.com/id/Capacitive-Sensing-for-Dummies/
http://playground.arduino.cc/Main/CapacitiveSensor?from=Main.CapSense