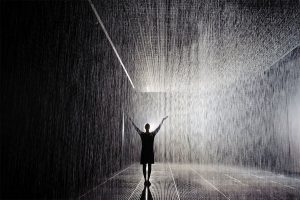
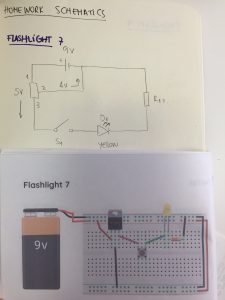
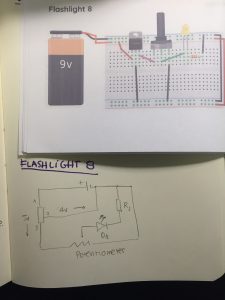
These are my 3 schematics.
I’ve chosen one with a voltage regulator, one with a potentiometer and one with a transistor.
These are my 3 schematics.
I’ve chosen one with a voltage regulator, one with a potentiometer and one with a transistor.
UPDATES:
DUE BY 2/8:
DUE BY 2/15
This project is six years old, but I only just saw it for the first time. Still feels relevant. I clicked for the catchy name. I stayed for the hardware talk. Once I heard “video experimenter shield,” I was hooked. My knowledge of PComp is so limited, that this whole concept of shields is new to me.
This example showcases a video shield made by Nootropic Design. The shield allows you to feed the video signal from cable box to Arduino, which parses the closed captioning transcript for keywords. When a keyword is detected, the Arduino mutes the TV for 30 seconds via an IR sensor.
As Matt Richardson explains in the video, a world of possibility opens up when you turn your Arduino into an infrared remote control. It’s such a simple mechanism, but when used as a form of censorship or commentary, it has some real potential. Here it facilitated a conversation between cable box, Arduino, and TV, and between passive consumer/active producer by extension.
I also like that this project is explained well in the video. I feel like I could replicate this and then tweak with my own ideas.
This was one of the first projects that inspired me to find the interesting intersection and the infinite results between the analog and the new technologies. The Kinetic Sculpture: THE SHAPES OF THINGS TO COME (2008), is an installation designed for the BMW museum in Munich by Art + COM where the history of BMW is shown by animating the iconic forms of the cars. BMW’s brand recognition is given by the car silhouettes, and the sculpture efficiently highlights the pure values of BMW design and brand history.
The sculpture integrates good design, great story / concept, simplicity in the result and technical complexity (electronics + mechanics + code). This is an equation that makes an object, sculpture, experience successful.
Technical details: six-square-meters area and 714 metal spheres are suspended from the ceiling.
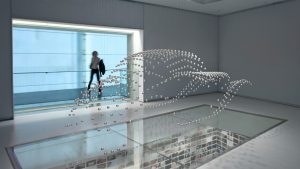
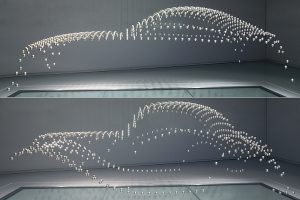
In the words of the designers: “The theme of the installation is the form-finding process in car design, which is performed in a seven-minute choreographed sequence: at the beginning the installation is in a chaotic state. No form or design idea has yet been found. The spheres move individually creating an impression of spatial white noise. Slowly the first geometric forms emerge, loosely relating to the contours of the vehicle that appear later.”
I found this interactive installation done by Arduino very interesting. It consists of 27 luminous spheres and will light up differently. I don’t completely understand the technology used in this project yet. But seeing the final effect, I feel that it can be used in many fields such as installation art and stage settings. Also, I’m imaging that if we change the output into something not only physical but also digital, the outcome will be more fun.
The Eyewriter
One of the first projects that I encountered after coming to DT was the Eyewriter. It uses a low-cost eye-tracking system and open-source software to allow people suffering from any kind of neuromuscular syndrome to draw by tracking their eye movement and translating it into lines on the screen. This project reminds me of the immense potential of creative computation- the ability to make a difference in people’s lives. This work embodies the spirit of design and technology- one built on collaboration and knowledge sharing, made possible through open source platforms and the DIY maker culture.

Rain Room
Another project I would like to share is Random International’s Rain Room, an immersive interactive environment, with perpetually falling rain, that ceases when a human body is in proximity. I love the simplicity of the interaction- basic sensors are used to create a truly awe-inspiring experience. The environment is an amalgam of natural and artificial, chaos and stillness, art and science.
I’m really interested in how to bring the physical and the digital world together in order to create more engaging experiences.
Light Kinetics connects the real world physics into digital in a way that is both magical and mystic. This installation creates a seamless effect of light al through the lightbulbs loop. The accuracy and the detail make it so special.
http://www.espadaysantacruz.com/projects/light-kinetics-in-the-loop
Light Kinetics is the last interactive installation of Espadaysantacruz a, Madrid based, creative studio.
In this piece, light is controlled by a physics simulator creating a astonishing effect.
A piezo electric sensor situated in the first bulb captures the force of the tap, generating a light particle that moves along the loop. All the shades of the energy are reflected in the trajectory of the light.
The system is powered by Unity 3D that simulates de forces that apply to the virtual corpuscle.
This project is a follow up of the previous experiment: vimeo.com/90523113
espadaysantacruz.com
March, 2015
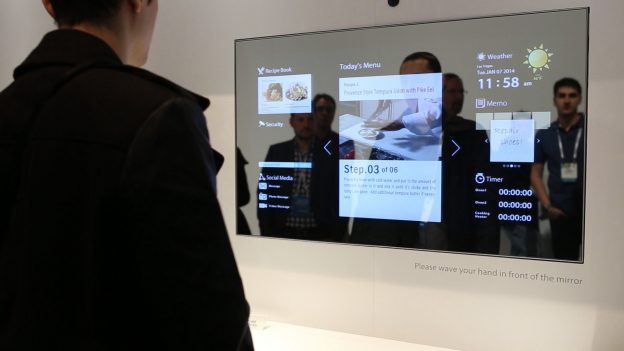
Frankly, I have no idea what I am capable of regarding physical computing. I’ve had experience with a Raspberry PI, but “experience” is too strong a word to describe my pitiful attempt at Python and fooling with a breadboard. A better word that synopsizes my experience might be that I have but encountered the massive and interesting world of computing. One thing that always stays on my mind in regards to tech projects is practicality, and how I can implement the project and innovate it’s systems to benefit in my daily routine. Ergo, the Magic Mirror project is one I find particularly interesting to explore.
Upon initial reflection the Magic Mirror appears to be a regular mirror, but can actually feature images and text by subtly materializing onto a LCD screen behind two way glass. Via remote connection to wifi and Raspberry Pi to a main PC the user can exhibit weather forecasts, calendar, notes, and essentially anything provided the effort and configuration. I’m very interested in learning how to remotely connect my PC to a third party LCD and explore the overall schematics of the Raspberry PI interface.
http://blog.dylanjpierce.com/raspberrypi/magicmirror/tutorial/2015/12/27/build-a-magic-mirror.html
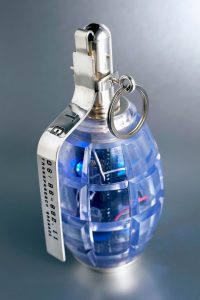
The Transparency Grenade of Julian Oliver is a work that exposes the powerful invisible surveillance status of our world.
With a visually strong object he makes visible everyday hidden technologies and uses of power.
The transparent grenade contains a small arduino computer, a microphone and an antenna. When activated, the antena records the audio of a room and the information travelling wireless, sending it to a public website and exposing it.
Liliana Farber