I was inspired by the double pendulum’s random patterns to create something that would capture its patterns randomly for my finals:
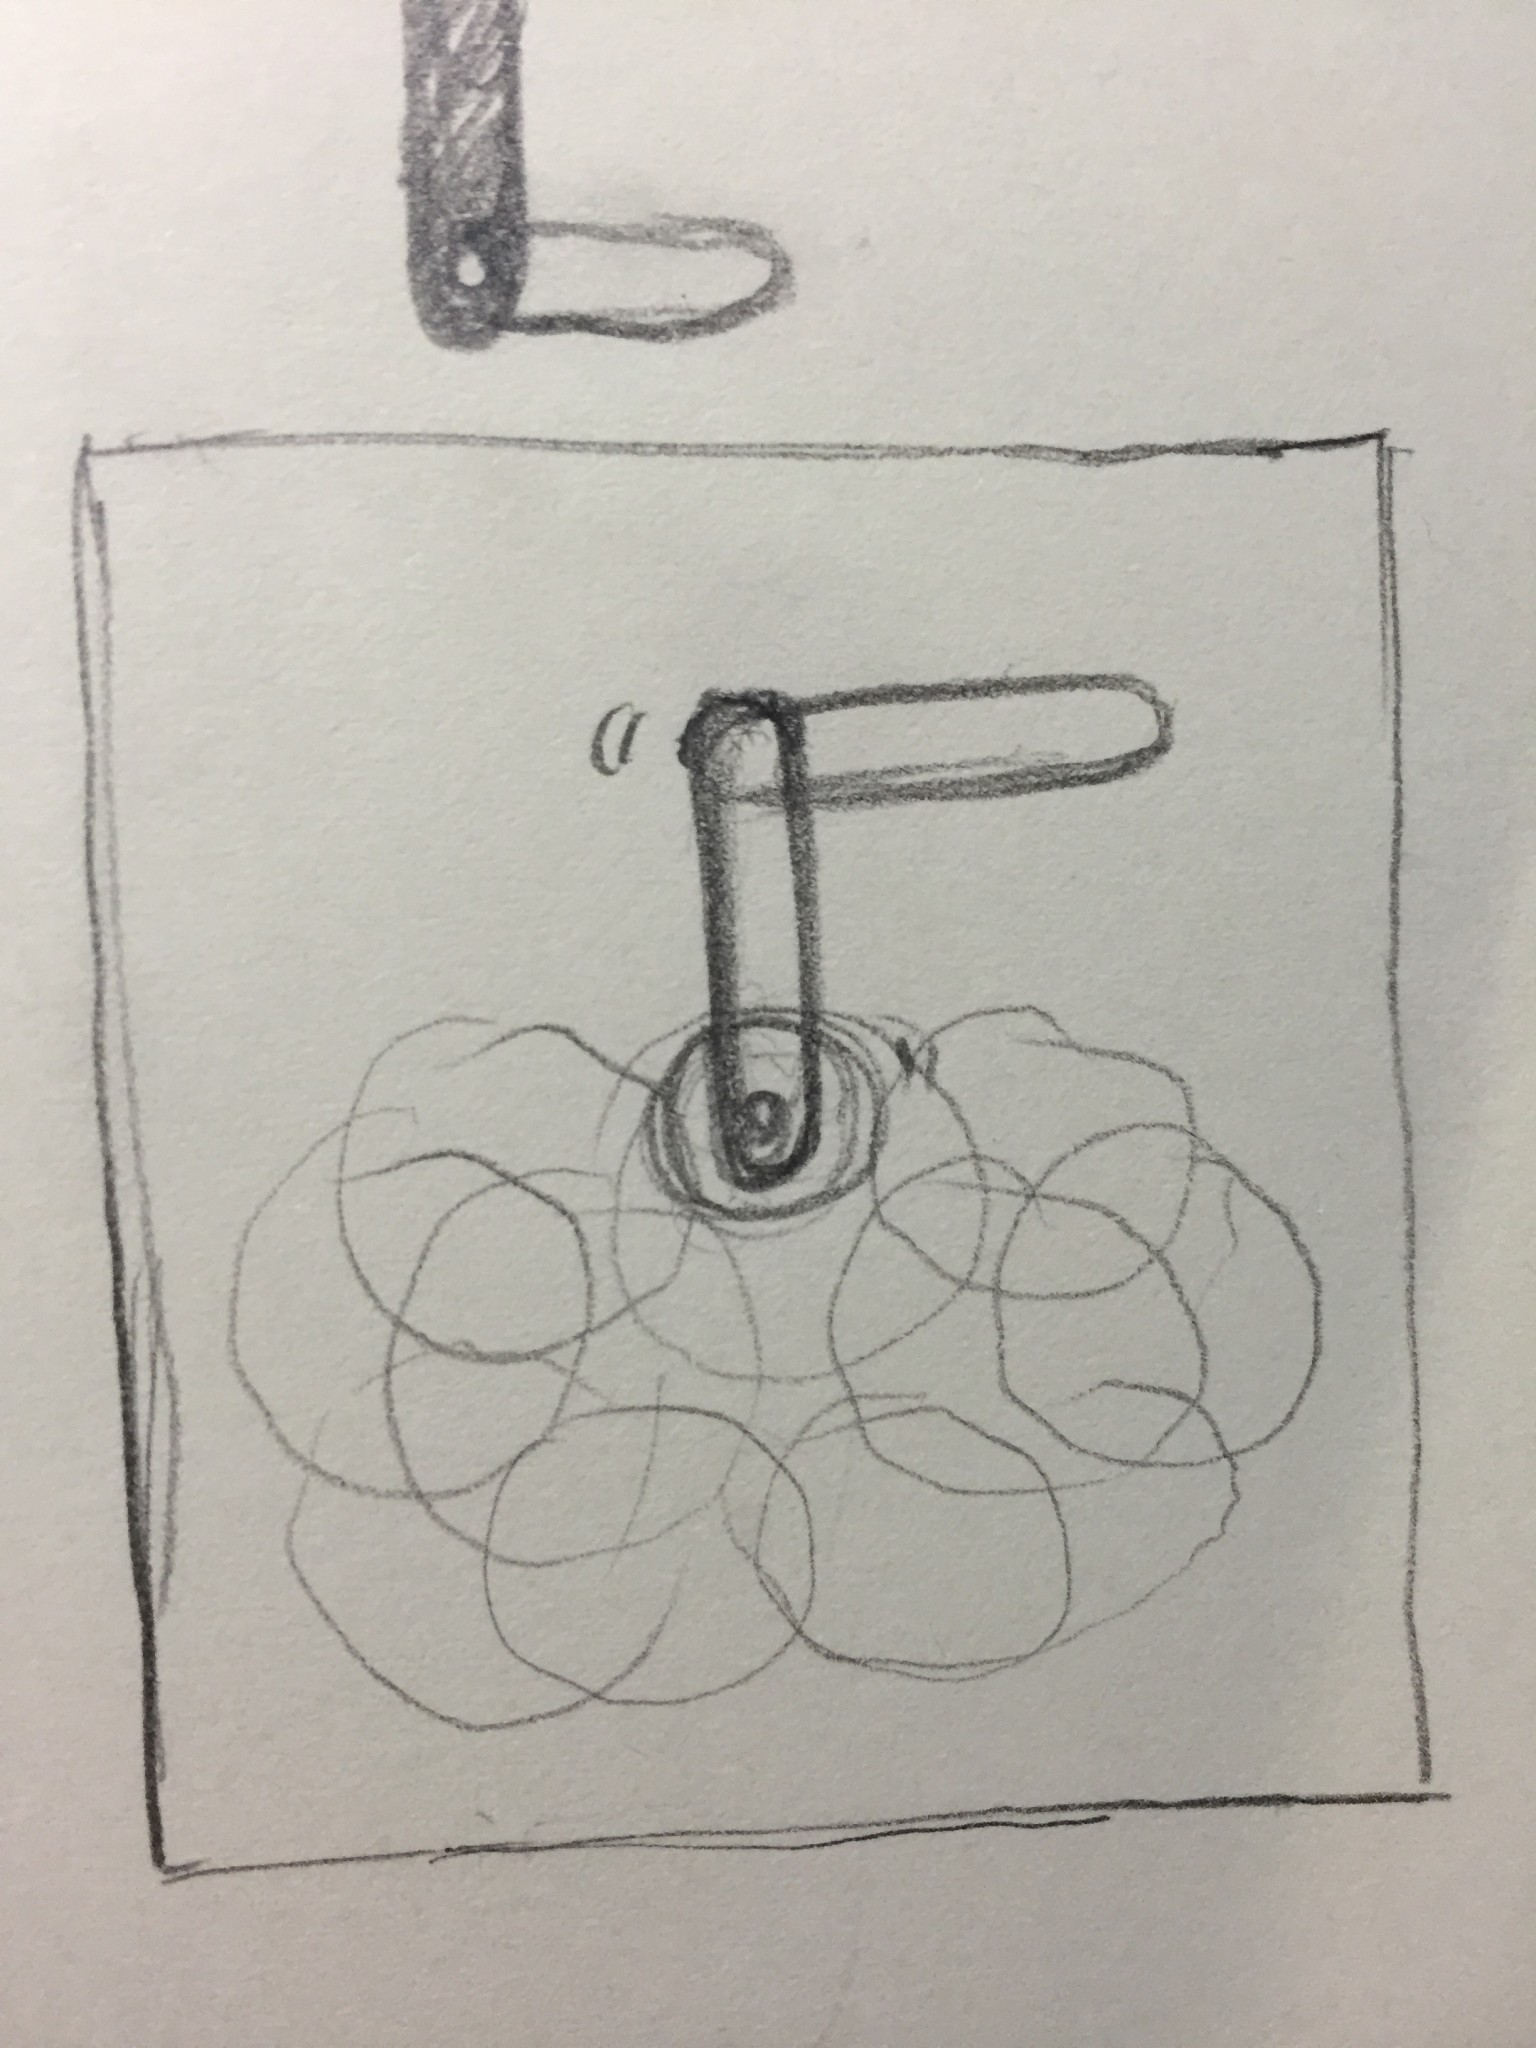
The concept was theoretically simple: I would use a stepper motor and the Easy Stepper Driver from Sparkfun to drive the pendulum, and I would draw the patterns on thermochromic ink with a heating element attached to the pendulum to trace its motion temporarily. All of this would be controlled using a Arduino Pro Mini, though at the beginning, I used an Arduino Uno to prototype.
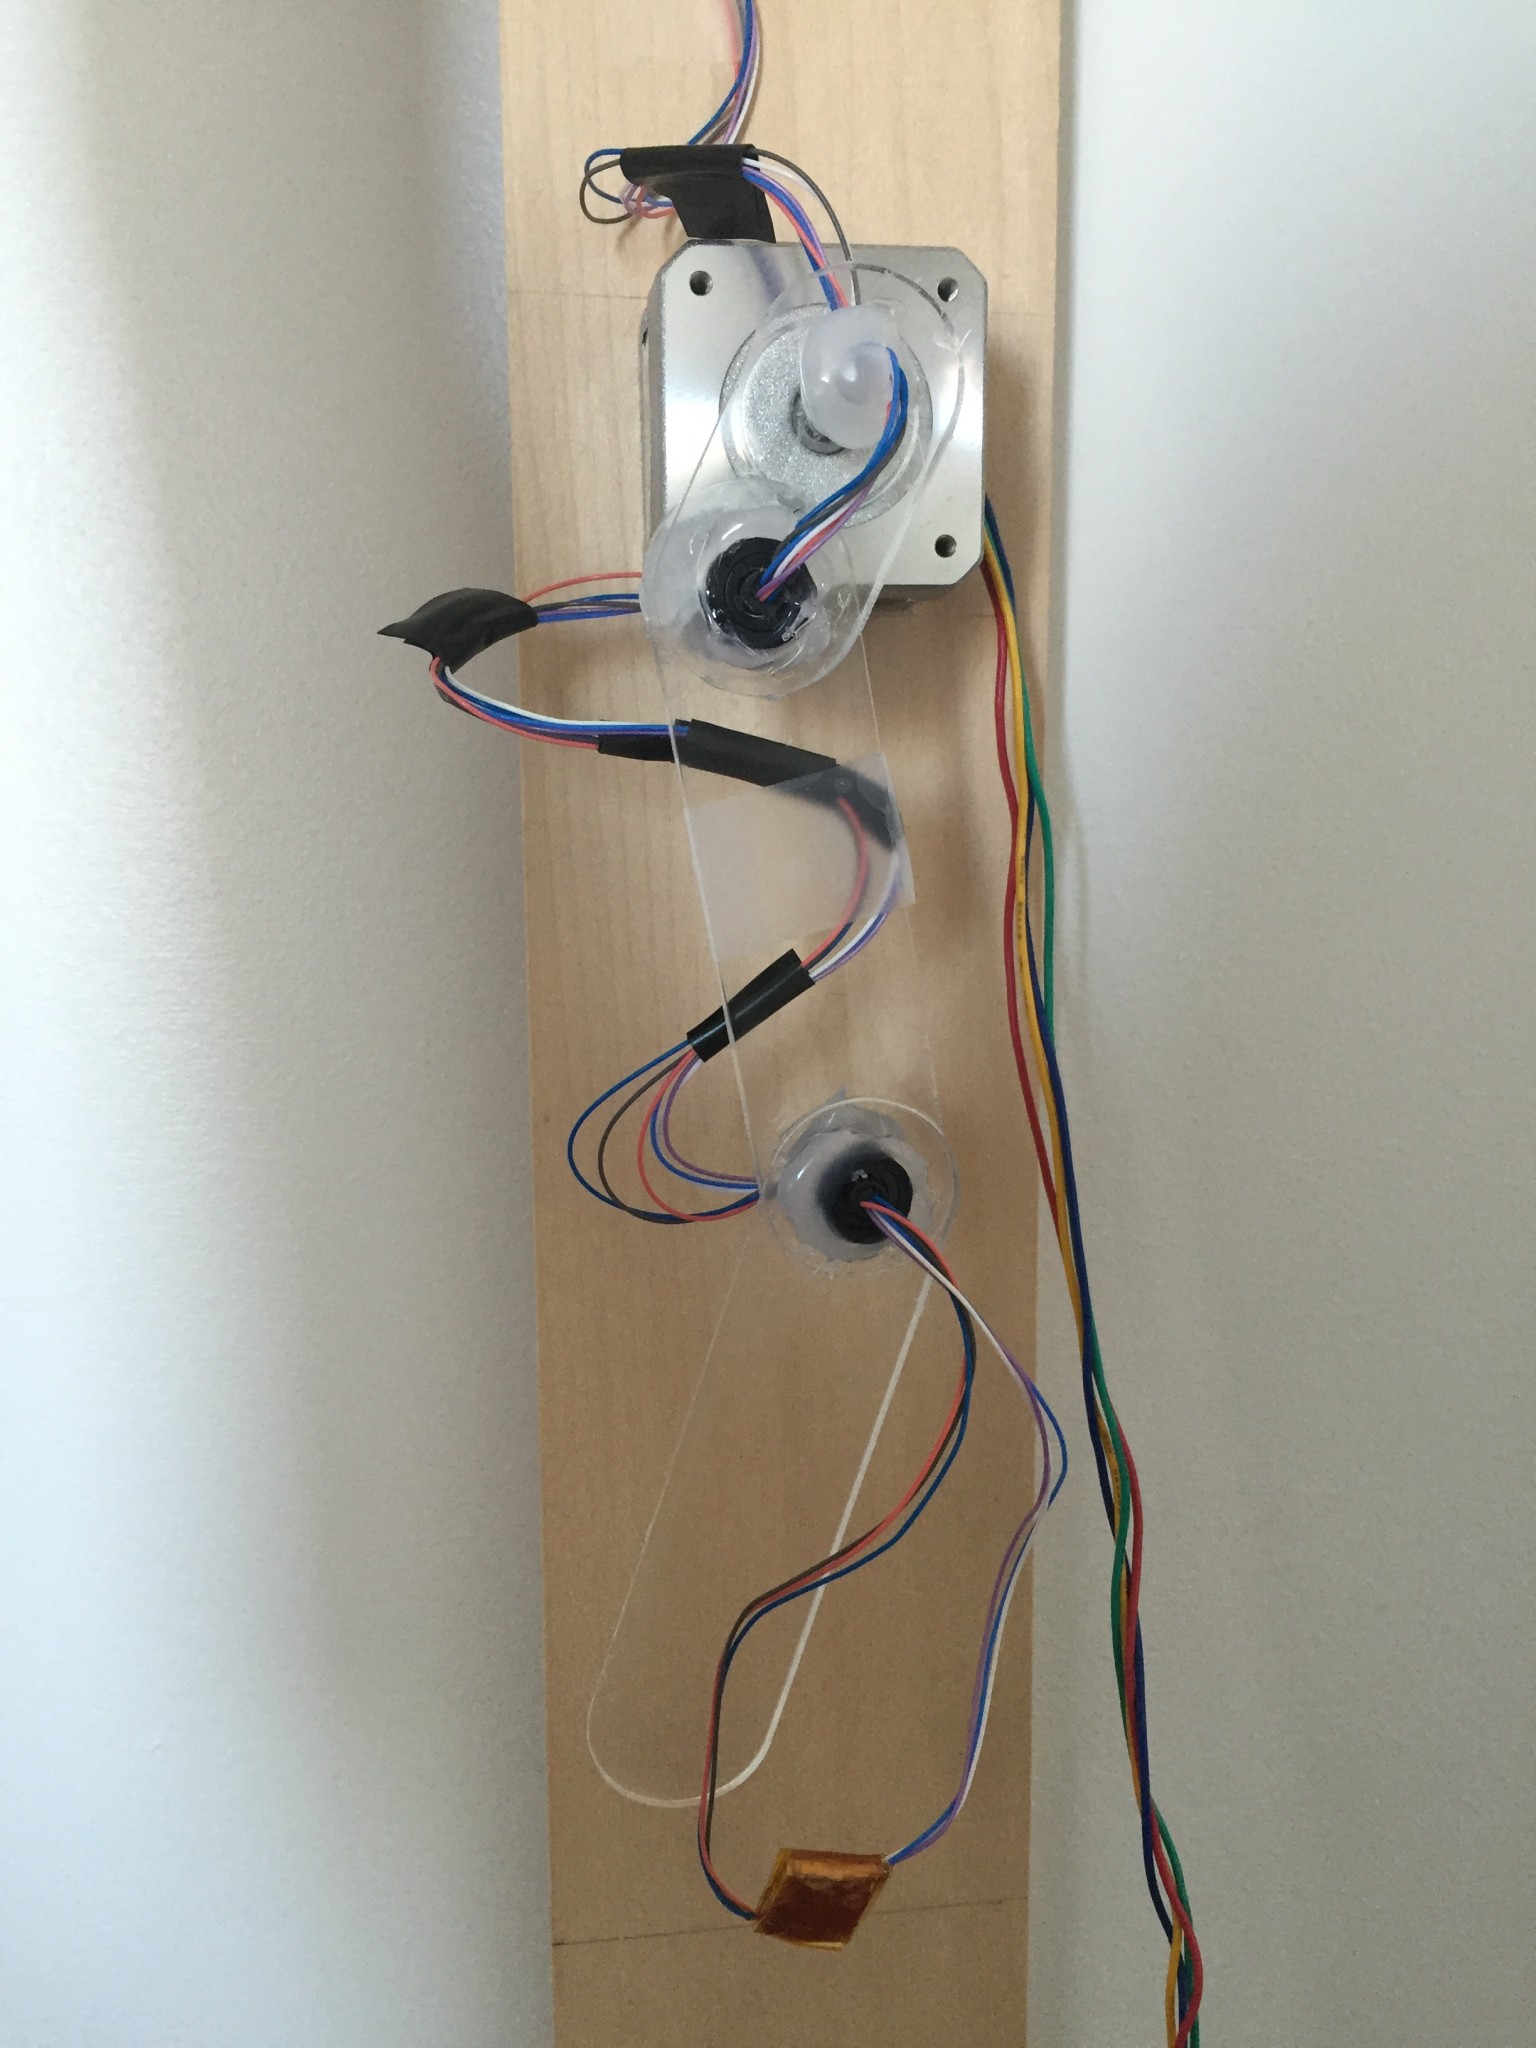
I powered the motor and driver from Sparkfun using a 12V/1A power source since at first I couldn’t seem to find any concrete information about what kind of power source to use with the driver. I laser cut the pieces for the pendulum from plexiglass and used a slip ring and glue gun to hold them together. The slip ring worked great to wire the heating element at the tip of the pendulum while still allowing for it to swing. I only wished the wires were thicker because the thin ones were flimsy and kept breaking, however, soldering three of them together to create one worked relatively well.
The circuit I used for the heating element is the one found off of How To Get What You Want:
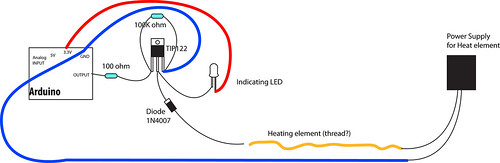
Instead of using the TIP122 transistor though, I used a TIP120 transistor, which according to its spec sheet, can handle up to 60V/5A of power. Throughout working on this project, I used a 9V/1A wall adapter and a 12V/1A wall adapter, and I also briefly tried using a 18V/1.5A battery which I’ll talk more about later. For the heating element, I originally wanted to use flexinol, however it burnt out too easily and its ability to move was a hinder in this case. After some research, I decided to use nichrome wire wrapped between layers of kapton tape for my heating element with much better results.

For the “canvas”, I mixed black thermochromic pigment with acrylic fluid matte medium binder, so that when heat was applied to it, the black would fade to an opaque white. Originally, I wanted to spray it onto a large sheet of plexiglass, however, the paint was too thick to go through the spray paint bottle, so I resorted to dabbing paint blobs onto the surface, which resulted in a interesting texture. 
I then built a frame around the plexiglass to which I would attach the motor with the heating element attached to it.

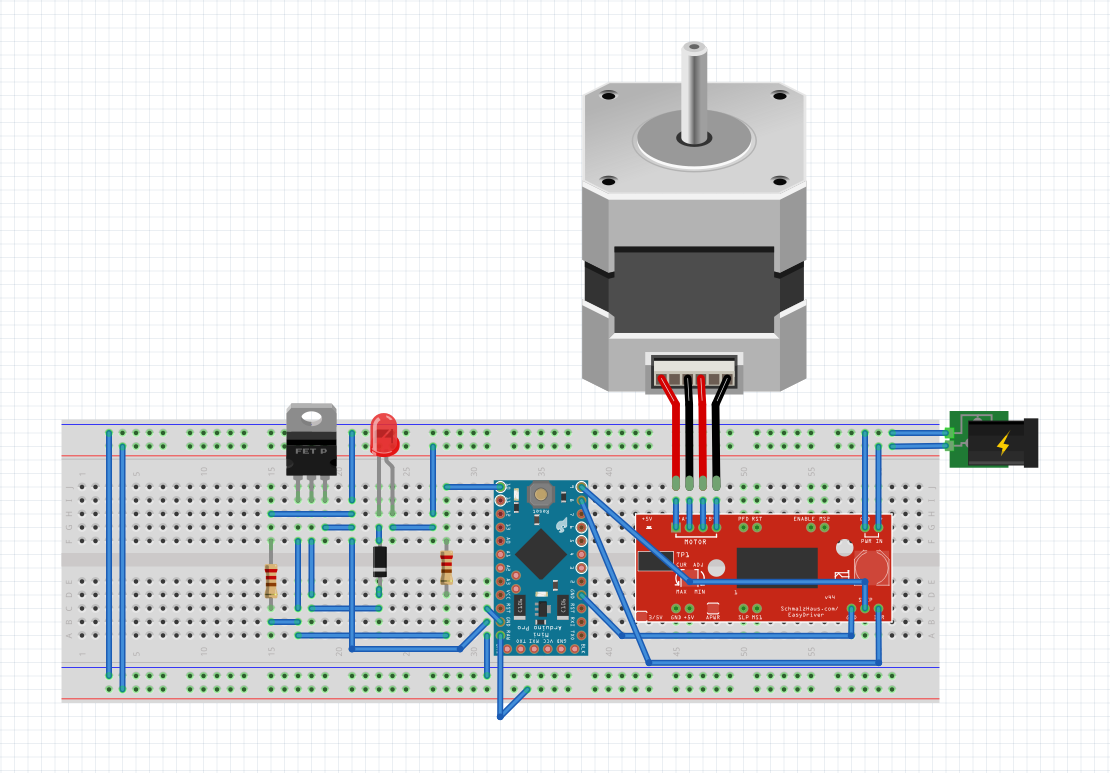
I then soldered the circuits for the motor and heating element together with the Arduino Pro Mini, to run off the same power source (12V/1A). The circuit looked somewhat like this (the heating element is where the red LED is):
The code I was using:
const int DIR = 8;
const int STEP = 9;
const int HEAT = 10;
int distance = 0;
int heatState = LOW;
int stepState = LOW;
unsigned long prevMillisHeat = 0;
unsigned long prevMillisMotor = 0;
unsigned long prevMicrosStep = 0;
unsigned long currentMillis;
unsigned long currentMicros;
long heatInterval = 5000;
long motorInterval = 1;
long stepInterval = 100;
boolean running = true;
void setup() {
pinMode(DIR, OUTPUT);
pinMode(STEP, OUTPUT);
pinMode(HEAT, OUTPUT);
digitalWrite(DIR, LOW);
digitalWrite(STEP, LOW);
}
void loop() {
currentMillis = micros();
heat();
if (currentMillis – prevMillisMotor >= motorInterval) {
prevMillisMotor = currentMillis;
if (running == true) {
motorInterval = 1000;
spin();
Serial.println(distance);
if (distance == 2000) {
if (digitalRead(DIR) == LOW) {
digitalWrite(DIR, HIGH);
} else {
digitalWrite(DIR, LOW);
}
distance = 0;
running = false;
}
} else {
motorInterval = 2000000;
running = true;
Serial.println(“PAUSE ME”);
}
}
}
void spin() {
digitalWrite(STEP, HIGH);
digitalWrite(STEP, LOW);
distance ++;
}
void heat() {
if (currentMillis – prevMillisHeat >= heatInterval) {
prevMillisHeat = currentMillis;
if (heatState == LOW) {
heatInterval = 5000;
heatState = HIGH;
} else {
heatState = LOW;
heatInterval = 100;
}
digitalWrite(HEAT, heatState);
}
}
As a result, my project worked — for a very brief two minutes or so (which was not enough time to grab a camera to document this), before the power source blew. Wondering if it was just a wonky power adapter, I blew two more before I decided that there was something wrong. Exactly what though, I had no idea. Thinking that the 12V/1A adapter was not giving off enough current, I decided to try a 18V/1.5A rechargeable battery which burnt my nichrome wire into smoke and ash as soon as I plugged in the power source. 1.5A with my current circuit was way too much current, and produced way too much heat for the nichrome to handle.
Doing some more investigation, I found that Brian Schmalz (the designer of the driver) wrote:
- M+ : This is the power input to the Easy Driver. Connect this to the positive power supply lead. This should be a 6V to 30V, 2A (or more) power supply that is clean (low ripple).
I have no clue how on earth I missed this! I think because I read the driver can regulate the current to produce 150mA – 700mA, that I thought that 1A would be enough to power the driver. I ended up buying a 12V/2A adapter and prayed it would work.
The problem now, is that 2A would be enough to fry my nichrome, since it’s way more than 1.5A. I had two options: use two power sources, or start thinking a little about physics.
If V = I * R, and E = V * V / R, when I used a 9V/1A power supply, I had roughly 9 watts of power going through the nichrome. For 12V/1A, I had roughly 12W. And 18V/1.5A which caused smoke was roughly 27W. Theoretically if I can keep the W down to ~12W, then I should be able to use 12V/2A. So if I added a 10 ohm resistor to one of the heat lines, that should keep it to roughly 9W of heat going through the nichrome. That’s my theory, but my physics was really, really dusty.
Since I was really short on time, I decided to rewire things to take on two power sources, with this circuit: 
So the motor no longer blew out my adapter, and the nichrome played nice when plugged in separately…. However, when I plugged in both of the power sources at once, the motor wouldn’t spin smoothly, if at all.
At this point, I’m at a loss and not quite sure what’s wrong with my project. So I’m going to accept the fact that some things just weren’t meant to work for the time being and leave it be. I’ll come back to it after some time with a fresh mind and hopefully I’ll figure out what’s wrong.
Instructables: http://www.instructables.com/id/Trace-a-Work-In-Progress
[On Paris]: Honestly, I thought the feedback was alright, but not very useful. It would’ve been great had it come a lot sooner, maybe if we were going back and forth since the beginning of the semester.