Week 5- LED behavior -Albee

< DON’T READ IN DARK>

Since it is always bad to our eyes from reading or using cellphone under not enough light source. Therefore, I use Arduino to create a little device that can remind you the current light situation you are at.

Not enough light- Red.

Moderate light source- Yellow.

Good amount of light- Green.


including Arduino Uno, one photoresistor, and three LEDs


albee_photoresistor_code

Week 6: Capacitance + ATtinys

All code is here.

Sketches include:

  • softwareSerial_ATtiny
  • softwareSerial_LEDs_ATtiny
  • softwareSerial_LEDs_Mapping_ATtiny
  • CapacitiveSensing
    • Arduino
      • CapSense_Arduino_with_LED.
      • HumanCircuit_with_Arduino_LED
    • ATtiny
      • CapSense_ATTiny
      • CapSense_ATTiny_SoftwareSerial
      • CapSense_ATTiny_SoftwareSerial_FadingLEDs
      • Touch_ATtiny_Mellis

https://raw.githubusercontent.com/damellis/attiny/ide-1.6.x-boards-manager/package_damellis_attiny_index.json

Week 5 Homework – Alonso Castro

The prototypes I have prepared are two different ones to represent lamps. One is a mitten or glove for bike riders that will help them see things immediately close to the handlebars in darkness.

The second drawing on the right is a tool for people who enjoy reading in small dark corners.

img_5500


Jed Segovia, Week 5: Ice Cream Sandwich Sensor Homework

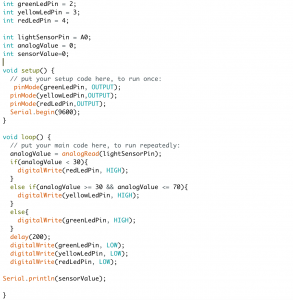
My code for this project.

I wanted to make an easy sensor so I could focus my energy on the Arduino code.

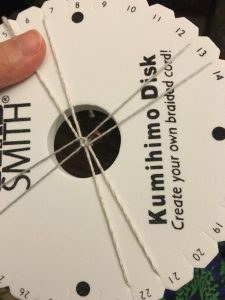
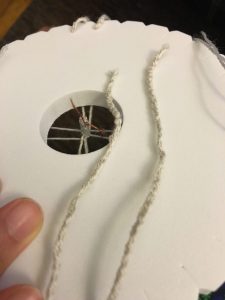
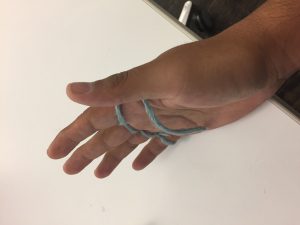
I used the ice cream sandwich swatch example shared by Cat Schmitz. I cut a circle of foam, cut a hole in the middle, and sandwiched it between two velostat sheets. Now I needed lobster clips to complete the circuit.

When I got that working I tried using the sensor instead of a regular button in the typical Arduino Button sketch. I replaced the button with two lead wires, and lobster clipped them with my button. It didn’t work. I was dismayed because it looked like my sensor button wouldn’t work. I also realized the Arduino cable was broken, and not detecting my port. Another setback. I left to buy two Arduino USB cables at Tinkersphere in 5th Street, and I spent an hour doing that.

It wasn’t until I reviewed the previous week’s slides did I realize that there was a sketch called “ReadingSensorValues.” I couldn’t find it in the Arduino examples, and was at a loss, until my classmate Audrey pointed out there was a link to our instructor’s Github right under the slideshow. Thankfully Audrey pointed it out. I ran the sensor homework and voila, I got the sensor to produce a range of brightness in my LED.

Using this template, I would now scale it up to three LEDs. First, I scaled it to two.

Scaling it up to two, I wanted to activate the first LED immediately, and activate the second LED only after pressing down the button for a certain time.

I struggled to use an If/Then code, so I went with While, which is certainly interesting. My first successful attempt was turning on the white LED right away, and when the sensor is pressed, the blue LED lights up. When the blue LED’s value goes beyond 150, the white LED turns off.

I finally got three LEDs to work with if-then statements. The circuit is based on how much pressure is delivered on my button. The blue LED lights up first. When the blue LED value goes beyond 110, the white LED lights up. As long as I am pressing hard on the sensor, the values of both the blue and white LEDs go up. When the white LED value goes beyond 140, the yellow LED lights up.

Lovely. Seeing the LEDs light up with a range of brightness is exciting. Plenty of potential applications to many projects.

Now to see if I can synthesize this into my Internet of Things homework.

Assignment 4 – Learning a craft “Kumihimo” _Albee Kang

I am an integrated designer. I worked in the field of fashion and visual design before. I identify myself as 50% a designer, 25%observer, and 25%explorer. Being as an explorer and observer, I like to look up things that are unusual or unfamiliar to me, and trying to look for some logic and pattern that I can keep in my storage (which is my brand). Now I am a learner and trying to be a coder.

My favorite tool really depends on what kind of style or scenario that I want to illustrate, but I like to sew (machine and hand), and making a collage with paper and scissors to create a moldboard or storyboard.

This week I learn this Japanese craft call “Kumihimo”. It is a technique of braiding by this Kumihimo board. It is a simple action, but you can get a well-structured sting that people commonly use for a bracelet or some other accessories.

( I  suggest learning this with text tutorial is much easier than those watching video one! )

img_4042  img_4041

(photo online: a bracelet using wider thread)


Week 5 Assignment

1) Choose a control structure to change LED behavior. Construct a circuit with one sensor and 3 LEDs. Turn the LEDs on and off in sequence as the values you get increase using one of the control structures below and the functions we discussed in class (map and constrain – you can also try playing with smoothing and calibration). Post your code and any challenges or insights you discovered.

  • if/then
  • Case switch
  • while()
  • (Interrupts if you’re feeling fancy)

2) For your midterm

  • Paper prototypes for feedback (Focus on role or look+feel)
  • Concept and design goal (What does your design seek to accomplish? Who are you  designing for?
  • Materials list (What do you need to build your design)
  • Prior art and precedents that inspired your design and direction.

Week 4. Assignment_Paper craft_Misung

Designer, Educator

I am a graphic/UX designer, and eager to design user-friendly, easy-to-access. I enjoy teaching what I’ve got and interacting with students, so during my undergrad, I achieved the official teacher’s license. I was an instructor at design hight school in Korea, and from there I tried to introduce and make them use various material. Since then, I’m interested in creating education tools.

Learner/Researcher

I usually try to get inspirations from anyplace, anything, anyone by walking around the city. (Especially, listening to what people say, observing their behaviors, habits and trying to catch their needs, habitual patterns)I also like to learn/research new skills in order to broaden my design spectrum. (So exicited about learning Aruduino!!)

Craftperson

Love making things by hands! any materials are welcome. (Maybe I enjoy making tangible things rather than screen-based designs)

Favorite Tool

is paper, pen, cutter, 401bond. It’s enough to create prototypes, and final works as well. It’s the most accessible, easy to handle for me than other materials. I also like knitting. I usually weave my warmers in winter: but just a warmer.

img_1370 img_1413

For this week assignment, I used paper-engineering. Basically each part is twisted against each other to be able to be elastically stretched out and flat as well.

img_1378 img_1399 img_1383

img_1414

At first, I start making it with delight, and after several trials, failures, I noticed there was a paper size issue. If somebody want to try this, I’d recommend to keep the alignment when folding it and use a bit harder paper otherwise, it’ll be crumpled. I also tried it with a paper writings on it, and found if there are too many patterns, they distract the lines to make you hard to see.

I refered to this tutorial.


Link

I learned a new Craft

I identify myself as a Interactive Designer, Maker & Creative Technologist who aims to create solutions for society both in Peru and the US using my own personal identity, and cultural and professional backgrounds. All are sources for inspiration for my DT projects and the NYC creative and technology communities.

My favorite tool is always my notebook, pen/pencil and a sketchbook too because its always good to write down ideas in many different ways (mind maps, drawing, reading, etc) to get organized and perhaps see things that have been ignored. Thais is how I always start. Sometimes I replace the previously mentioned tools with a whiteboard and a few markers.

Finger knitting was one of the hardest things I have tried to learn this year. At first it was frustrating because the different tutorial videos made it look easy. I got to a point where I decided to shut down my computer and turn the music on. I found that it was very methodic and fun. My advice for whoever wants to start finger knitting would be trying with with different materials and thicknesses. Some good examples I saw used old t-shirts cut into long strips, very thick yarn, elastic fabric.

img_5473-2img_5471-2

img_5472-2

img_5477-2


img_5474-2

The following is the tutorial I watched to learn how to finger knit.

screen-shot-2016-09-26-at-7-07-59-pm screen-shot-2016-09-26-at-7-07-08-pm screen-shot-2016-09-26-at-7-06-31-pm

http://pinetothepacific.blogspot.com/2011/12/make-your-own-finger-knit-scarf.html