I used the linear trained version, but I realized it would be better to use spiral one to create the more active and realistic effect. Next time, I’d like to train by myself or get a trained wire having different movement pattern.
I controlled the amount of heat through Arduino so that the wire was not able to be burnt.
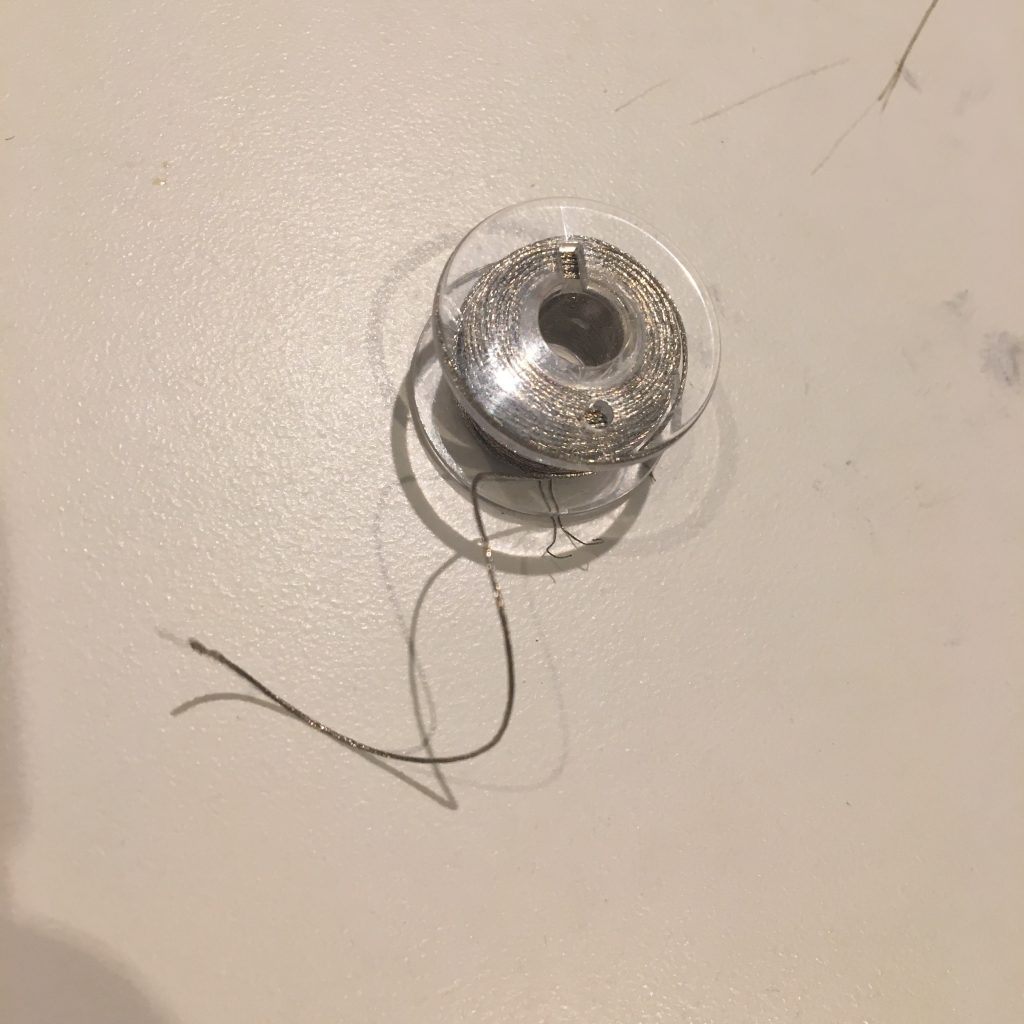
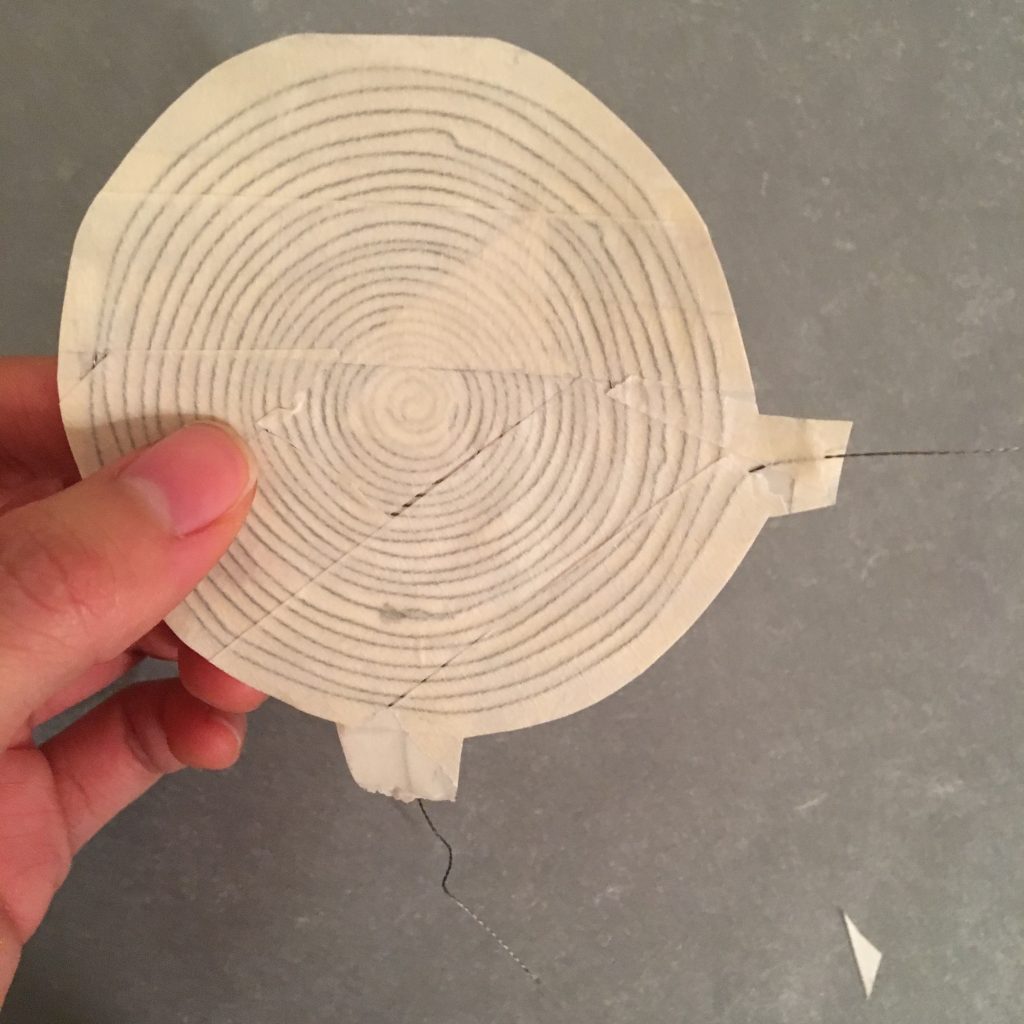
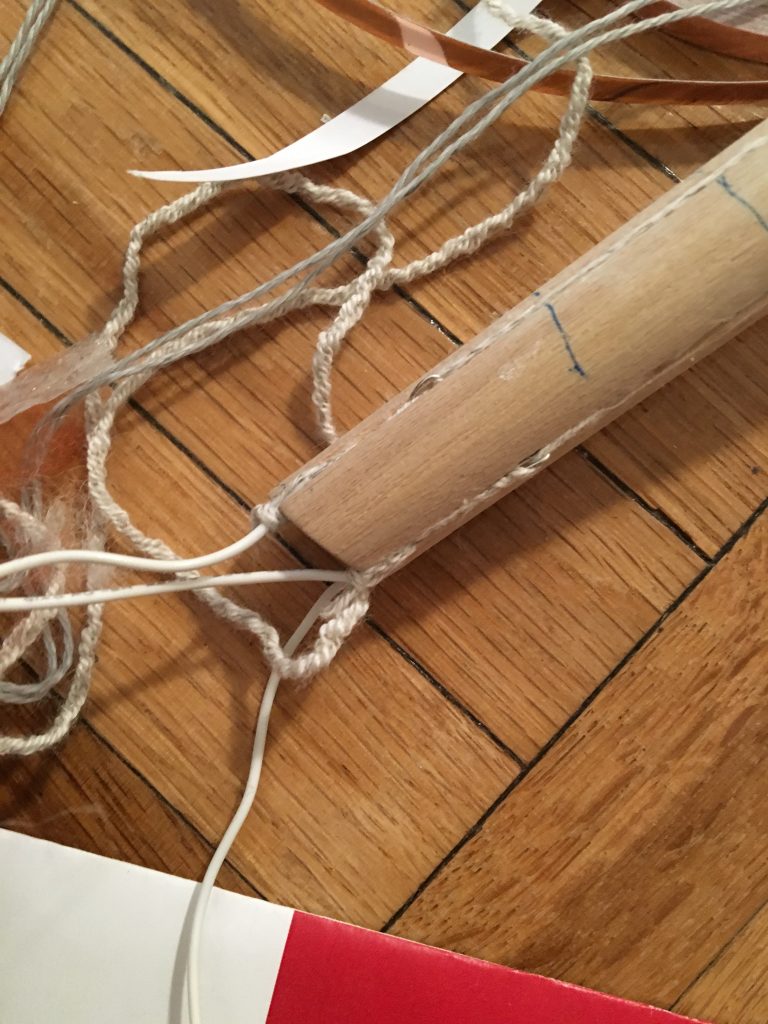
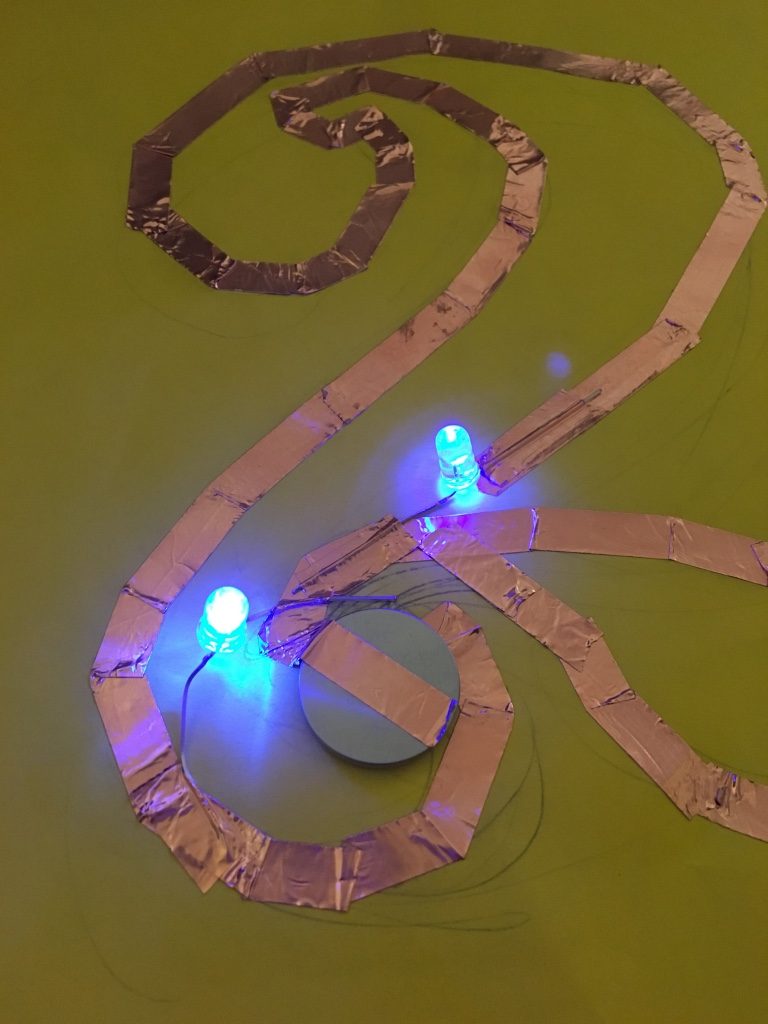
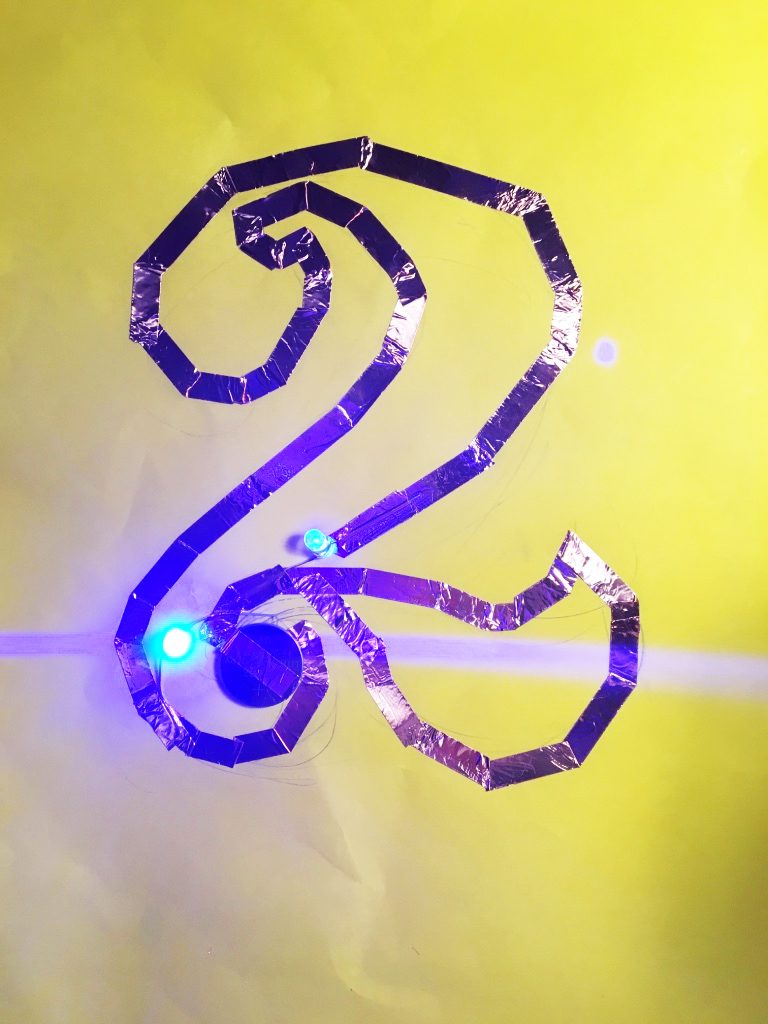
I tried several times by sewing and attaching conductive thread on a paper in a spiral shape and I found that it is important to not only keep the closest distance between each gap but using the conductive silver thread that Liza gave us to get a quality sound.
Moreover, I knew that if I use thick paper or fabric, it hinders the sound waves to vibrate easily.
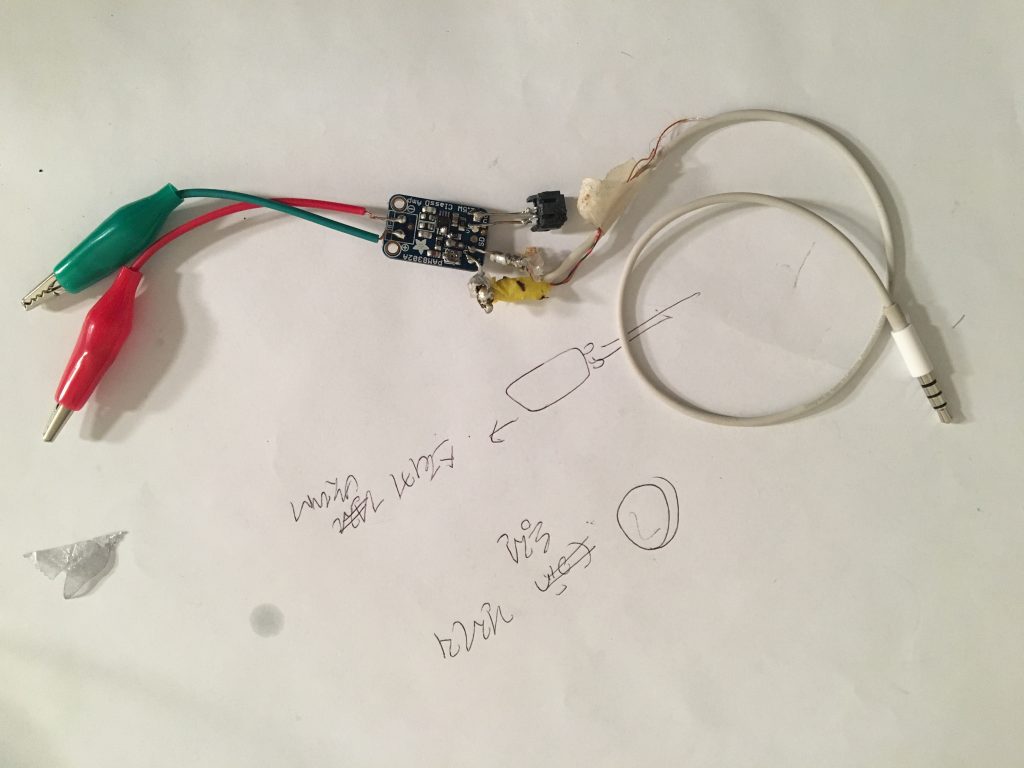
Soldering two elegator clips, lithium Ion Polymer Battery, and two sides of audio cable! it was quite challeging because of having very small room for soldering.
[Connect the amplifier to paper speaker and play the music by using magnets]
Plugin the audio cable to my phone and after hitting play button, I could listen to it by swaying the magnets above the paper speaker (or I could just attach the magnet on it).
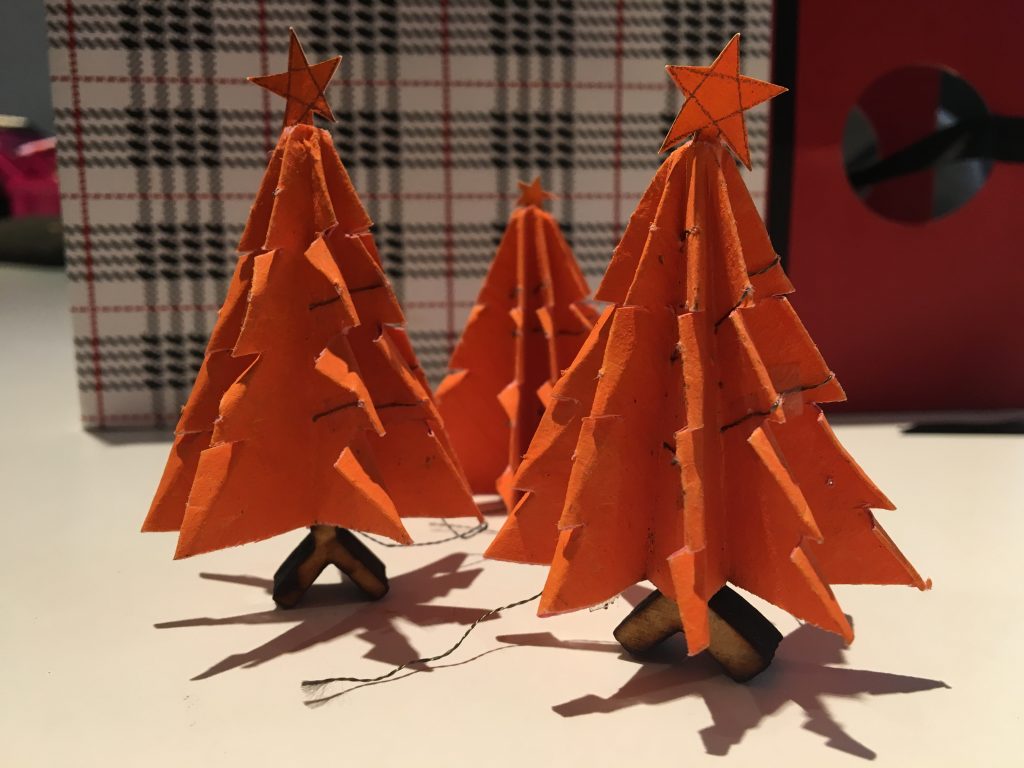
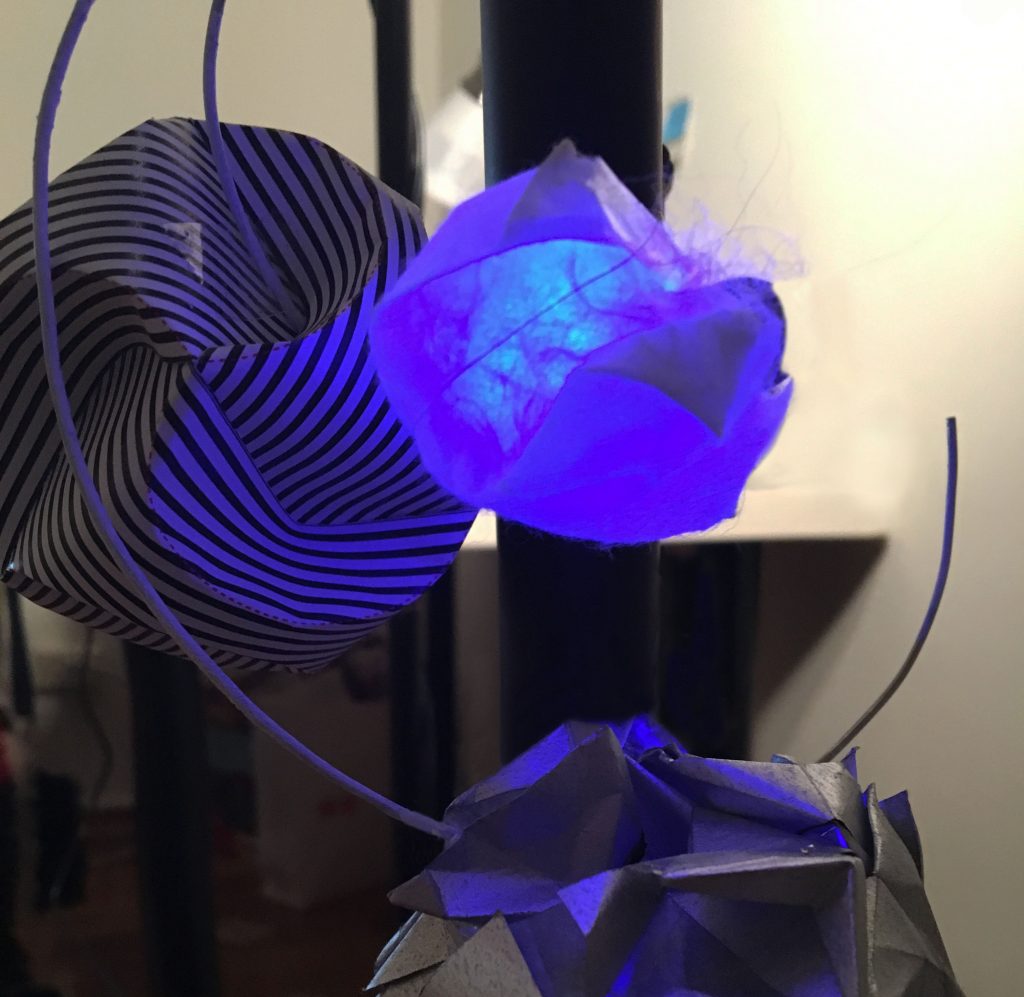
Snowy mobile speaker is an interactive speaker that I created it as my personal expression to get away from mundane Christmas day and enjoy it with.
Since I crafted this by folding origami and running basic led Arduino code, beginners or elementary after school STEAM club are also manage to create it and have fun together if they have materials.
Precedents
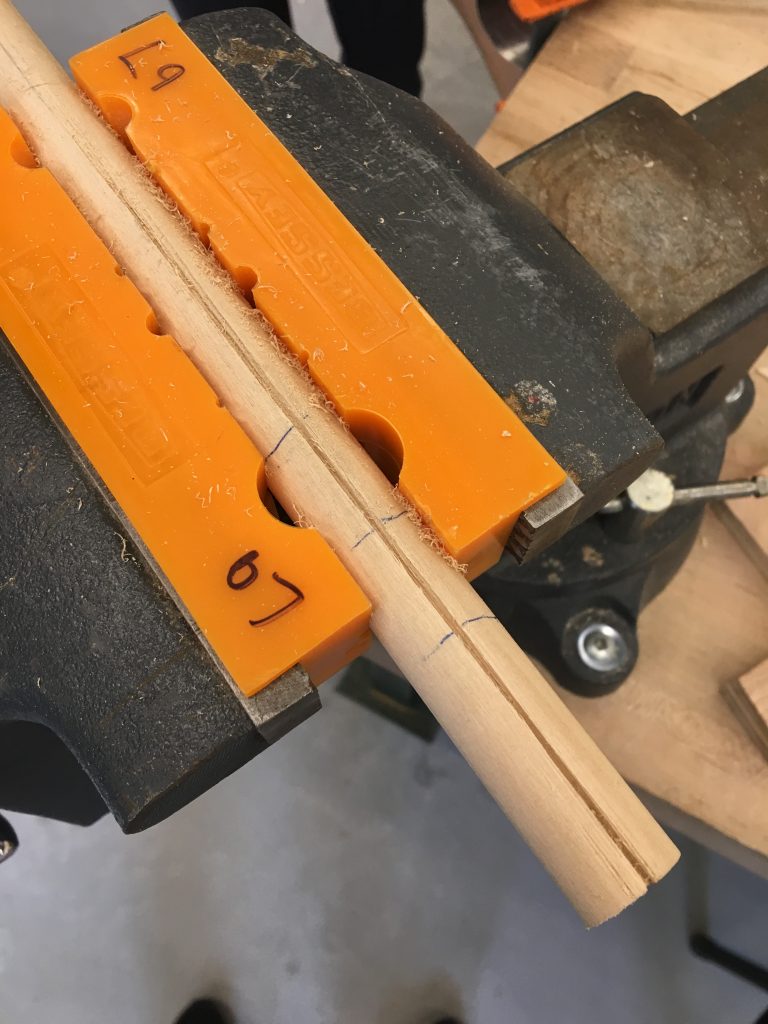
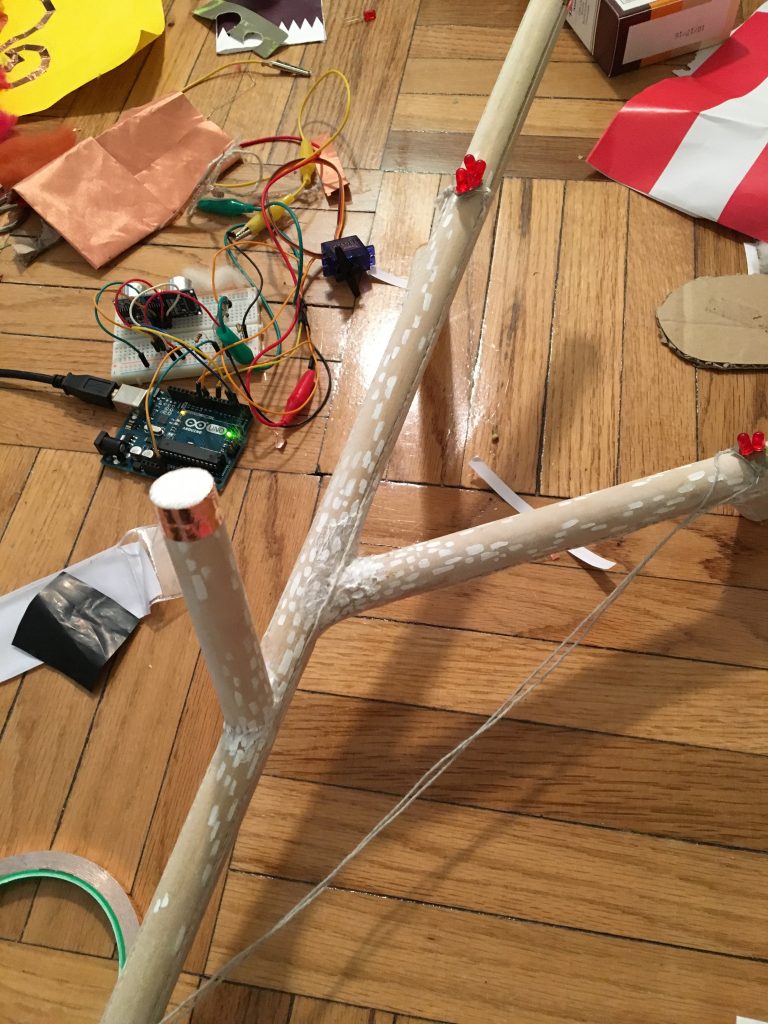
For referring to snowflakes origami, I researched three dimensional origami, and in terms of making the frame, Alexander Calder’s mobile was the ideal precedent for my project.
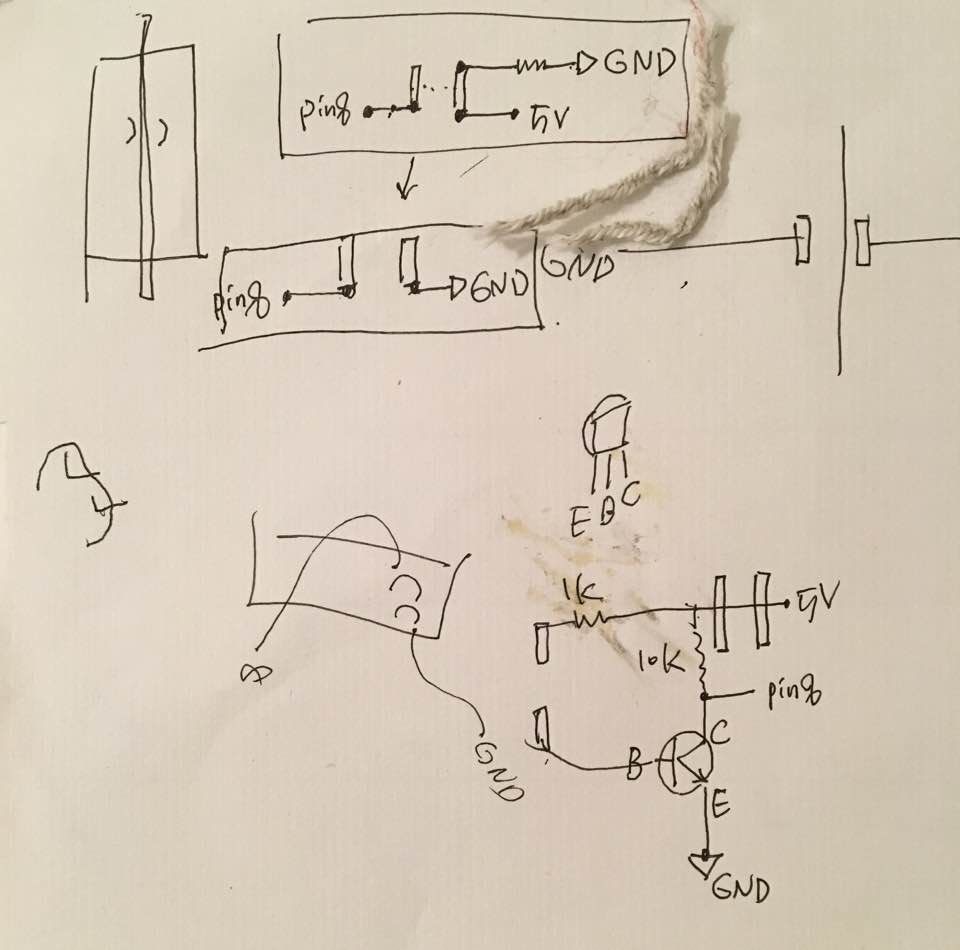
Based on his mobile mechanism, I drew my own drawing and make frames with wires.
In order to make it more like snowflakes and looks active, I used trained Flexinol and white and silver colored papers.
Challenges
First of all, I had a difficulty in making an amplifier circuit. I tried several kinds of conductive threads and attach on one of the biggest origami but it is smaller than I expected so for future iteration, I will try to embed all things like Arduino and speaker and other circuits in origami.
What I learned from this project
I learned how to link Flexino to Arduino and how to use it not only technically but in design wise. I also found which thread works better than others to make quality sounds.
For future iteration, I’d like to use sprial trained muscle wires to move them up and down naturally. Also I will embed all circuits and Arduino in the orgami and make more snowflakes as if it looks snowing.
Feedback from class
It can be applied to express corals
Because of the display which I left the hole only for the project, it looks like a holiday window and makes the project precious.
Even if the last leaf falls
I made a tree with a leaf, and attached flower origamis as a metaphor for a hope. Even if the last leaf falls, there are still flowers which never fall even with bright lights on
‘Never give up, I will pray for you, grandma.’
If I can go back to the certain moment, I definitely would like to return to just before my grandmother had conscious when she was alive.
I missed the chance to say goodbye to her, and I couldn’t endure the despair not telling her anything. I should have given hope to her and had a lot of conversations with her.
Whenever I remind the regretful moment, I conjure up the novel ‘The last leaf’.
This story is about giving a hope by drawing a leaf which deceives a person to think it real, on the wall to a person coming down with pneumonia, and being close to death.
Referring to this story, I made a tree with a leaf, and attached flower origamis as a metaphor for a hope. Even if the leaf falls, there are still flowers which never fall even with bright lights on.
To show the respect to my grandma and my sincere pray for her, I displayed the lights fade in and out smoothly.
AUDIENCE
I created the lamp for my lovely grandmother who is not here anymore.
DESIGNED INTERACTION
When the last leaf falls, the lights inside the flowers will turn on, otherwise, they will stay off. I intentionally made flower origamis instead using real flowers to show something immortal, and forever in order to give a hope to my grandma.
I used the arduino to generate natural fade in/out effects right after the leaf fell off the tree in order to not giving her any chance to notice that the leaf’s falling.
Prior art and precedents that inspired your design and direction
I got an inspiration from the novel ‘The last leaf’ by O. Henry published in 1907.
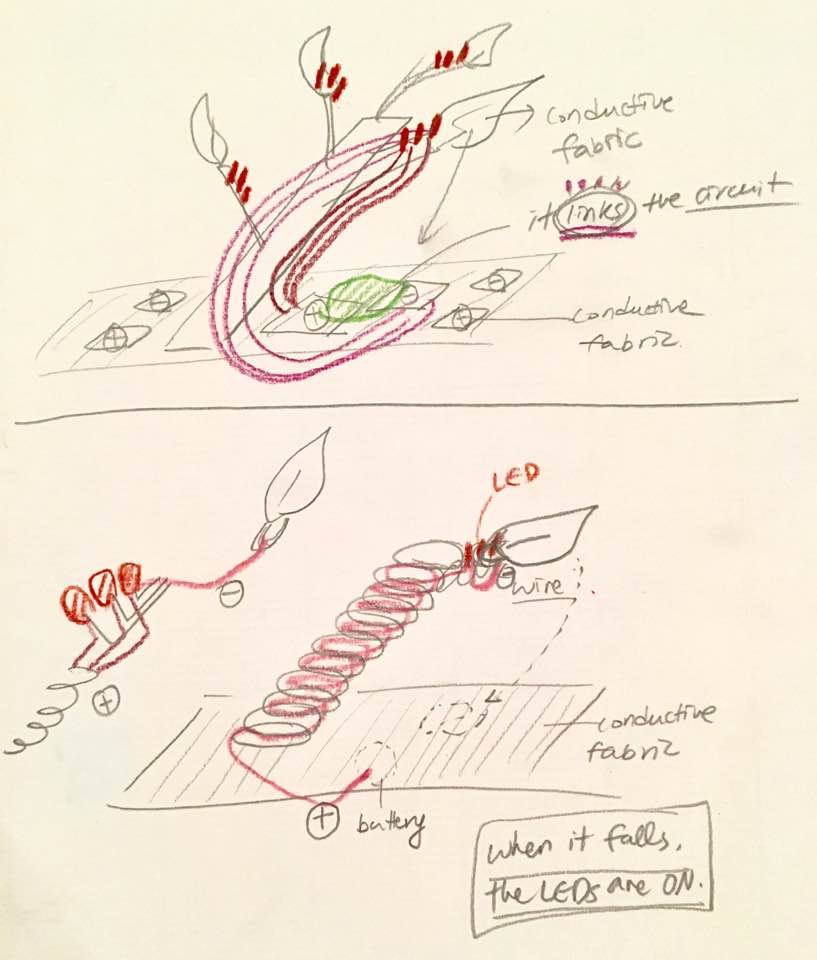
SKETCH 1
My initial design were two directions, but the basic principles are the same. First option was putting the conductive fabric on the floor with a battery beneath it which is linked with (+)side of LED. When the leaf which is connected to the LEDs’ (-), touches(falls) the fabric, the circuit is completed. The other was lying both (+), (—) patches which are linked to the LEDs on the floor, and then when the leaf(switch) falls on both(+,—) surfaces, the circuit is closed, and the lights turn on.
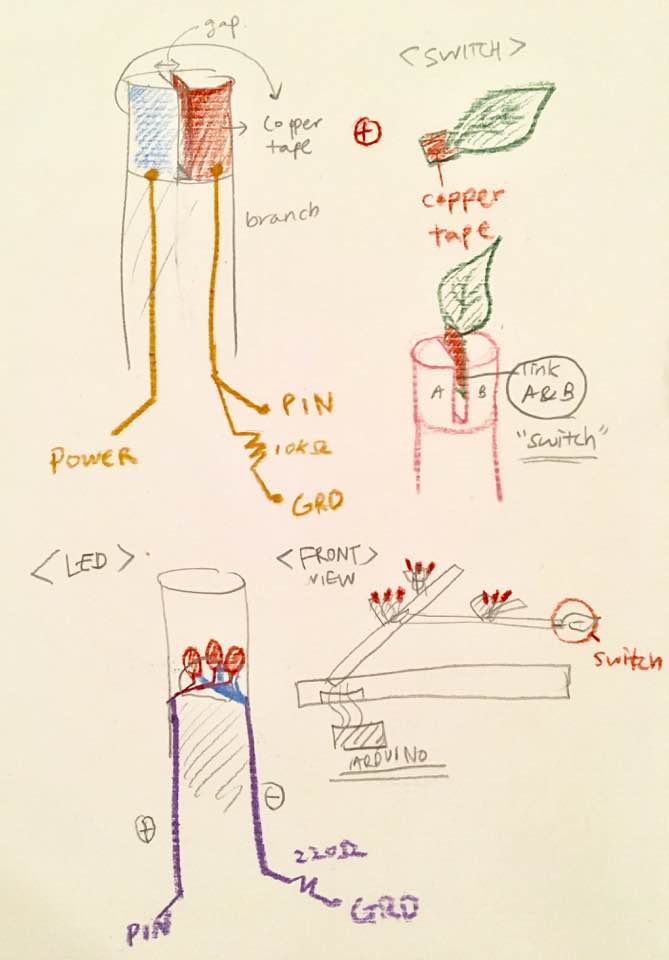
FINAL SKETCH / CIRCUIT
Design Process
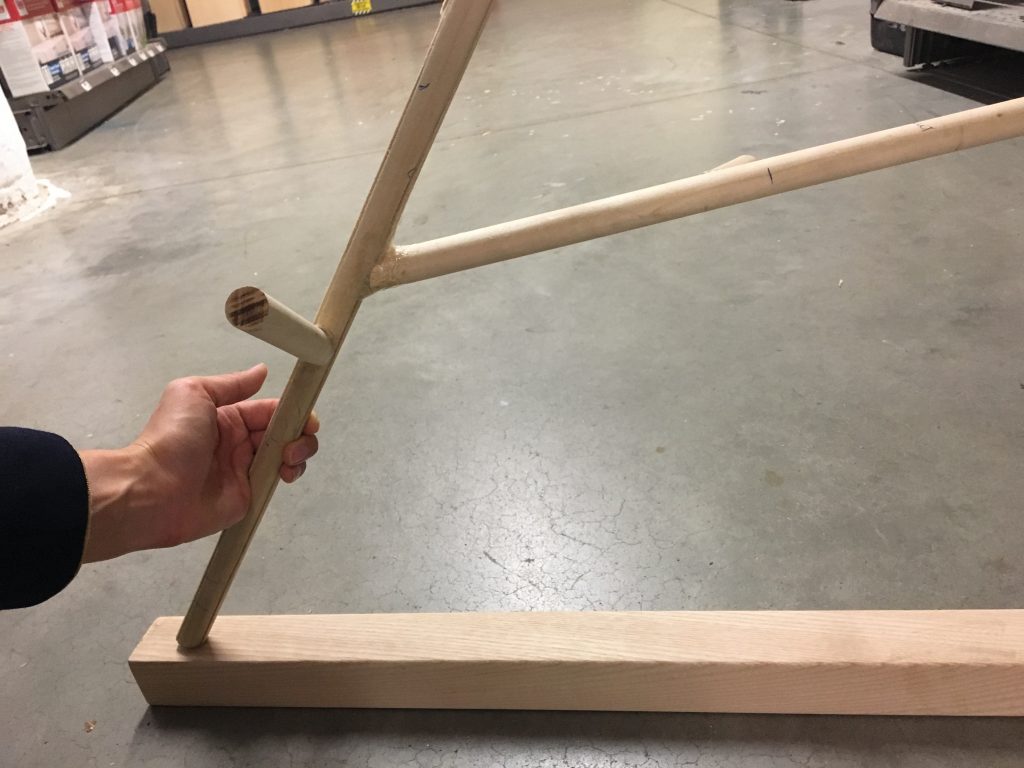
1. Made a structure of the tree by woodcraft
2. Cut the middle of the top of the branch to divide into two in order to construct a part of a ‘switch’.
3. Put a copper tape on the each inside of the separated parts.
4. Made another part of a switch which link the two divided circuits (On/Off)
5. Made flower origamis
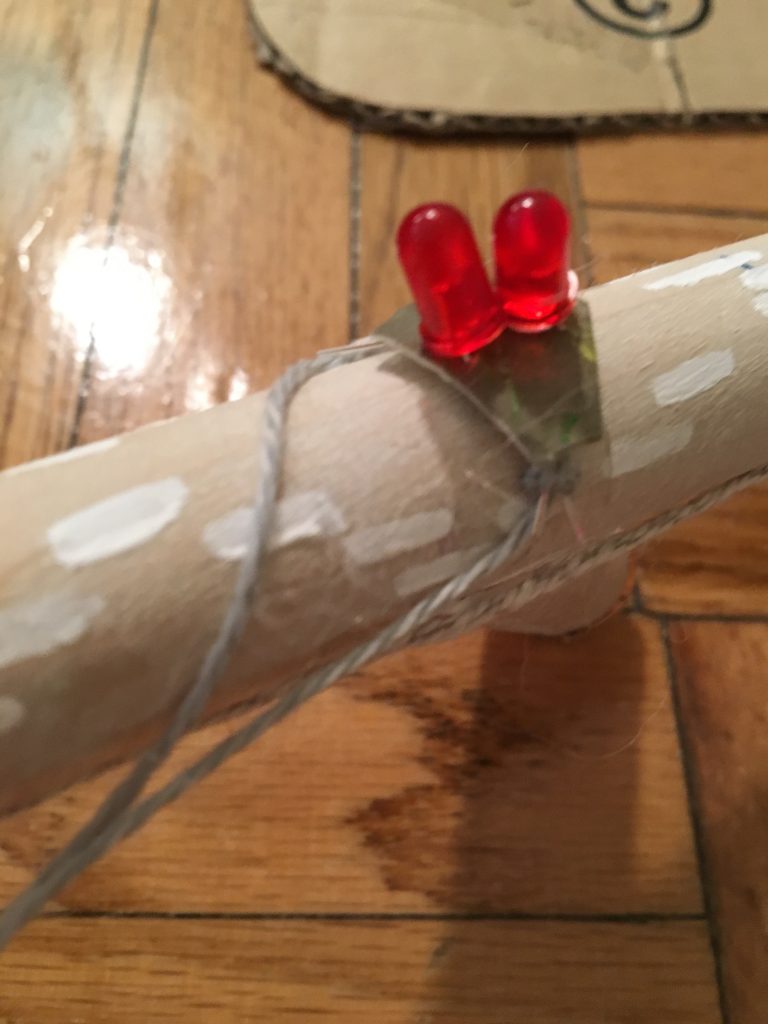
6. Installed the LEDs (Parallel circuit) liked with conductive threads, some resistors.
7. Chiseled the hole to link the wires to the arduino (LED fade in/out)
I chiseled to create a gap to disconnect the circuit, and linked each side to power & ground with conductive threads.
Codes
int button = 8;
const int ledOne = 9;
const int ledTwo = 10;
const int ledThree = 11;
int fadeAmount = 2;
int brightness = 0;
LED / Sensor
I made an ‘if/else’ statement with setting different values of the brightness of the LED(green/red/blue) depending on the sensor pressure.
Midterm Plan:
Concept and design goal
Before the last leaf falls
‘Never give up, I will pray for you, grandma.’
Whenever I remind the regretful moment, I conjure up the novel ‘Last leaf’.
This story is about giving a hope by drawing a leaf which deceives a person to think it real, on the wall to a person coming down with pneumonia, and being close to death.
Referring to this story, I will make a tree with a leaf, and attach flower origamis as a metaphor for a hope. Even if the leaf falls, there are still flowers which never fall even with bright lights on.
Design Process
1. Make a structure of the tree by woodcraft
2. Cut the middle of the top of the branch to divide into two in order to construct a part of a ‘switch’.
3. Putting a copper tape on the each inside of the separated parts.
4. Make another part of a switch which link the two divided circuits (On/Off)
5. Make flower origamis
6. Install the LEDs (Parallel circuit) liked with conductive threads
7. Link to the arduino (LED fade in/out)
Materials
Wood
Copper tapes
8 LEDs
paper
Conductive threadsNeedle
Arduino
Prior art and precedents that inspired your design and direction
The novel ‘Last leaf’
I am a graphic/UX designer, and eager to design user-friendly, easy-to-access. I enjoy teaching what I’ve got and interacting with students, so during my undergrad, I achieved the official teacher’s license. I was an instructor at design hight school in Korea, and from there I tried to introduce and make them use various material. Since then, I’m interested in creating education tools.
Learner/Researcher
I usually try to get inspirations from anyplace, anything, anyone by walking around the city. (Especially, listening to what people say, observing their behaviors, habits and trying to catch their needs, habitual patterns)I also like to learn/research new skills in order to broaden my design spectrum. (So exicited about learning Aruduino!!)
Craftperson
Love making things by hands! any materials are welcome. (Maybe I enjoy making tangible things rather than screen-based designs)
Favorite Tool
is paper, pen, cutter, 401bond. It’s enough to create prototypes, and final works as well. It’s the most accessible, easy to handle for me than other materials. I also like knitting. I usually weave my warmers in winter: but just a warmer.
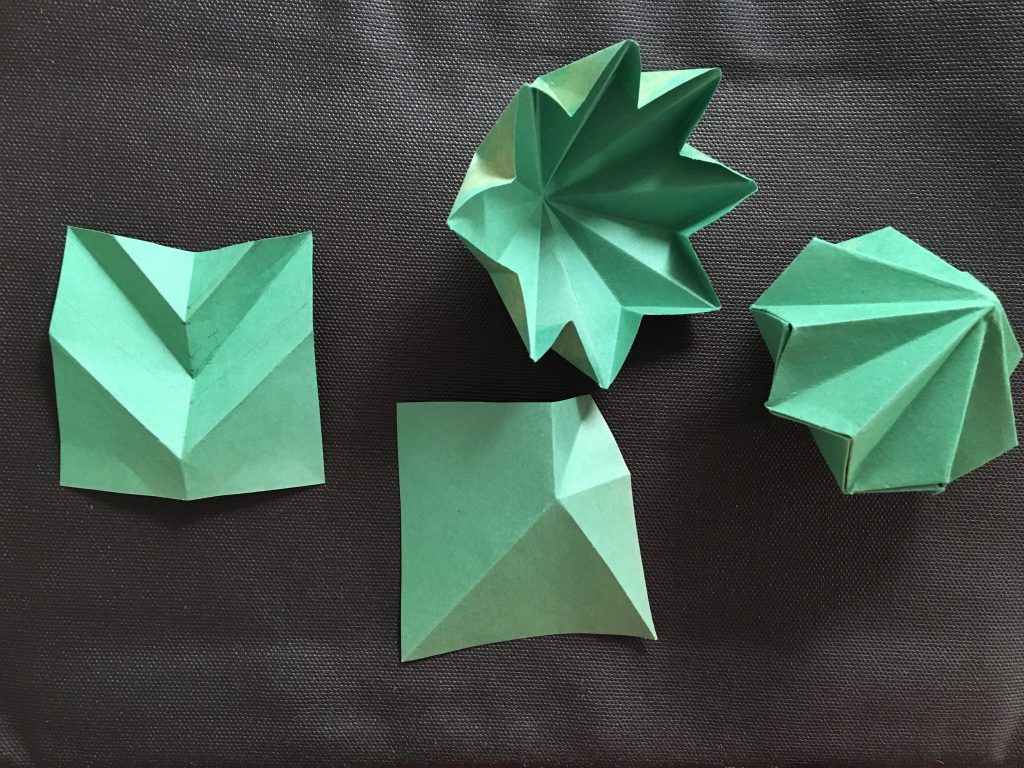
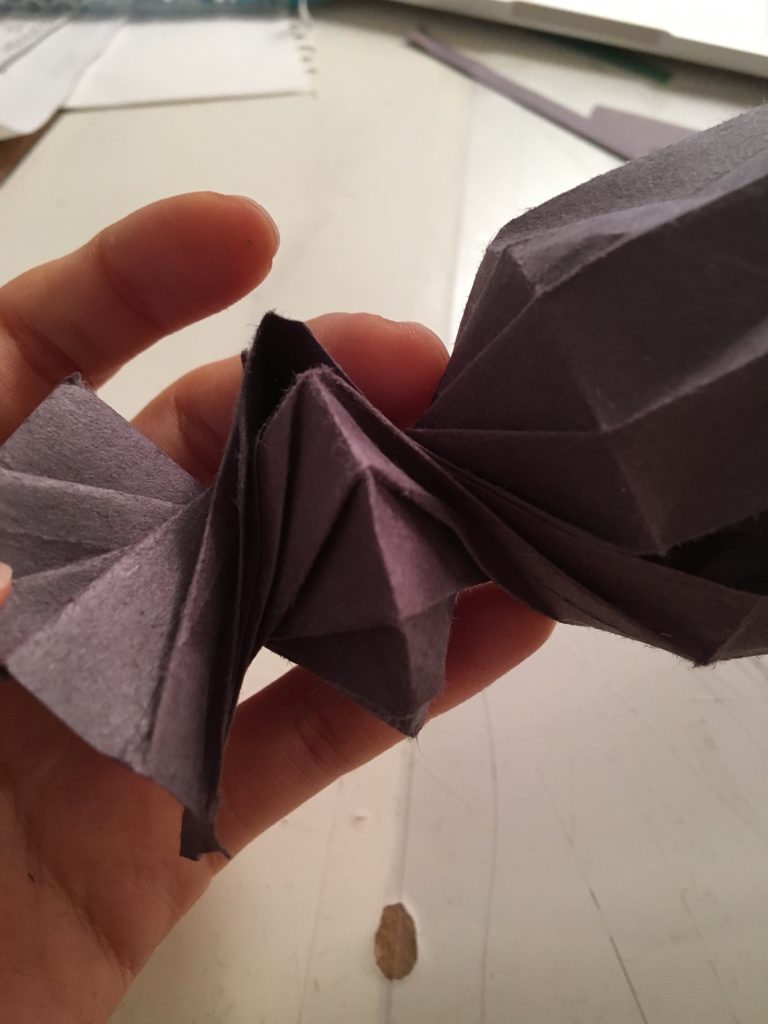
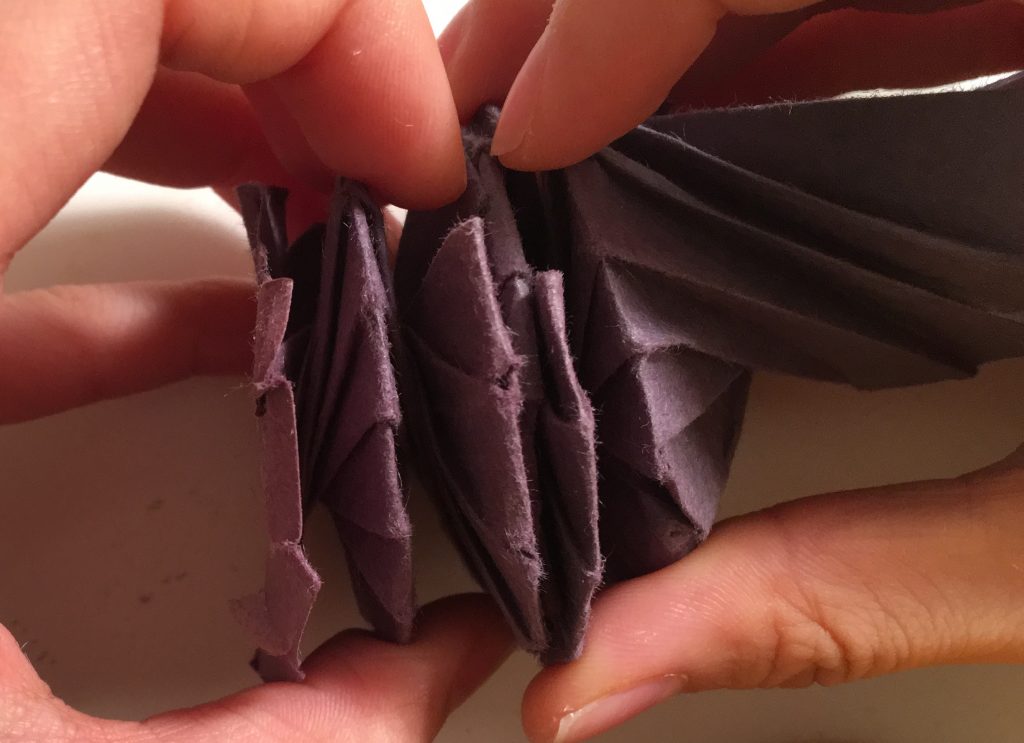
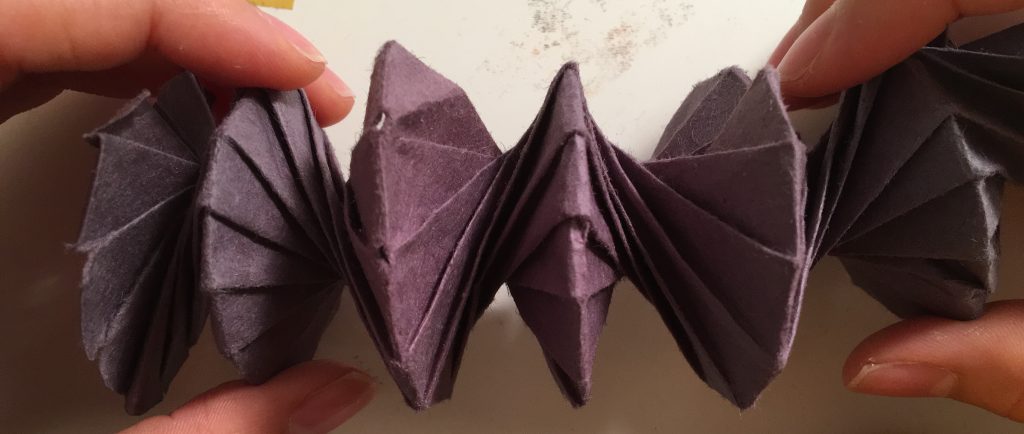
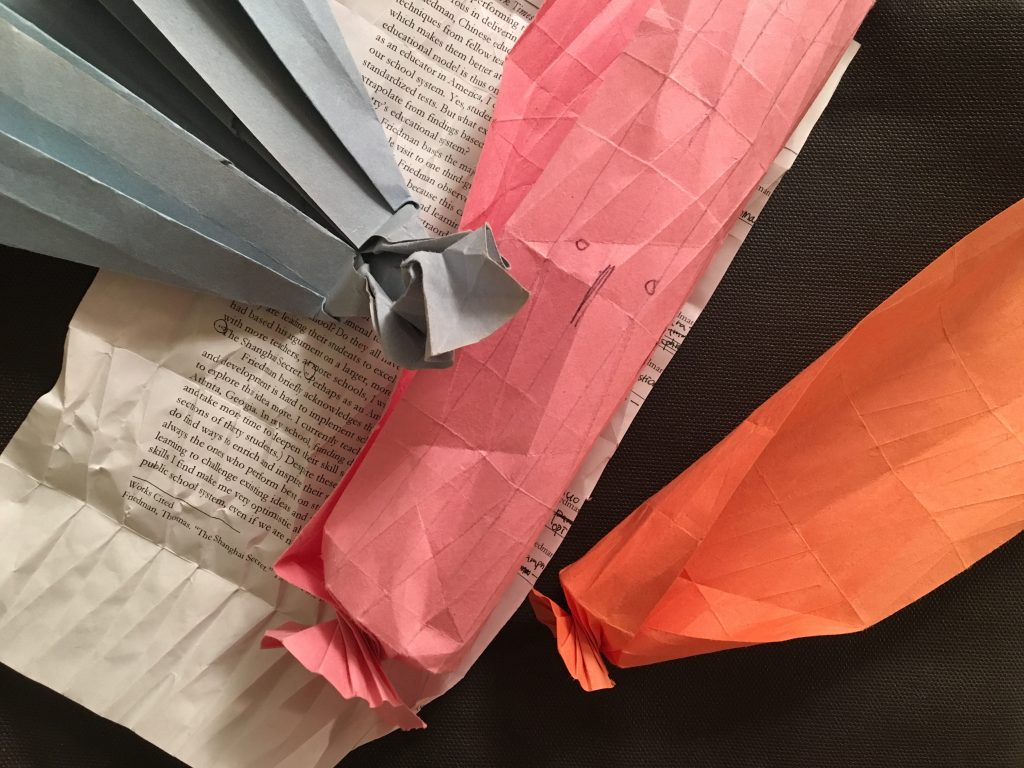
For this week assignment, I used paper-engineering. Basically each part is twisted against each other to be able to be elastically stretched out and flat as well.
At first, I start making it with delight, and after several trials, failures, I noticed there was a paper size issue. If somebody want to try this, I’d recommend to keep the alignment when folding it and use a bit harder paper otherwise, it’ll be crumpled. I also tried it with a paper writings on it, and found if there are too many patterns, they distract the lines to make you hard to see.
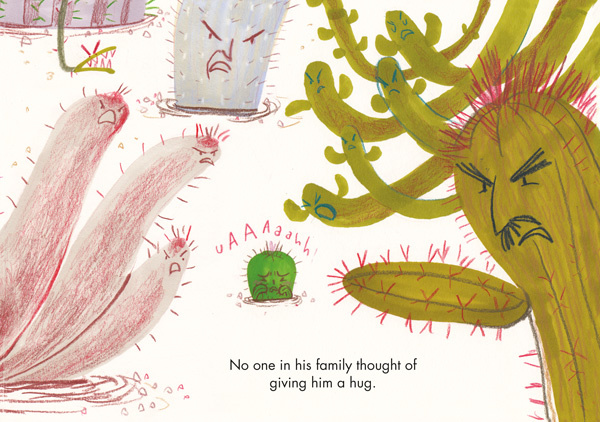
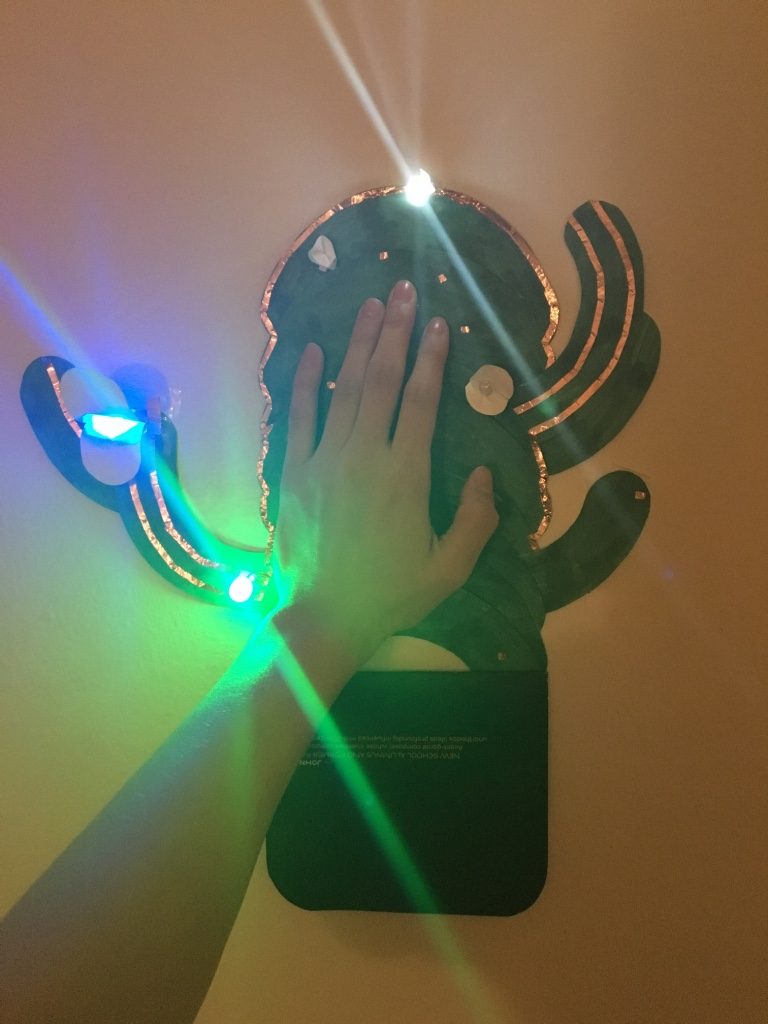
‘No one in his family thought of giving him a hug.’
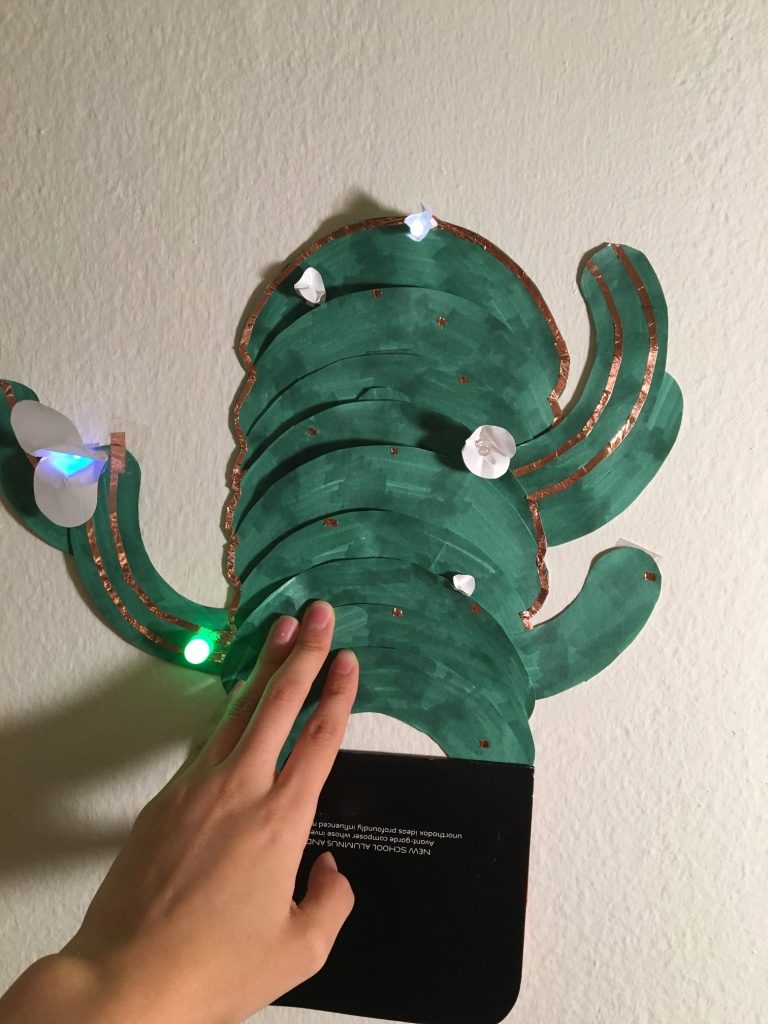
I chose a sentence from ‘Hug me’ by Simona Ciraolo.
It’s the story of the universal need for affection and friendship. I decided to give him a hug(touch).
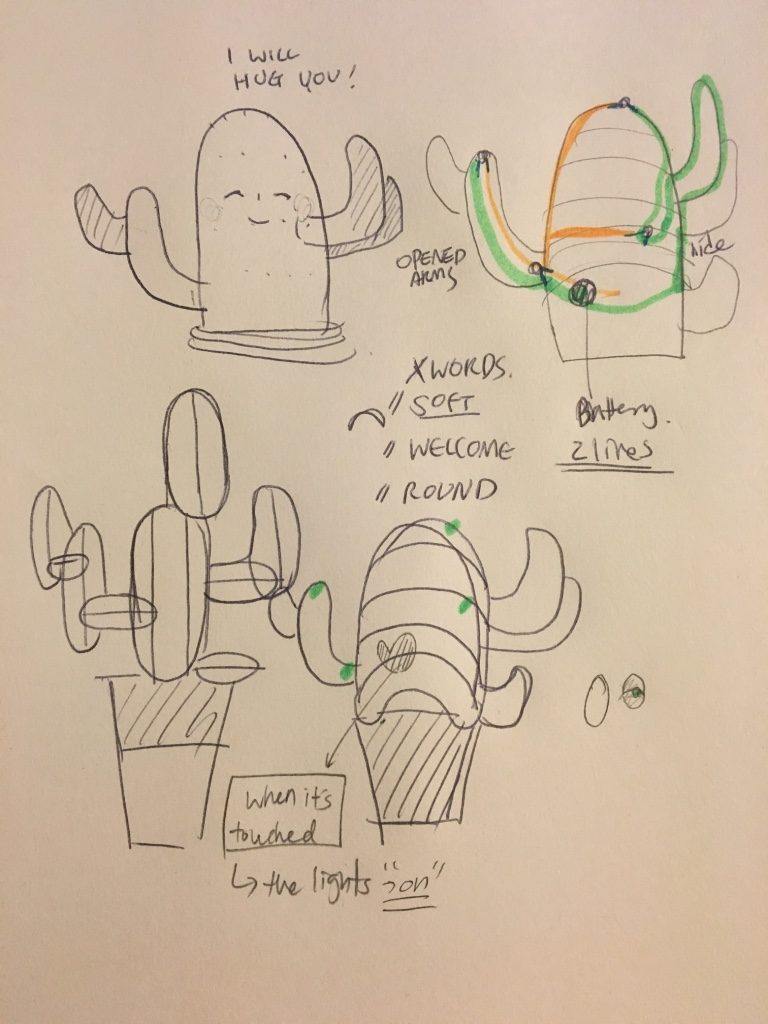
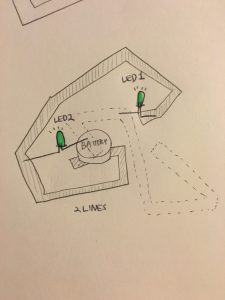
This is my sketch.
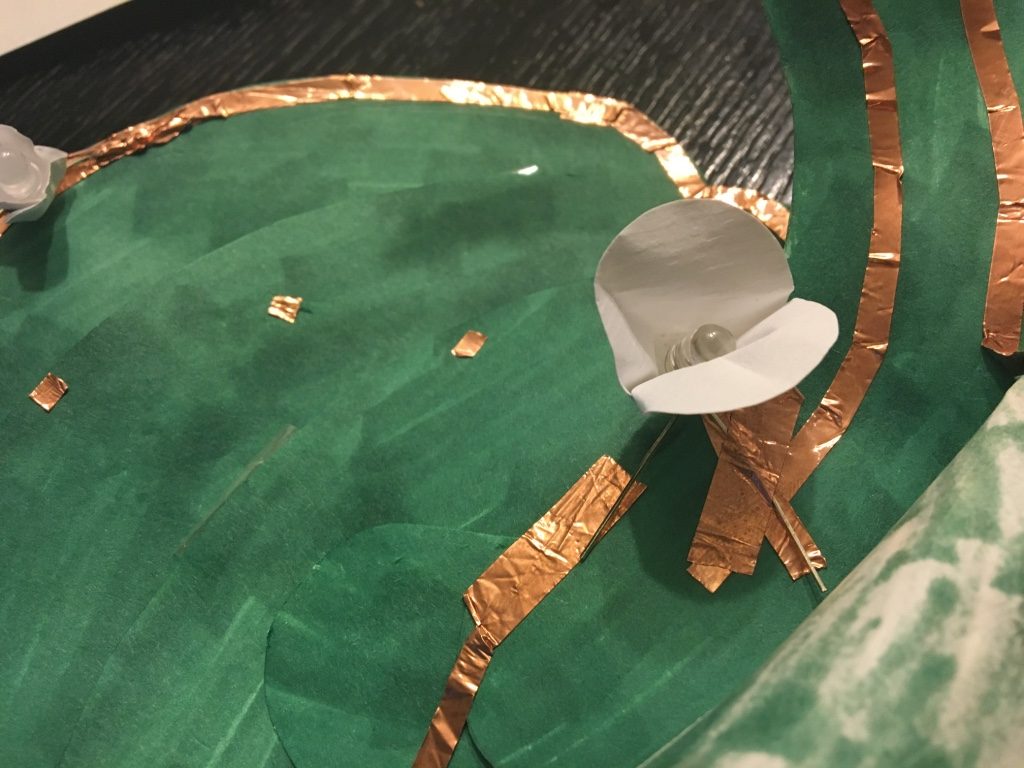
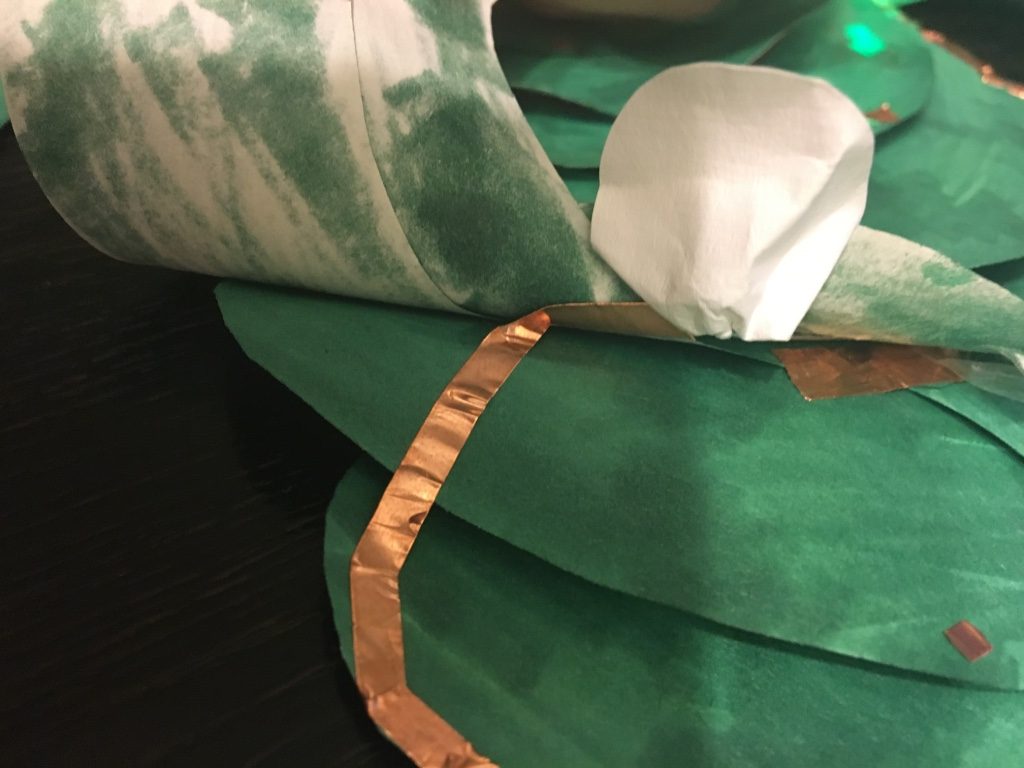
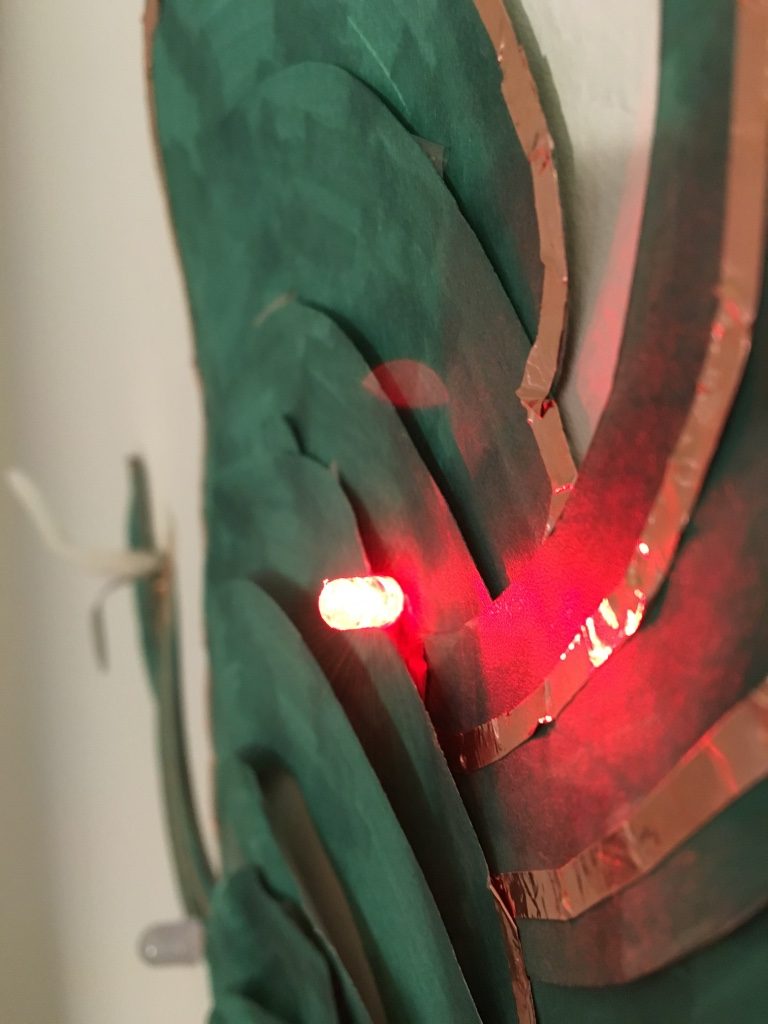
I imagined that the little cactus has a heart like a human. When it’s touched or pressed, the cactus react to it presenting its delight (by turning lightings on).
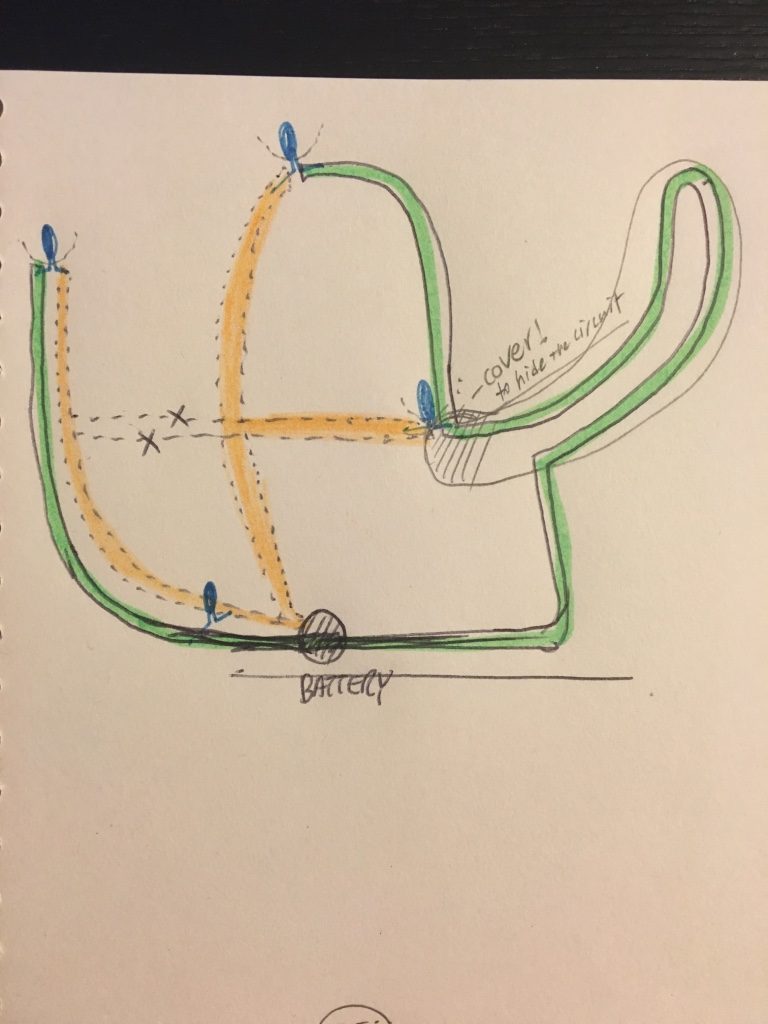
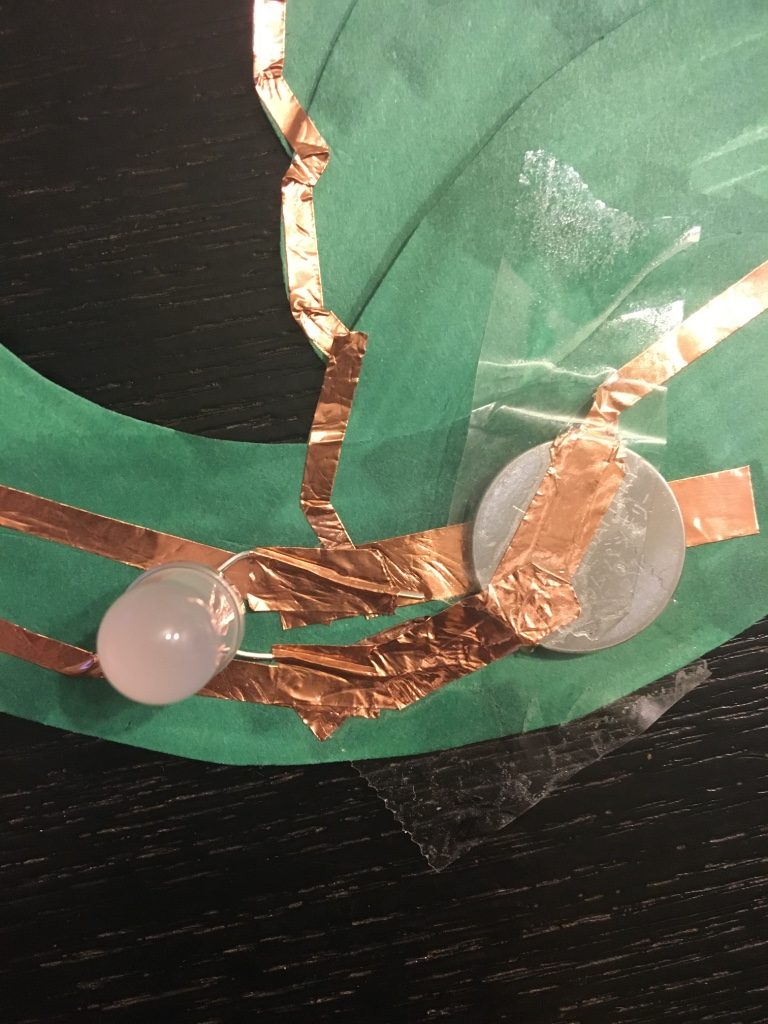
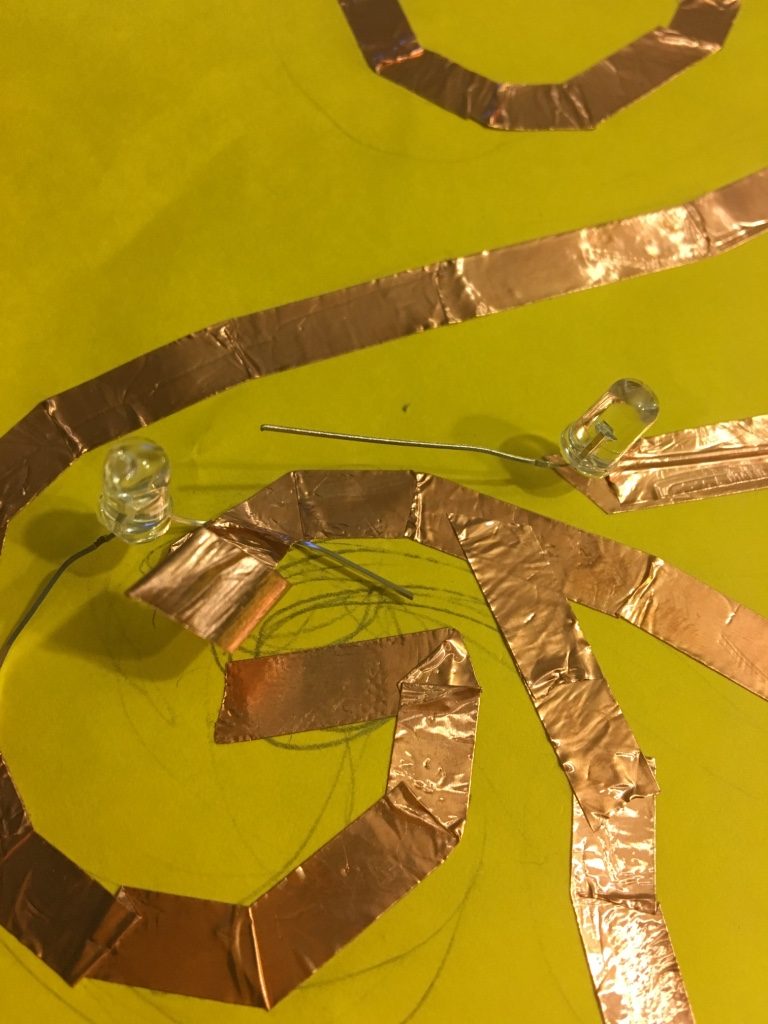
I tried to make a parallel circuit using only two lines, and linked each side of LED node with a line of copper tape passing through the cactus.
Since copper tape lines looked messy, I decided to hide them and the battery as well. So I overlapped the bottom of cut outs and also for hiding LED nodes, I covered them with paper flowers.