OP and App
I used the …….
I used the …….
Brain wave and environment Midterm proposal
What
How
When
(insert slides, and timeline and research as well as working serial code)
Film
Materials
Switch
PIR sensor
LED
Sound Wave Sheild
When the switch circut is completed the light turns on which then triggers the PIR motion sensor. This sensor then sends a signal to the wave sheild to play a WAV recorded track
(INSERT PHOTS AND CODE)
Slides PDF: FPMS
Experiment Artsist Statement:
This is not a piece to put in a gallery it is a means to an end which will produce information for what type of aspects in reactive interior and architectural design support learning and creates a “safe” optimal learning environment based on empirical data. It will explore the use of plants to enhance the environment of a classroom by comparing quantitative and qualitative data. The quantitative data will be collected using an wearable brain computer interface head gear that measurers EEG waves and a written test. Participants will also be filmed which will be analyzed based on body movement and participants will fill out a survey based on their experience. This data will be analyzed and produce a data visualization piece created from black and white paper and ink. This visualizations will then be translated onto cross sections of a tree visually comparing not only the brain waves and learning data but also the tree rings.
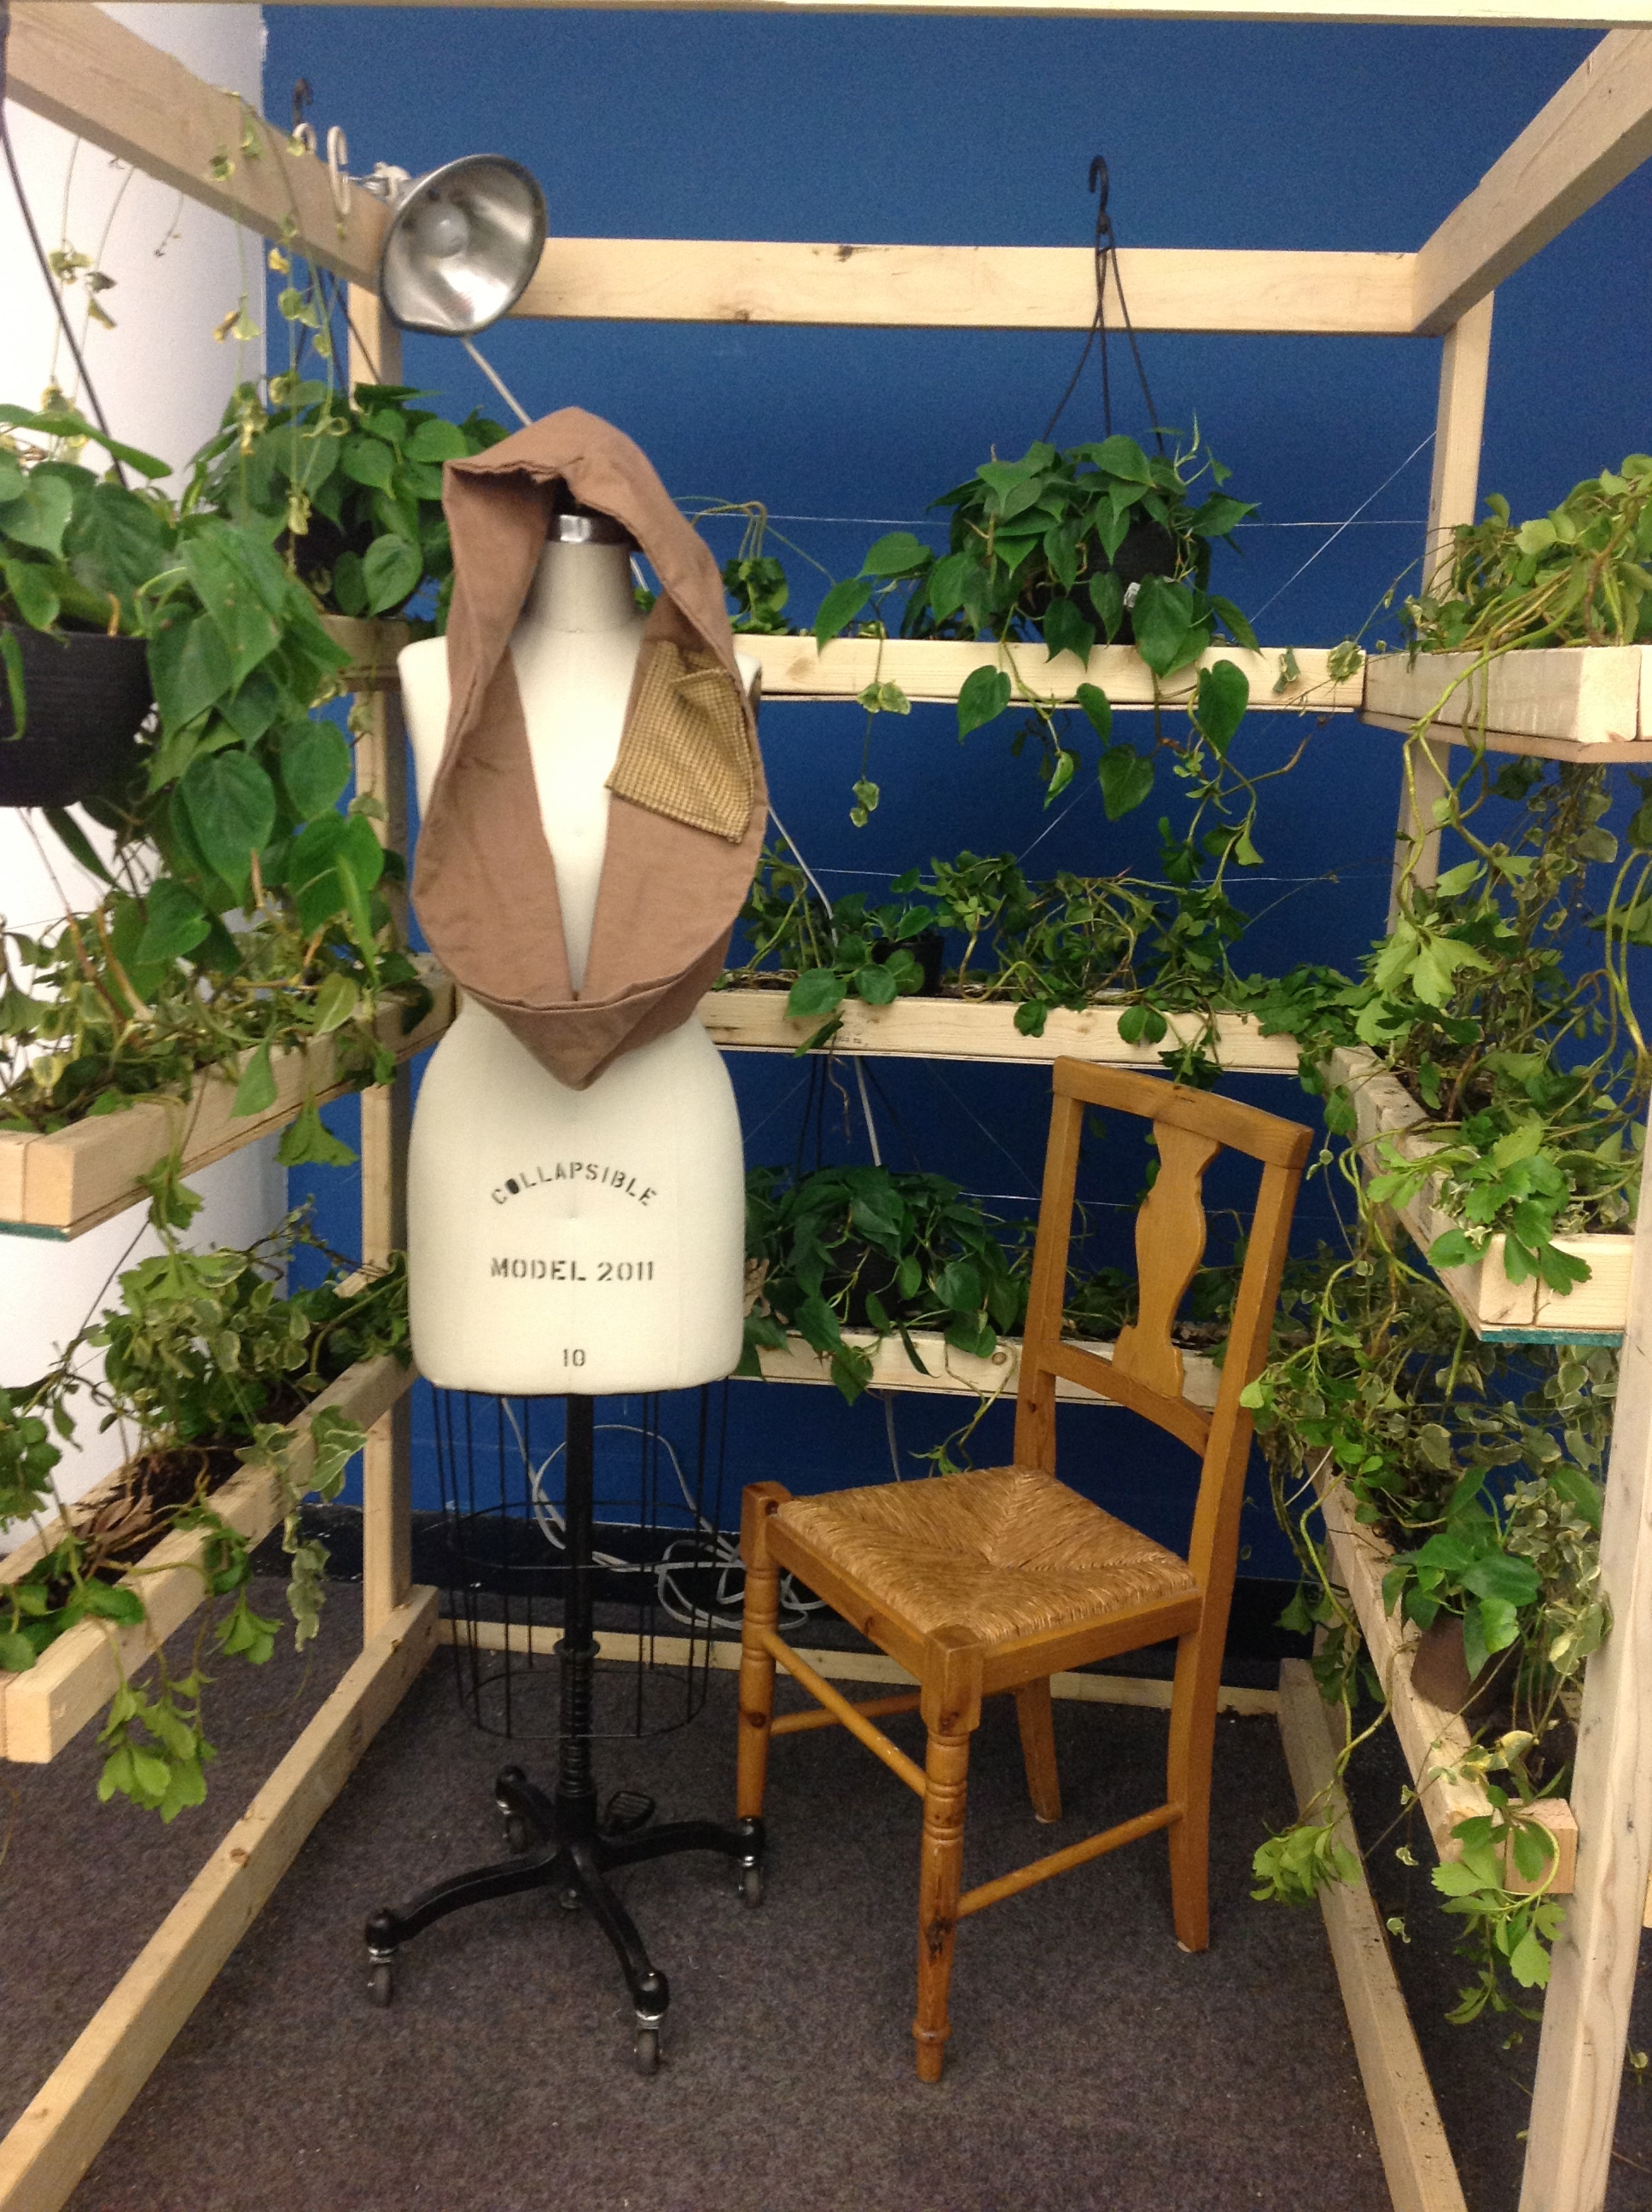
Sustanibility was importnat so I used various found scrap wood for the structure, a found wood chair, and a found wood log. For the headwear I used various cotton fabric blends, wire, nuerosky chip, mind flex original circuit board, bread board, one Arduino led, and a SD break out board.
Materials used for structure:
Wire
Screws 2 inch
Nails 1inch
plywood
2 by 4 inch wood
wood glue
Potting soil
various plants
wooden chair
Materials for study:
Pre survey
Post Survey
2 vedios
2 quizes
nuerosky head wear data
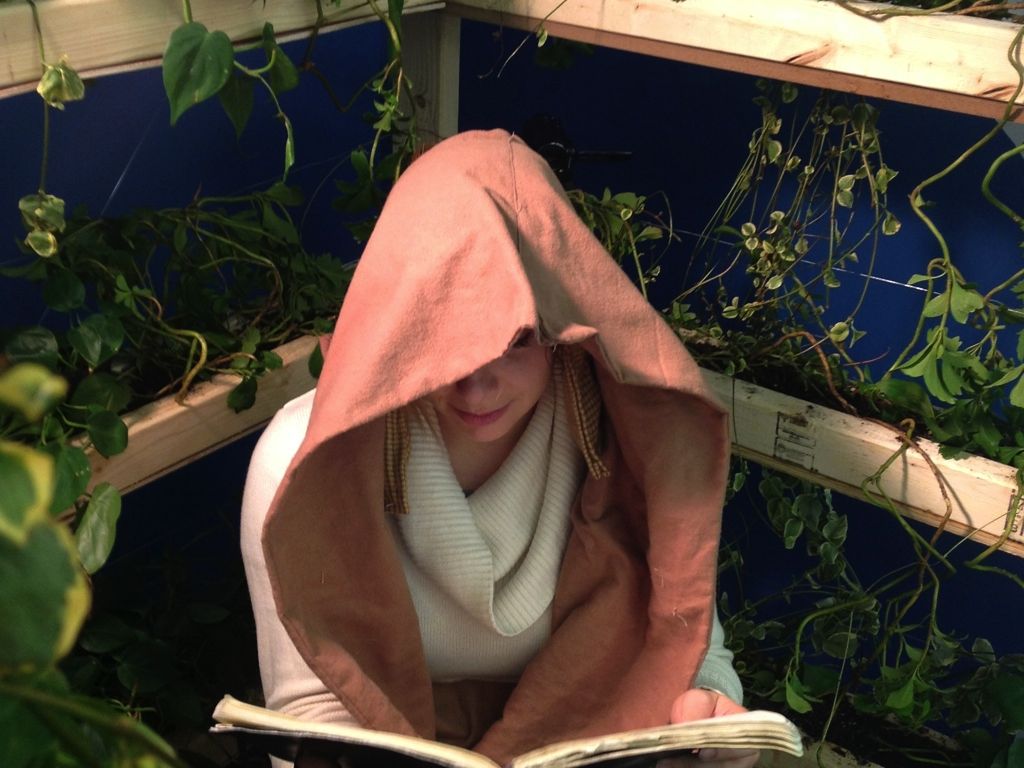
Participant in plant structure.
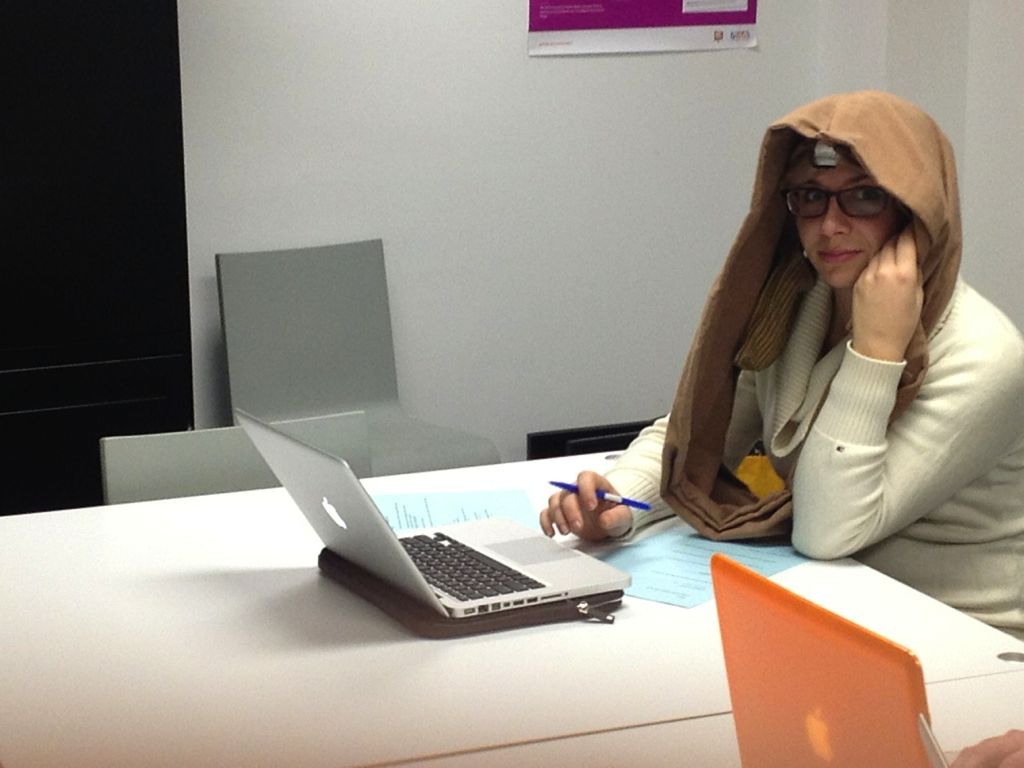
Participant in main room
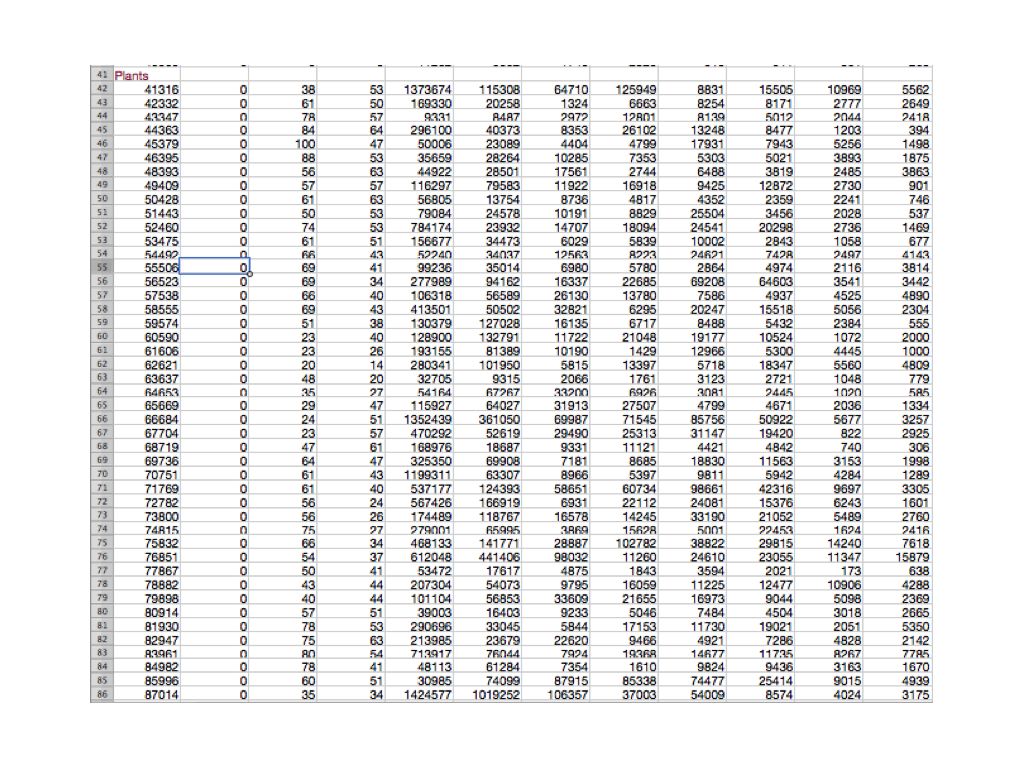
Raw data received from SD card from plant structure
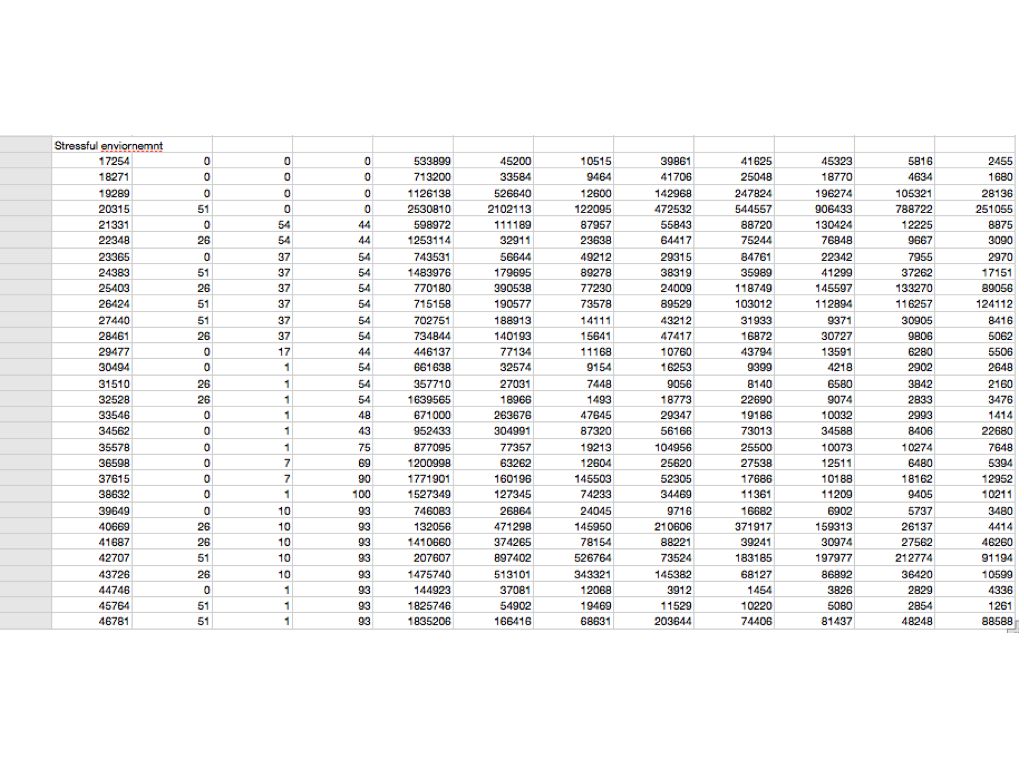
Raw data received from SD card from regular room
Headwear design code and problems:
In the begining of the project the wearbility of the headwear was not the main focus. Instead the headwear was simply supposed to be unobtrusive and functional. I was focused on the weight of the head gear and the ability for it to be collecting data and wirelessly sending it to the computer.
To collect the brain wave eeg data I used a hack that can be found here. This hack walks you thorugh how to use a Mindflex headwear which is made for a toy by metal and use it to read raw eeg signals. The key is the nueroscky chip which is within the mindflex headgear. There is a pin which you can connect the arduino to recive the data to your computer. The arduino must have its own power source seperate from the mindflex. I then used the brain library, again already created, to test the serial read of the eeg reader. Once I got that to work I used and then agumented the example code to make an LED light blink based on the signal strength of the attention infromation and then I agumented this code to make different blinks on multiple LEDS for the different signals.
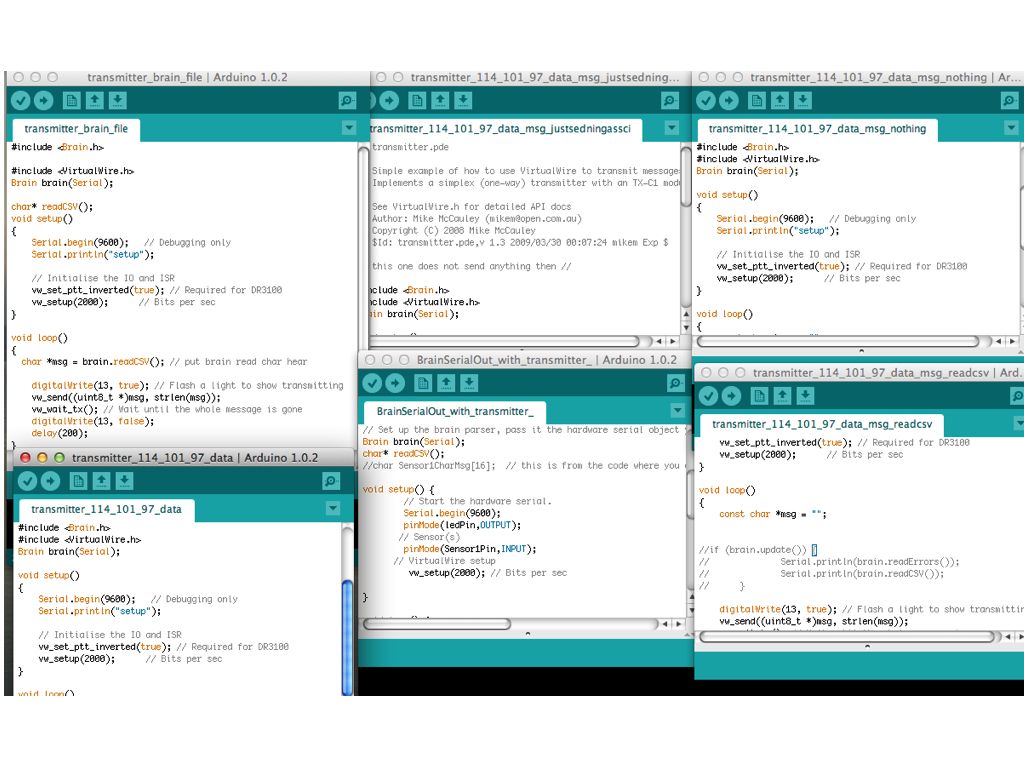
After having played with the Mindflex and understanding the data I then embarked on the task to make it wireless using rx and tx receiver and transmitter. This turned out to be very difficult. I got the transmitter and receiver to communicate in hex code by using the virtual wire library which can be found here. I then augmented the original code to include the brain library and received DEX data (numeric) however the data it was receiving and the order in which it was receiving it or the amount was incorrect I worked with the code for many days straight and finally concluded that it must be a problem with the buf and bit length between the two libraries. I dove into the header file for each library but was not able to change the correct areas to make it work. I will be continuing to pursue this task but due to the time scope of the project I ended up continuing to pursue wireless by using the SD card breakout board that can be found on Adafruit.
The code that I used for the SD card reader was a combination of the brain library and the example sd card library found in Arduino. I also then augmented code provided by a colleague Sarah Weaver who’s work can be found here.
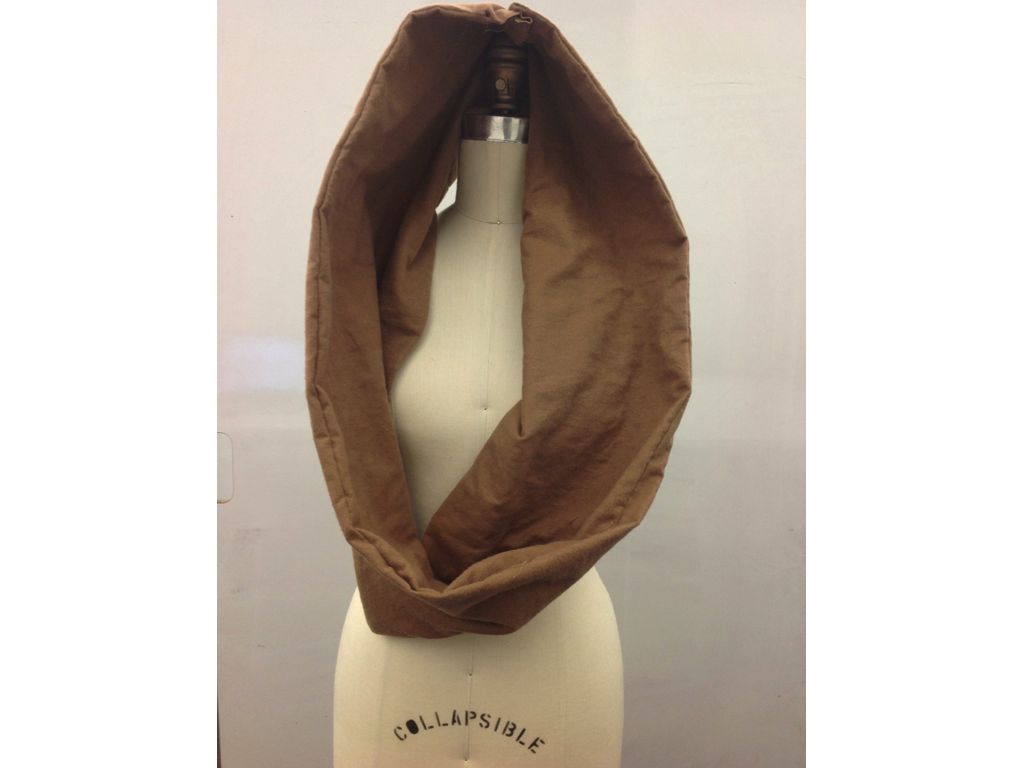
After user testing and reciving feedback that the headwear was too heavy and distracting I decided to move forward with a different wearble design. The design idea came from a friends unity scarf. This scarf when worn on the head was soft, warm and comforting. I devised a plan to use this design and add pockets to rest on the shoulder of the participent that were movable based on the participants height because there were adheared with velcro. The unity scarf also had a headband in which the eeg reader was worn on the forehead The eeg was concealed and the headband was made of elastic and velcro so that it could fit correctly.
Problem code
Headwear materials:
Wire
SD breakout board
One LED
bread board
Arduino
9v battery pack
mindflex
Cotton fabric
thread
velcro
elastic
Some of the code samples:
// transmitter.pde
//
// Simple example of how to use VirtualWire to transmit messages
// Implements a simplex (one-way) transmitter with an TX-C1 module
//
// See VirtualWire.h for detailed API docs
// Author: Mike McCauley (mikem@open.com.au)
// Copyright (C) 2008 Mike McCauley
// $Id: transmitter.pde,v 1.3 2009/03/30 00:07:24 mikem Exp $
// this one does not send anything then //
#include <Brain.h>
#include <VirtualWire.h>
Brain brain(Serial);
void setup()
{
Serial.begin(9600); // Debugging only
Serial.println(“setup”);
// Initialise the IO and ISR
vw_set_ptt_inverted(true); // Required for DR3100
vw_setup(2000); // Bits per sec
}
void loop()
{
const char *msg = “”;
//if (brain.update()) {
// Serial.println(brain.readErrors());
// Serial.println(brain.readCSV());
// }
digitalWrite(13, true); // Flash a light to show transmitting
vw_send((uint8_t *)msg, strlen(msg));
vw_wait_tx(); // Wait until the whole message is gone
digitalWrite(13, false);
delay(200);
}
SD card code from Sarah Weaver slightly augmented
Tree Ring Artists Statement:
It has long been understood that humans’ interaction with their physical space effects cognitive development, physical development, brain development, and success in life. (Eberhard, 2011; Bingler,1995; David & Wienstein, 1987 ; Taylor, 1995 ; Bradley, 1998) Recent studies show that enriched environments and our interaction with them effects brain development (Baroncelli et all, 2010 ; Davis, 2004 ; Kempermann et all 1997). Therefore the architecture and physical facilities of schools, homes, and workplace need to be designed with neuroscience research in mind to facilitate positive productivity and overall success. Architects have an overwhelming responsibility to use this knowledge to make sure that schools create enriched environments to support neuron growth during optimal development periods and take into account the plasticity of the brain (Eberhard 2009). Many researchers have argued about how to impact brain development, and student achievement within schools. Studies have looked at the effects of light, sound, air quality, pedagogy, furniture, open space, and meeting the basic needs of humans as identified in Maslow’s hierarchy of needs. (Hardiman, 2010 ; Letterick, 2010 ; Eberhard, 2008). This piece is the culmination of a study that explored the use of plants to enhance the environment of a classroom by comparing quantitative and qualitative data and engraving this data on cross sections of trees.
Tree rings reflect the climatic conditions of the given year in which the tree grew. Droughts, heat and rain all effect the color and width of a ring. I have chosen to display the data visualization comparison of EEG brain wave and test score data on these cross sections because of the similarities that the growth of trees have to that of a developing brain. In both cases the environment plays a key role in the development and growth of the entity.


I’m struggling with the file structure. For some reason my file is compining and pointing to libs and not my apps even though it is in the app folder.
Please help!
- Kristen
Here is a link to our code from our presentation.
Using Photo sensor and RGB Led
https://github.com/Sussesj/CC-LAB/tree/master/RGB_sensor
Please mark that this version is not mapped
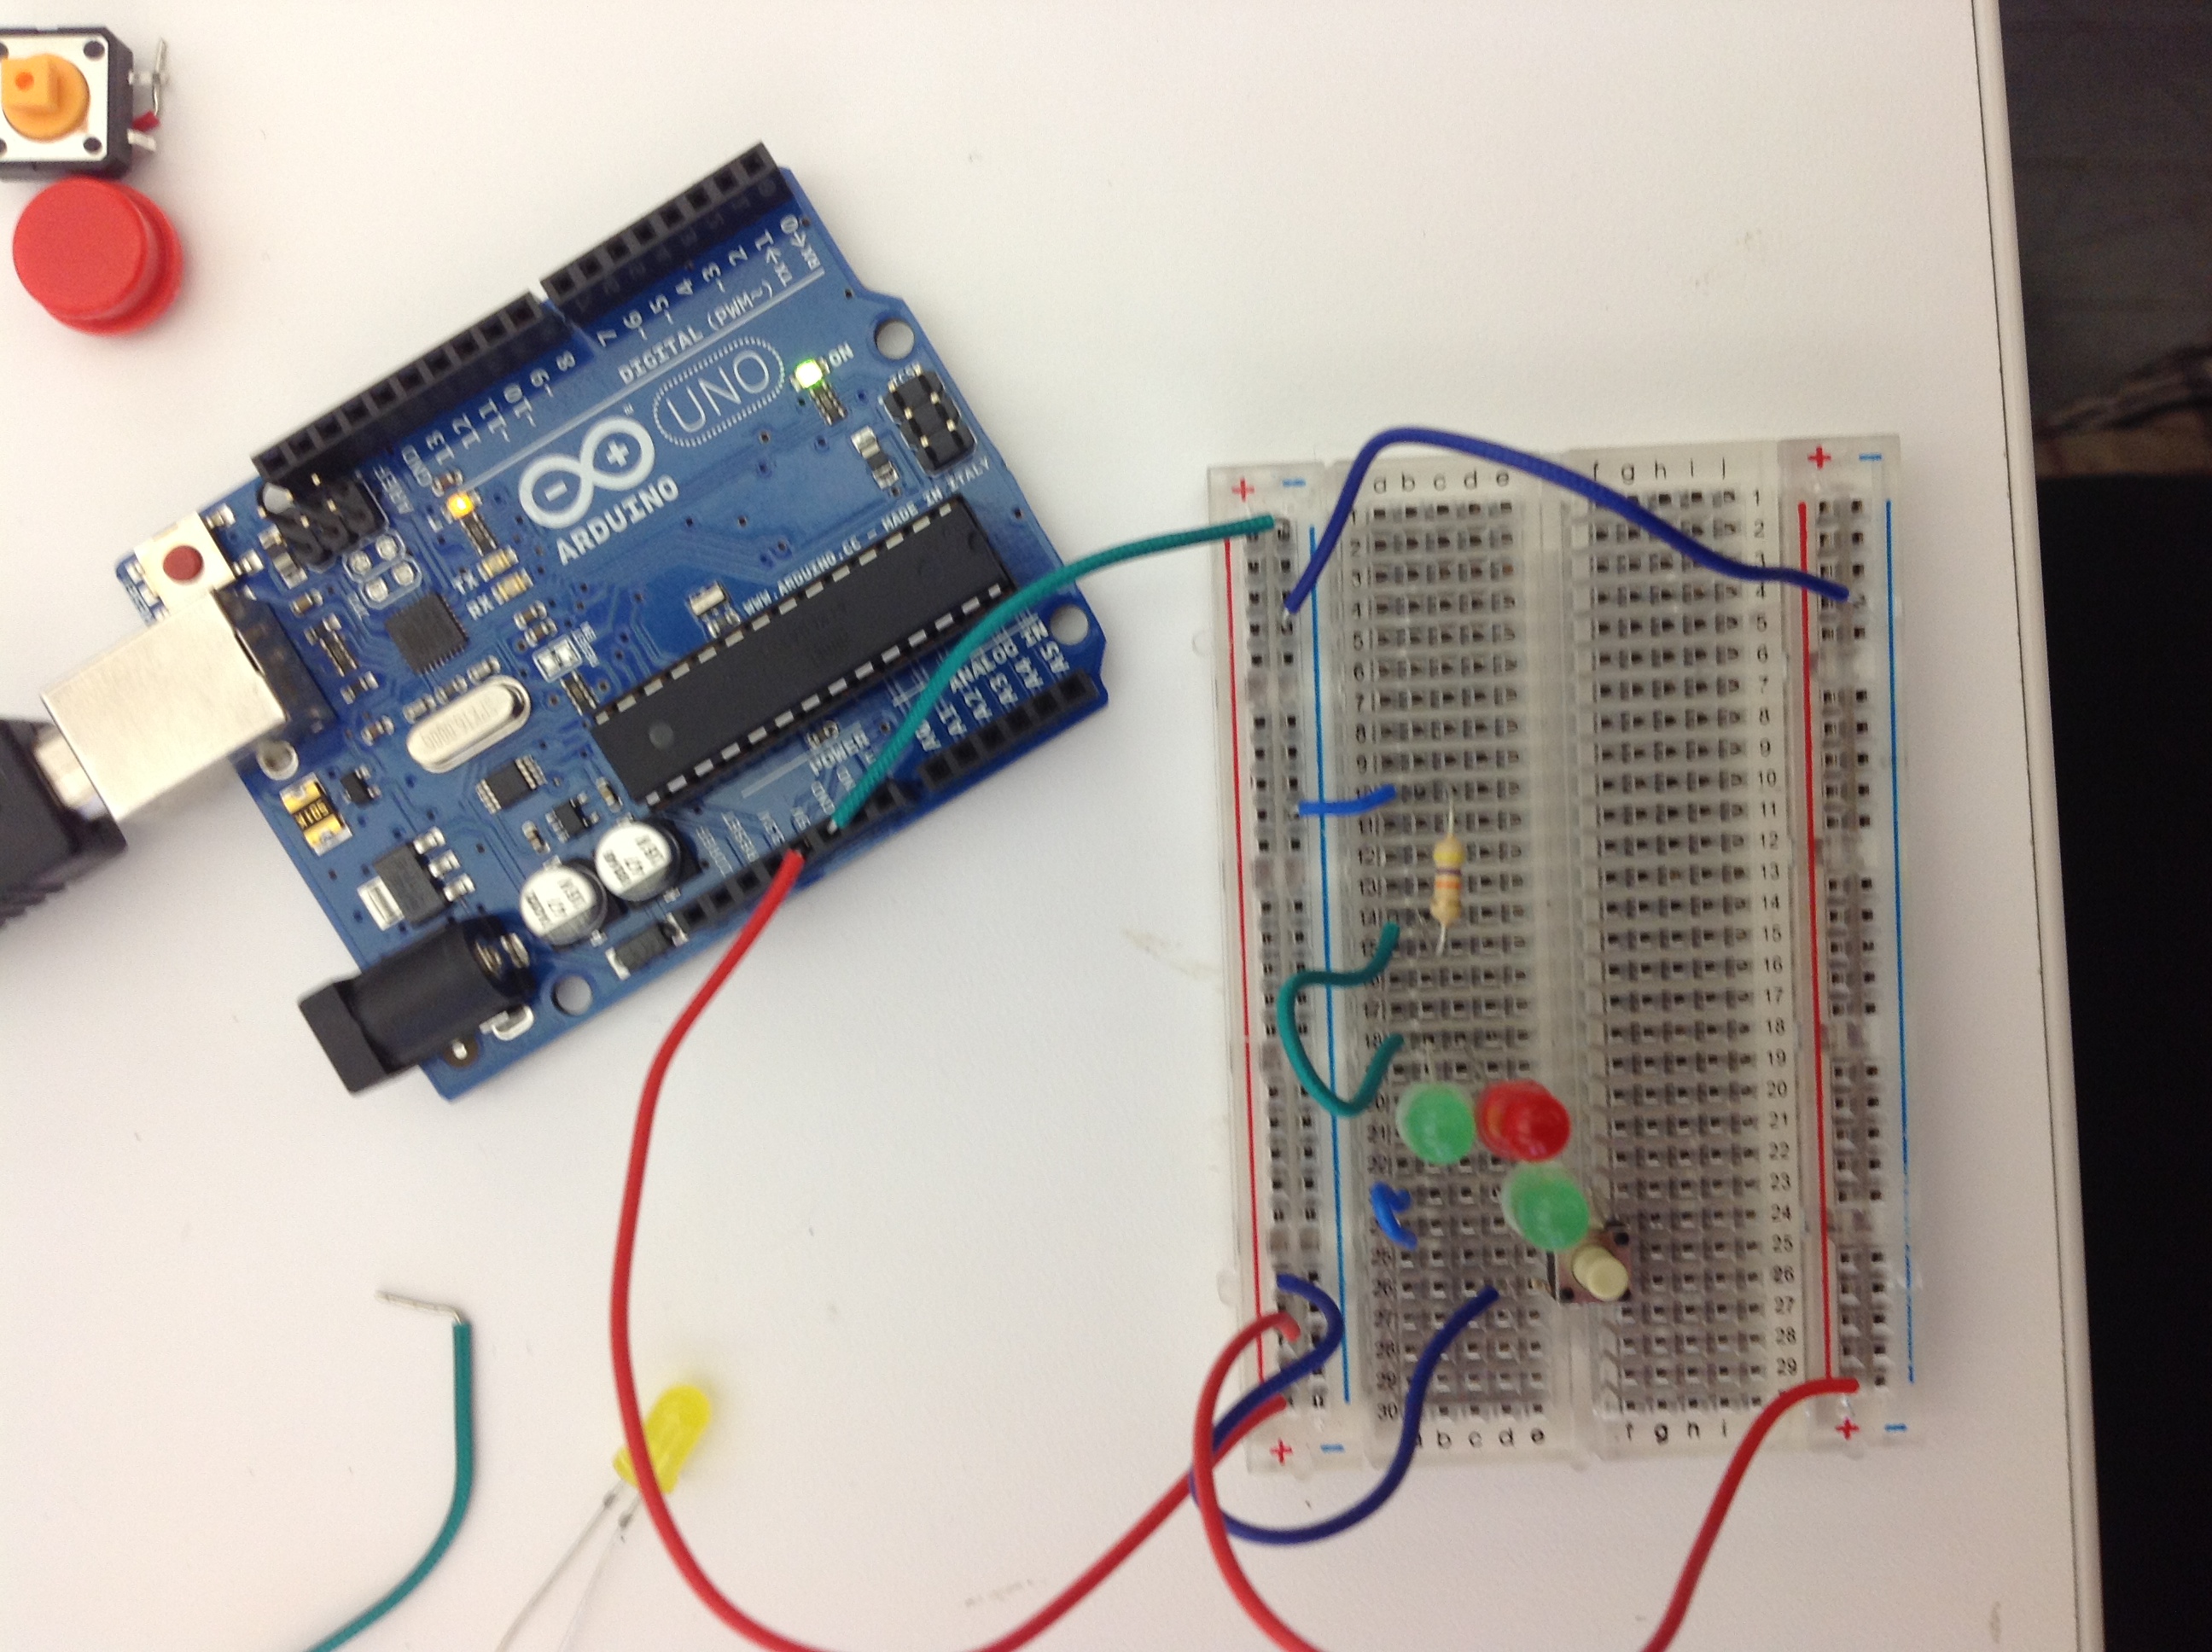
For this project I wanted to learn how to use the laser cutter to make a creature. My original plan was to use wood, a PIR sensor, wave shield and 5 LEDS. Due the time constraint I ended up just working on the LEDS and getting the correct fade that I desired.
Steps CODE:
1) Basic code testing fade function with one LED
2) Code at 50% Duty Cycle which is equal to 127 with 2 LEDS and delay of 10 milliseconds.
3) For the final code instead of trying to cross fade the leds i decided to use a for loop to fade them all at once.
Result:


Link to Film:
CODE:
Questions:
I noticed a couple of things last week. I found it was very helpful to go through the basics of circuitry and how to calculate electrical currents. Completing the excursuses it became apparent the need to pick resisters that will not be to strong. Lastly, I really appreciated this assignment as I’m in PCOMP and found that this was a great basic lesson in circuits that I did not have.
Parallel:


Series:
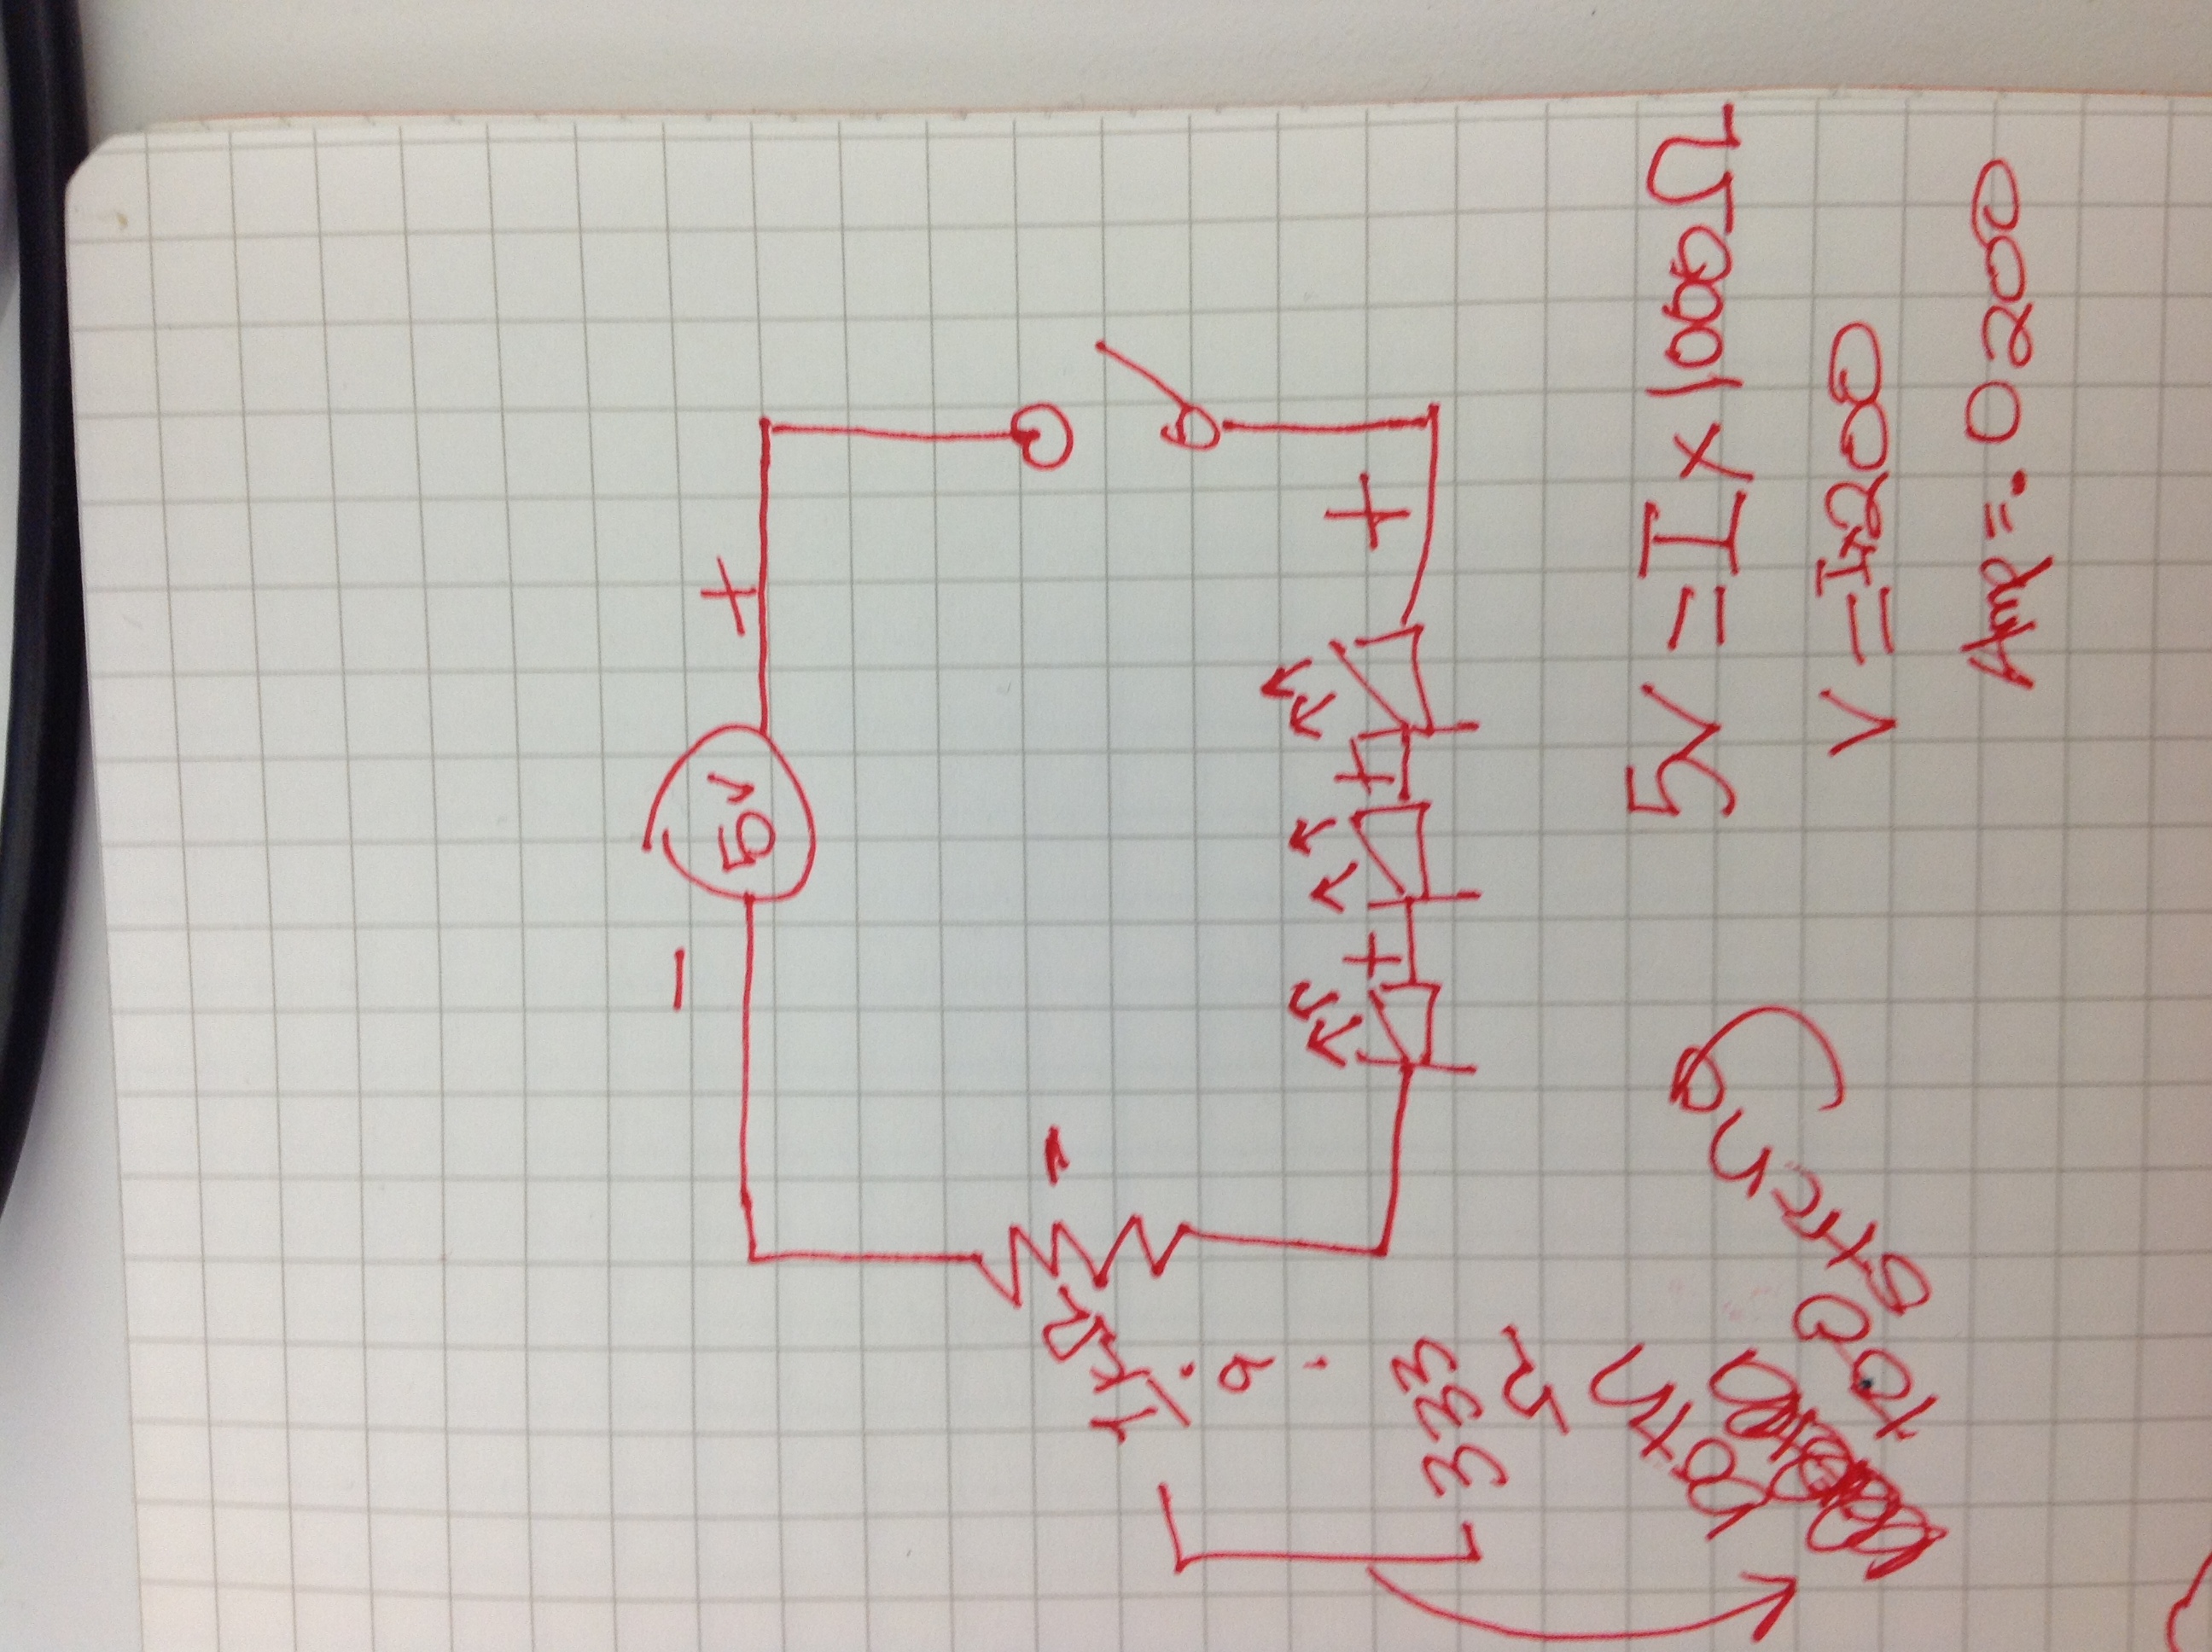
**** I had a problem here because the resister was way too high.**
I wanted to continue to use Minim while also exploring openGL. Opengl is a library that allows you to work with 3d graphic objects. More information on opengl can be found here.
Inspiration: http://www.openprocessing.org/sketch/50329
I found this sketch on open processing. It is amazing how interactive and alive this peice is. I asxpire to create something like this as it stimulates the feeling of technology as life.
I hacked this code which started as an example from the opengl library. It was a great exercise as i found that i came to understand what was generating the cubes the colors and the motion. I added sound to it and have found myself staring at it for hours.
Reflection:
I was very frustrated with trouble shooting this hoemwork. I kept getting an error expected Rcurly found ‘*’ and it highlighted a closing curly bracket. It also will not let me export the sketch. I have tried re-writting it 3 different ways. Does anyone have any ideas. The code and sudeo code is below.
Sudeo:
//What I want:
//Spots that fall when you hold and click
//background will be circles
//overlay will be lines random within blue color spectrum
//
//
//code suto
//
//I need array of circles (class)
//I need array of lines that overlay circles (class)
//I need circles that move when you push a key or click and hold down
//
//
//1) declare global varibles
//2) void setup
//- this should have the background
//- size of sketch
//- construct the object
//
//
//3) void draw
//background color
//- display sp the object
//- display class
//
//4) class (name of class) (new tab)
//
//
//5)class (name of class) (new tab)
//*** questions — so if you have a class how do you display it again?
Main File:
line1 [] firstLine;
line1 [] secondLine;
line1 [] thirdLine;
line1 [] fourthLine;
line1 [] fifthLine;
void setup () {
size (600, 600);
smooth ();
noStroke ();
int numSets = width; // what is this dooing width of array?
firstLine = new line1[numSets];
for (int i=0;i<numSets;i++) {
firstLine[i] = new line1(i * 10, 50, 0.01);
}
}
void draw () {
background (0);
for (int i=0; i <width; i++) {
firstLine [i].display();
}
}
Class File for Line:
//** why do i want to float as apposed to giving a direct number
//Delcare : Name the class
class line1 {
float x;
float y;
color lc;
//
line1(float xPos, float YPos, float xPos, float YPos){
x = xPos;
y = Ypos;
}
}
void display() { //functions
line(x, 0, 600, 0);
stroke (random);
}
}