
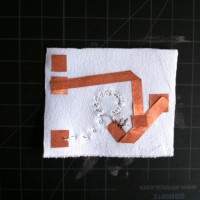
First ProtoBoard Components! (INPUT)
-
- Potentiometer (front)
-
- The stroke sensor effectively acts as a switch.
-
- Still in the works – just a tuft of conductive fabric right now.
Live and Learn

My first attempt at salt and vinegar etching a PCB turned out to be a bust. I left the fabric in the solution for almost 24 hours instead of the recommended 12; this disintegrated the traces and lost all the connectivity. I am in the middle of a second attempt at the moment.
")

Two lessons to take:
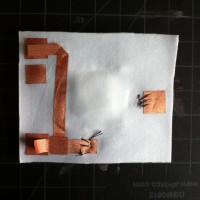
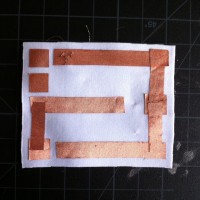
PCB Etch for ProtoBoard Back


The entire design cut out and ready to be moved to the copper fabric.

Lay the copper fabric over the board.

Do a quick but delicate flip so the copper is the bottom layer.

Remove the board (neoprene)

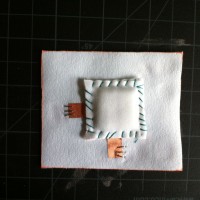
Tape down the pattern to the copper so it won't move as you apply the vaseline.

Apply the vaseline. For technique, rub lightly over shapes and press harder over thin lines/connectors.

The lubed up final product.

Pattern removed from the fabric.

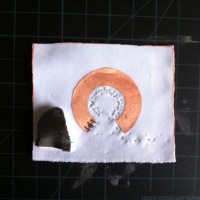
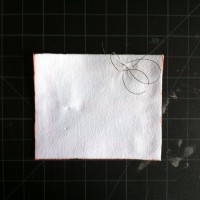
Submerge in salt and vinegar bath (used solution from HOW TO GET WHAT YOU WANT)

After submerged for 10 hours

Transparency (it's real!)
Natalie Freed’s Amazing TeleScrap Book
This is great precedence for my current final project. I really like her execution and simple approach, as well as the ability to have two books communicate with each other.
PhysComp Final Project Concept 2
Calm Computing+IR Sensor
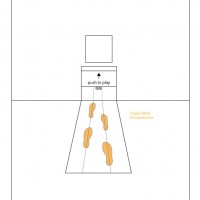
This final project assignment has three parameters: it must be calm computing; it must solve a problem; and it must use a IR sensor. Brainstorming this and avoiding a completely kitsch or overdone concept is much harder than you would think; so, I propose a project that would alleviate the omnipresent ordeal of erasing the spatial divide between user and interactive object. That is, constructing an object that facilitates interaction between the user/audience and an installation piece. Installations are often the preferred method of execution for many projects, yet we all fall into the trap of assuming our project will call people to interact with it. In reality, we have been conditioned with a museum mentality not to touch and we must break this behavior through the affordances of our design.
By combining the IR sensor to gauge the distance of a potential user, thermochromic ink and fabric traces (copper, specifically), I will construct a “red carpet” of sorts to invite the user to interact with a piece when they pass. As the user gets closer, Arduino triggers voltage from a certain pin to a footprint that leads up to the piece. Once the user is 6″ away, a sign is revealed to them that says “push me”. Not only will this aid in encouraging interaction with the specific piece, but is a form of interaction itself that can be used in a variety of situations.
Below are the paper prototypes and distance logistics (based on the ideal range of the sensor (4cm – 150cm):
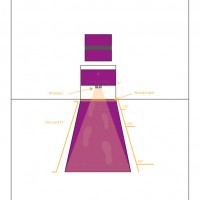
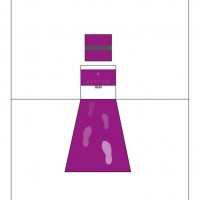
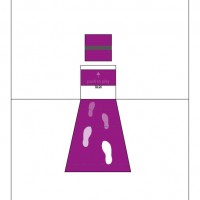

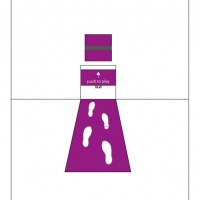
Proof of Concept:
PhysComp Final Project Concept 1
Light+Time
For my light and time final project, I am stepping away from the modules for a more topical subject more in the line of calm computing: a countdown clock for the p comp room. After a program-wide email stressing our timeliness in cleaning up (I withhold judgment on the validity of sending an email in this particular situation) AND the general state of the p comp room during finals/thesis, I propose a countdown clock that will be programmed in accordance with building closing hours. There are four stages (names are subject to change): get ready, clean up, no really, clean up, and get out.


")
In-Class Feedback
The feedback from our peer groups was invaluable. Here are a few of the major points:
After giving a quick update on the breadth my project was starting to take (a board, module components, book, etc. – I promise I am not a masochist), Tami swooped in to remind me of the scale we should be working in for this project, especially at this stage of our process. From here the group was great in listening to my ideas and helping me isolate the key interactions supporting the concept that I needed to concentrate on.
Since one of my objectives is to have users understand the flow of the circuit and the I/O interaction, my group suggested skinning it in some type of narrative that might give users an analogy to help them follow the flow, similar to Braun’s Lectron. So far, all I have had on the mind in this department is pirates, due in large part to a fantastic April Fool’s joke I was lucky enough to bear witness to. While we’re on look/feel, I do plan on integrating stylized (though not kitschy) circuit schematics into the design as well for extra added fun.
Another solution for the above point is using thermochromic ink on the board and manipulating the voltage to the correct temperature to effect the ink. In effect, it would light up the flow of electricity between components in “real” time. The “magical” factor in this solution cannot be underestimated.
At the moment, my final project is moving towards the shape of a prototyping board with a focus on understanding circuitry through “soft” components and learning the interactions of different inputs and outputs. I hope to have a working prototype of this by mid-next week with the goal of having removable and remixable components by the end of the semester. The big goal is to have small book attached to the board packaging or a website explaining how to make these circuits so users can create their own.
“Serial Alien Attacks LCD!”
This was a MONSTER of an assignment:
Upload eight custom characters to a Newhaven LCD display (3 wire config) via RS232 protocol using the Arduino Software Serial library.
Yea. I know. Please use the code below as a reference, because there ain’t much out there:
SoftwareSerial serial=SoftwareSerial(7, 8);
byte topL = 0x01;
byte topR = 0x02;
byte bottomL=0x03;
byte bottomR = 0x04;
byte leftFoot=0x05;
byte rightFoot=0x06;
byte handUp=0x07;
byte handDown=0x08;
void setup() {
pinMode(7, INPUT);
pinMode(8, OUTPUT);
// set serial rate
serial.begin(9600);
// turn lcd on
lcdOn();
// set lcd contrast to default 40
defltContrast();
// clear lcd
clearLCD();
// top left of alien
customChar(topL);
serial.print(0x00, BYTE);
serial.print(0x00, BYTE);
serial.print(0x0F, BYTE);
serial.print(0x1F, BYTE);
serial.print(0x19, BYTE);
serial.print(0x19, BYTE);
serial.print(0x1F, BYTE);
serial.print(0x1F, BYTE);
// top right of alien
customChar(topR);
serial.print(0x00, BYTE);
serial.print(0x00, BYTE);
serial.print(0xFE, BYTE);
serial.print(0xFF, BYTE);
serial.print(0xF3, BYTE);
serial.print(0xF3, BYTE);
serial.print(0xFF, BYTE);
serial.print(0xFF, BYTE);
// bottom left of alien
customChar(bottomL);
serial.print(0x1F, BYTE);
serial.print(0x1F, BYTE);
serial.print(0x1F, BYTE);
serial.print(0x1C, BYTE);
serial.print(0x1C, BYTE);
serial.print(0x1C, BYTE);
serial.print(0x0, BYTE);
serial.print(0x0, BYTE);
// bottom right of alien
customChar(bottomR);
serial.print(0xFF, BYTE);
serial.print(0xFF, BYTE);
serial.print(0xFF, BYTE);
serial.print(0xE7, BYTE);
serial.print(0xE7, BYTE);
serial.print(0xE7, BYTE);
serial.print(0x0, BYTE);
serial.print(0x0, BYTE);
customChar(leftFoot);
serial.print(0x1F, BYTE);
serial.print(0x1F, BYTE);
serial.print(0x1F, BYTE);
serial.print(0x0, BYTE);
serial.print(0x0, BYTE);
serial.print(0x0, BYTE);
serial.print(0x0, BYTE);
serial.print(0x0, BYTE);
customChar(rightFoot);
serial.print(0xFF, BYTE);
serial.print(0xFF, BYTE);
serial.print(0xFF, BYTE);
serial.print(0x0, BYTE);
serial.print(0x0, BYTE);
serial.print(0x0, BYTE);
serial.print(0x0, BYTE);
serial.print(0x0, BYTE);
customChar(handUp);
serial.print(0x0, BYTE);
serial.print(0x0, BYTE);
serial.print(0x0, BYTE);
serial.print(0xE4, BYTE);
serial.print(0xEC, BYTE);
serial.print(0xF8, BYTE);
serial.print(0xF0, BYTE);
serial.print(0xF0, BYTE);
customChar(handDown);
serial.print(0x0, BYTE);
serial.print(0x0, BYTE);
serial.print(0x0, BYTE);
serial.print(0x0, BYTE);
serial.print(0x0, BYTE);
serial.print(0x0, BYTE);
serial.print(0x0, BYTE);
serial.print(0xFF, BYTE);
}
void loop(){
serial.print(topL, BYTE);
serial.print(topR, BYTE);
serial.print(handUp, BYTE);
// move cursor to second line
serial.print(0xFE, BYTE); // command flag
serial.print(69, BYTE); // cursor position command
serial.print(0x40, BYTE); // cursor position
serial.print(bottomL, BYTE);
serial.print(bottomR, BYTE);
// admire the little guy for a sec
delay(1000);
// make way for the next step
clearLCD();
serial.print(topL, BYTE);
serial.print(topR, BYTE);
serial.print(handDown, BYTE);
// move cursor to second line
serial.print(0xFE, BYTE); // command flag
serial.print(69, BYTE); // cursor position command
serial.print(0x40, BYTE); // cursor position
serial.print(leftFoot, BYTE);
serial.print(bottomR, BYTE);
delay(1000);
// clear lcd
clearLCD();
serial.print(topL, BYTE);
serial.print(topR, BYTE);
serial.print(handUp, BYTE);
// move cursor to second line
serial.print(0xFE, BYTE); // command flag
serial.print(69, BYTE); // cursor position command
serial.print(0x40, BYTE); // cursor position
serial.print(bottomL, BYTE);
serial.print(rightFoot, BYTE);
delay(1000);
// clear lcd
clearLCD();
serial.print(topL, BYTE);
serial.print(topR, BYTE);
serial.print(handDown, BYTE);
// move cursor to second line
serial.print(0xFE, BYTE); // command flag
serial.print(69, BYTE); // cursor position command
serial.print(0x40, BYTE); // cursor position
serial.print(leftFoot, BYTE);
serial.print(bottomR, BYTE);
delay(1000);
// clear lcd
clearLCD();
serial.print(topL, BYTE);
serial.print(topR, BYTE);
serial.print(handUp, BYTE);
// move cursor to second line
serial.print(0xFE, BYTE); // command flag
serial.print(69, BYTE); // cursor position command
serial.print(0x40, BYTE); // cursor position
serial.print(bottomL, BYTE);
serial.print(rightFoot, BYTE);
delay(1000);
// clear lcd
clearLCD();
delay(2000);
serial.print("Hello");
delay(2000);
// move cursor to second line
serial.print(0xFE, BYTE); // command flag
serial.print(69, BYTE); // cursor position command
serial.print(0x40, BYTE); // cursor position
serial.print("serial.");
delay(2000);
clearLCD();
}
void customChar(byte address) {
serial.print(0xFE, BYTE);
serial.print(0x54, BYTE);
serial.print(address, BYTE);
}
void clearLCD(){
// clear lcd function
serial.print(0xFE, BYTE);
serial.print(0x51, BYTE);
}
void backSpace(){
// go back one space
Serial.print(0xFE, BYTE);
Serial.print(0x4E, BYTE);
}
void serCmd(){
// command flag
serial.print(0xFE, BYTE);
}
void defltContrast(){
// set default contrast
serial.print(0xFE, BYTE);
serial.print(0x82, BYTE);
serial.print(0x51, BYTE);
}
void lcdOn(){
// turn lcd on
serial.print(0xFE, BYTE); // command flag
serial.print(0x41, BYTE); // on command
}
void shiftRight(){
serial.print(0xFE, BYTE);
serial.print(0x56, BYTE);
}
void cHome(){
// ser cursor to home position
serial.print(0xFE, BYTE); // command flag
serial.print(0x46, BYTE); // cursor home command
}
void bcOn(){
// set box cursor on
serial.print(0xFE, BYTE); // command flag
serial.print(0x4B, BYTE); // cursor on command
}
/*
void dftBaudRate(){
serial.print(0xFE, BYTE);
}
*/
Minithesis Prototypes: Round 2


thank you late night subway rides

I got a little stuck over the weekend and earlier this week as I began to really shape my concept. With each new major project I am increasingly learning the indeterminate nature of my process; it certainly requires much unyielding percolation followed by periods of rapid action.
Slowly I am meandering my way towards a hard schematic, metaphorically speaking, of realizing my concept, especially after the feedback I received from my group.
Major Studio Prototype Presentation
More documentation to come, but here is the presentation.
SoftShop Syllabus Draft 1
Here is the link to my syllabus for a middle school program on soft circuits. It is still in an early malleability stage and its evolution will be closely tied to my major studio final project. Below is the course description:
SoftShop
Talking Lights and Stretching Sound
An Introduction to Physical Computing and SoftWear for Middle School Students
Shop Hours
Mondays from 3 – 5pm
Shop Location
2 West 13th Street, Rm 1006
Instructors
Liza Stark
TBD
Course Description and Objectives
In this course, middle school students will explore the possibilities of physical computing through soft components to offer students a large toolkit to draw from in implementing their designs. There will be a focus on interaction design, computational concepts, and craftsmanship. This course will be held largely in a workshop format with opportunities for group learning and individual work.
Learning Outcomes
By the end of this course, students will:
Major Studio Final Project Concept
Tentative Title
Does Not Compute: An Investigation into Computational Points of Entry for Middle/High School Students
Concept
For my final project, I am going to compose a curriculum aimed at introducing middle to high school students to basic electronic, programming, and design concepts through soft circuits and a create a body of compiled and personal research surrounding this sphere.
Deliverables
As of right now I am still in the process of fully flushing this out, but I will include some or all of the following:
Big Ideas
This final project is the intersection of two recent conceptual preoccupations and a recent experience at a girl’s after school session at Quest to Learn. The first preoccupation centers directly on the mystification, or demystification, of technology. The second is the idea of a point of entry, specifically regarding technology.
Background
As for the third, I have recently been interning at Quest to Learn’s Short Circuit after school program. I usually go on Thursdays when the dominant population are 6th and 7th grade boys, along with one girl who I have been working with a variety of independent projects on. Over spring break, however, I had the chance to help plan and run the Girlz Jam (I have class at this time otherwise, much to my chagrin) in which a group of ten 7th grade girls come together for a 2 hour after school session centered around a weekly topic. I should mention that the goal of this program is specifically to encourage female after school participation by creating a shared creative space, especially since at this time in development, blurry elementary school gender lines begin to focus quite sharply.
While I have had experience running after school before, this session was quite unfocused and largely dictated by the girls with the organizers acting more like herders. First and foremost, I must say that after school is hard – students have just had a long day of school and really just want to listen to music and text their friends. Secondly, teaching soft circuits is extremely difficult: it requires a rewiring of your brain around both sewing and circuitry, not an easy feat especially for those who are novices to both. In spite of this, the potential was palatable enough for me to continue thinking about it for the past five days, and brought back previous work I had done in curriculum design and interaction design in spaces of learning. For me, the design problems that arise in these areas are fascinating. Combine that with the masochistic satisfaction of working with soft circuits and e-textiles, the intersection of these domains is endlessly stimulating.
The “WHY” and Audience
Based on countless studies and statistics, bodies of research, and simple observation or questioning, computation is a realm that most of the population feels estranged from, largely due to (as I will posit for a thesis) a psychological barrier resulting from lack of exposure or disinterest in the components that they traditionally associate with programming and physical computing.
It feels trite to state the following, but its significance cannot be underscored enough: students must have more exposure to and experience with working with various technologies. This is for a variety of reasons that we have all heard before – international competition, job preparation, etc – but for this project, I will assume these as established propositions and posit that engaging youth with this type of process is innovative in its inherent ability to unlock creative potential by challenging preconceptions of materials, processes, and the cultural milieu traditionally associated with them.
Further Concepts to Incorporate
I would like this project to have an open source focus. Open source movements are in full swing and are going to play a massive role in defining culture, economics, politics – life in general – in the coming years. Following from this, as technology has become more and more accessible, a significantly large portion of the public have undergone a transformation from consumer to producer. (I would like to note, however, that these roles are not binary and there is much grey space to be exploited in between.) By making youth more aware of the individual and collective benefits of open source and the communities surrounding it, they will be more likely to actively contribute, thereby both sharing knowledge and reinforcing their own.